 ---
We introduce "acceptance proofs", so that a peer can verify any block accepted by consensus. In the aforementioned use-case, if a P-Chain block is unknown by a peer, it can request the block and proof at the provided height from a peer. If a block's proof is valid, the block can be executed to advance the local P-Chain and verify the proposed subnet block. Peers can request blocks from any peer without requiring consensus locally or communication with a validator. This has the added benefit of reducing the number of required connections and p2p message load served by P-Chain validators.
---
Figure 2: A Validator is verifying a subnet’s block `Z` which references an unknown P-Chain block `C` in its block header
---
We introduce "acceptance proofs", so that a peer can verify any block accepted by consensus. In the aforementioned use-case, if a P-Chain block is unknown by a peer, it can request the block and proof at the provided height from a peer. If a block's proof is valid, the block can be executed to advance the local P-Chain and verify the proposed subnet block. Peers can request blocks from any peer without requiring consensus locally or communication with a validator. This has the added benefit of reducing the number of required connections and p2p message load served by P-Chain validators.
---
Figure 2: A Validator is verifying a subnet’s block `Z` which references an unknown P-Chain block `C` in its block header
 Figure 3: A Validator requests the blocks and proofs for `B` and `C` from a peer
 Figure 4: The Validator accepts the P-Chain blocks and is now able to verify `Z`
 ---
## Specification
Note: The following is pseudocode.
### P2P
#### Aggregation
```diff
+ message GetAcceptanceSignatureRequest {
+ bytes chain_id = 1;
+ uint32 request_id = 2;
+ bytes block_id = 3;
+ }
```
The `GetAcceptanceSignatureRequest` message is sent to a peer to request their signature for a given block id.
```diff
+ message GetAcceptanceSignatureResponse {
+ bytes chain_id = 1;
+ uint32 request_id = 2;
+ bytes bls_signature = 3;
+ }
```
`GetAcceptanceSignatureResponse` is sent to a peer as a response for `GetAcceptanceSignatureRequest`. `bls_signature` is the peer’s signature using their registered primary network BLS staking key over the requested `block_id`. An empty `bls_signature` field indicates that the block was not accepted yet.
## Security Considerations
Nodes that bootstrap using state sync may not have the entire history of the
P-Chain and therefore will not be able to provide the entire history for a block
that is referenced in a block that they propose. This would be needed to unblock a node that is attempting to fast-forward their P-Chain, as they require the entire ancestry between their current accepted tip and the block they are attempting to forward to. It is assumed that nodes will have some minimum amount of recent state so that the requester can eventually be unblocked by retrying, as only one node with the requested ancestry is required to unblock the requester.
An alternative is to make a churn assumption and validate the proposed block's proof with a stale validator set to avoid complexity, but this introduces more security concerns.
## Copyright
Copyright and related rights waived via [CC0](https://creativecommons.org/publicdomain/zero/1.0/).
# ACP-77: Reinventing Subnets (/docs/acps/77-reinventing-subnets)
---
title: "ACP-77: Reinventing Subnets"
description: "Details for Avalanche Community Proposal 77: Reinventing Subnets"
edit_url: https://github.com/avalanche-foundation/ACPs/edit/main/ACPs/77-reinventing-subnets/README.md
---
| ACP | 77 |
| :------------ | :---------------------------------------------------------------------------------------- |
| **Title** | Reinventing Subnets |
| **Author(s)** | Dhruba Basu ([@dhrubabasu](https://github.com/dhrubabasu)) |
| **Status** | Activated ([Discussion](https://github.com/avalanche-foundation/ACPs/discussions/78)) |
| **Track** | Standards |
| **Replaces** | [ACP-13](https://github.com/avalanche-foundation/ACPs/blob/main/ACPs/13-subnet-only-validators/README.md) |
## Abstract
Overhaul Subnet creation and management to unlock increased flexibility for Subnet creators by:
- Separating Subnet validators from Primary Network validators (Primary Network Partial Sync, Removal of 2000 $AVAX requirement)
- Moving ownership of Subnet validator set management from P-Chain to Subnets (ERC-20/ERC-721/Arbitrary Staking, Staking Reward Management)
- Introducing a continuous P-Chain fee mechanism for Subnet validators (Continuous Subnet Staking)
This ACP supersedes [ACP-13](https://github.com/avalanche-foundation/ACPs/blob/main/ACPs/13-subnet-only-validators/README.md) and borrows some of its language.
## Motivation
Each node operator must stake at least 2000 $AVAX ($70k at time of writing) to first become a Primary Network validator before they qualify to become a Subnet validator. Most Subnets aim to launch with at least 8 Subnet validators, which requires staking 16000 $AVAX ($560k at time of writing). All Subnet validators, to satisfy their role as Primary Network validators, must also [allocate 8 AWS vCPU, 16 GB RAM, and 1 TB storage](https://github.com/ava-labs/avalanchego/blob/master/README.md#installation) to sync the entire Primary Network (X-Chain, P-Chain, and C-Chain) and participate in its consensus, in addition to whatever resources are required for each Subnet they are validating.
Regulated entities that are prohibited from validating permissionless, smart contract-enabled blockchains (like the C-Chain) cannot launch a Subnet because they cannot opt-out of Primary Network Validation. This deployment blocker prevents a large cohort of Real World Asset (RWA) issuers from bringing unique, valuable tokens to the Avalanche Ecosystem (that could move between C-Chain <-> Subnets using Avalanche Warp Messaging/Teleporter).
A widely validated Subnet that is not properly metered could destabilize the Primary Network if usage spikes unexpectedly. Underprovisioned Primary Network validators running such a Subnet may exit with an OOM exception, see degraded disk performance, or find it difficult to allocate CPU time to P/X/C-Chain validation. The inverse also holds for Subnets with the Primary Network (where some undefined behavior could bring a Subnet offline).
Although the fee paid to the Primary Network to operate a Subnet does not go up with the amount of activity on the Subnet, the fixed, upfront cost of setting up a Subnet validator on the Primary Network deters new projects that prefer smaller, even variable, costs until demand is observed. _Unlike L2s that pay some increasing fee (usually denominated in units per transaction byte) to an external chain for data availability and security as activity scales, Subnets provide their own security/data availability and the only cost operators must pay from processing more activity is the hardware cost of supporting additional load._
Elastic Subnets, introduced in [Banff](https://medium.com/avalancheavax/banff-elastic-subnets-44042f41e34c), enabled Subnet creators to activate Proof-of-Stake validation and uptime-based rewards using their own token. However, this token is required to be an ANT (created on the X-Chain) and locked on the P-Chain. All staking rewards were distributed on the P-Chain with the reward curve being defined in the `TransformSubnetTx` and, once set, was unable to be modified.
With no Elastic Subnets live on Mainnet, it is clear that Permissionless Subnets as they stand today could be more desirable. There are many successful Permissioned Subnets in production but many Subnet creators have raised the above as points of concern. In summary, the Avalanche community could benefit from a more flexible and affordable mechanism to launch Permissionless Subnets.
### A Note on Nomenclature
Avalanche Subnets are subnetworks validated by a subset of the Primary Network validator set. The new network creation flow outlined in this ACP does not require any intersection between the new network's validator set and the Primary Network's validator set. Moreover, the new networks have greater functionality and sovereignty than Subnets. To distinguish between these two kinds of networks, the community has been referring to these new networks as _Avalanche Layer 1s_, or L1s for short.
All networks created through the old network creation flow will continue to be referred to as Avalanche Subnets.
## Specification
At a high-level, L1s can manage their validator sets externally to the P-Chain by setting the blockchain ID and address of their _validator manager_. The P-Chain will consume Warp messages that modify the L1's validator set. To confirm modification of the L1's validator set, the P-Chain will also produce Warp messages. L1 validators are not required to validate the Primary Network, and do not have the same 2000 $AVAX stake requirement that Subnet validators have. To maintain an active L1 validator, a continuous fee denominated in $AVAX is assessed. L1 validators are only required to sync the P-Chain (not X/C-Chain) in order to track validator set changes and support cross-L1 communication.
### P-Chain Warp Message Payloads
To enable management of an L1's validator set externally to the P-Chain, Warp message verification will be added to the [`PlatformVM`](https://github.com/ava-labs/avalanchego/tree/master/vms/platformvm). For a Warp message to be considered valid by the P-Chain, at least 67% of the `sourceChainID`'s weight must have participated in the aggregate BLS signature. This is equivalent to the threshold set for the C-Chain. A future ACP may be proposed to support modification of this threshold on a per-L1 basis.
The following Warp message payloads are introduced on the P-Chain:
- `SubnetToL1ConversionMessage`
- `RegisterL1ValidatorMessage`
- `L1ValidatorRegistrationMessage`
- `L1ValidatorWeightMessage`
The method of requesting signatures for these messages is left unspecified. A viable option for supporting this functionality is laid out in [ACP-118](https://github.com/avalanche-foundation/ACPs/blob/main/ACPs/118-warp-signature-request/README.md) with the `SignatureRequest` message.
All node IDs contained within the message specifications are represented as variable length arrays such that they can support new node IDs types should the P-Chain add support for them in the future.
The serialization of each of these messages is as follows.
#### `SubnetToL1ConversionMessage`
The P-Chain can produce a `SubnetToL1ConversionMessage` for consumers (i.e. validator managers) to be aware of the initial validator set.
The following serialization is defined as the `ValidatorData`:
| Field | Type | Size |
| -------------: | ---------: | -----------------------: |
| `nodeID` | `[]byte` | 4 + len(`nodeID`) bytes |
| `blsPublicKey` | `[48]byte` | 48 bytes |
| `weight` | `uint64` | 8 bytes |
| | | 60 + len(`nodeID`) bytes |
The following serialization is defined as the `ConversionData`:
| Field | Type | Size |
| ---------------: | ----------------: | ---------------------------------------------------------: |
| `codecID` | `uint16` | 2 bytes |
| `subnetID` | `[32]byte` | 32 bytes |
| `managerChainID` | `[32]byte` | 32 bytes |
| `managerAddress` | `[]byte` | 4 + len(`managerAddress`) bytes |
| `validators` | `[]ValidatorData` | 4 + sum(`validatorLengths`) bytes |
| | | 74 + len(`managerAddress`) + sum(`validatorLengths`) bytes |
- `codecID` is the codec version used to serialize the payload, and is hardcoded to `0x0000`
- `sum(validatorLengths)` is the sum of the lengths of `ValidatorData` serializations included in `validators`.
- `subnetID` identifies the Subnet that is being converted to an L1 (described further below).
- `managerChainID` and `managerAddress` identify the validator manager for the newly created L1. This is the (blockchain ID, address) tuple allowed to send Warp messages to modify the L1's validator set.
- `validators` are the initial continuous-fee-paying validators for the given L1.
The `SubnetToL1ConversionMessage` is specified as an `AddressedCall` with `sourceChainID` set to the P-Chain ID, the `sourceAddress` set to an empty byte array, and a payload of:
| Field | Type | Size |
| -------------: | ---------: | -------: |
| `codecID` | `uint16` | 2 bytes |
| `typeID` | `uint32` | 4 bytes |
| `conversionID` | `[32]byte` | 32 bytes |
| | | 38 bytes |
- `codecID` is the codec version used to serialize the payload, and is hardcoded to `0x0000`
- `typeID` is the payload type identifier and is `0x00000000` for this message
- `conversionID` is the SHA256 hash of the `ConversionData` from a given `ConvertSubnetToL1Tx`
#### `RegisterL1ValidatorMessage`
The P-Chain can consume a `RegisterL1ValidatorMessage` from validator managers through a `RegisterL1ValidatorTx` to register an addition to the L1's validator set.
The following is the serialization of a `PChainOwner`:
| Field | Type | Size |
| ----------: | -----------: | -------------------------------: |
| `threshold` | `uint32` | 4 bytes |
| `addresses` | `[][20]byte` | 4 + len(`addresses`) \\* 20 bytes |
| | | 8 + len(`addresses`) \\* 20 bytes |
- `threshold` is the number of `addresses` that must provide a signature for the `PChainOwner` to authorize an action.
- Validation criteria:
- If `threshold` is `0`, `addresses` must be empty
- `threshold` <= len(`addresses`)
- Entries of `addresses` must be unique and sorted in ascending order
The `RegisterL1ValidatorMessage` is specified as an `AddressedCall` with a payload of:
| Field | Type | Size |
| ----------------------: | ------------: | ------------------------------------------------------------------------: |
| `codecID` | `uint16` | 2 bytes |
| `typeID` | `uint32` | 4 bytes |
| `subnetID` | `[32]byte` | 32 bytes |
| `nodeID` | `[]byte` | 4 + len(`nodeID`) bytes |
| `blsPublicKey` | `[48]byte` | 48 bytes |
| `expiry` | `uint64` | 8 bytes |
| `remainingBalanceOwner` | `PChainOwner` | 8 + len(`addresses`) \\* 20 bytes |
| `disableOwner` | `PChainOwner` | 8 + len(`addresses`) \\* 20 bytes |
| `weight` | `uint64` | 8 bytes |
| | | 122 + len(`nodeID`) + (len(`addresses1`) + len(`addresses2`)) \\* 20 bytes |
- `codecID` is the codec version used to serialize the payload, and is hardcoded to `0x0000`
- `typeID` is the payload type identifier and is `0x00000001` for this payload
- `subnetID`, `nodeID`, `weight`, and `blsPublicKey` are for the validator being added
- `expiry` is the time at which this message becomes invalid. As of a P-Chain timestamp `>= expiry`, this Avalanche Warp Message can no longer be used to add the `nodeID` to the validator set of `subnetID`
- `remainingBalanceOwner` is the P-Chain owner where leftover $AVAX from the validator's Balance will be issued to when this validator it is removed from the validator set.
- `disableOwner` is the only P-Chain owner allowed to disable the validator using `DisableL1ValidatorTx`, specified below.
#### `L1ValidatorRegistrationMessage`
The P-Chain can produce an `L1ValidatorRegistrationMessage` for consumers to verify that a validation period has either begun or has been invalidated.
The `L1ValidatorRegistrationMessage` is specified as an `AddressedCall` with `sourceChainID` set to the P-Chain ID, the `sourceAddress` set to an empty byte array, and a payload of:
| Field | Type | Size |
| -------------: | ---------: | -------: |
| `codecID` | `uint16` | 2 bytes |
| `typeID` | `uint32` | 4 bytes |
| `validationID` | `[32]byte` | 32 bytes |
| `registered` | `bool` | 1 byte |
| | | 39 bytes |
- `codecID` is the codec version used to serialize the payload, and is hardcoded to `0x0000`
- `typeID` is the payload type identifier and is `0x00000002` for this message
- `validationID` identifies the validator for the message
- `registered` is a boolean representing the status of the `validationID`. If true, the `validationID` corresponds to a validator in the current validator set. If false, the `validationID` does not correspond to a validator in the current validator set, and never will in the future.
#### `L1ValidatorWeightMessage`
The P-Chain can consume an `L1ValidatorWeightMessage` through a `SetL1ValidatorWeightTx` to update the weight of an existing validator. The P-Chain can also produce an `L1ValidatorWeightMessage` for consumers to verify that the validator weight update has been effectuated.
The `L1ValidatorWeightMessage` is specified as an `AddressedCall` with the following payload. When sent from the P-Chain, the `sourceChainID` is set to the P-Chain ID, and the `sourceAddress` is set to an empty byte array.
| Field | Type | Size |
| -------------: | ---------: | -------: |
| `codecID` | `uint16` | 2 bytes |
| `typeID` | `uint32` | 4 bytes |
| `validationID` | `[32]byte` | 32 bytes |
| `nonce` | `uint64` | 8 bytes |
| `weight` | `uint64` | 8 bytes |
| | | 54 bytes |
- `codecID` is the codec version used to serialize the payload, and is hardcoded to `0x0000`
- `typeID` is the payload type identifier and is `0x00000003` for this message
- `validationID` identifies the validator for the message
- `nonce` is a strictly increasing number that denotes the latest validator weight update and provides replay protection for this transaction
- `weight` is the new `weight` of the validator
### New P-Chain Transaction Types
Both before and after this ACP, to create a Subnet, a `CreateSubnetTx` must be issued on the P-Chain. This transaction includes an `Owner` field which defines the key that today can be used to authorize any validator set additions (`AddSubnetValidatorTx`) or removals (`RemoveSubnetValidatorTx`).
To be considered a permissionless network, or Avalanche Layer 1:
- This `Owner` key must no longer have the ability to modify the validator set.
- New transaction types must support modification of the validator set via Warp messages.
The following new transaction types are introduced on the P-Chain to support this functionality:
- `ConvertSubnetToL1Tx`
- `RegisterL1ValidatorTx`
- `SetL1ValidatorWeightTx`
- `DisableL1ValidatorTx`
- `IncreaseL1ValidatorBalanceTx`
#### `ConvertSubnetToL1Tx`
To convert a Subnet into an L1, a `ConvertSubnetToL1Tx` must be issued to set the `(chainID, address)` pair that will manage the L1's validator set. The `Owner` key defined in `CreateSubnetTx` must provide a signature to authorize this conversion.
The `ConvertSubnetToL1Tx` specification is:
```go
type PChainOwner struct {
// The threshold number of `Addresses` that must provide a signature in order for
// the `PChainOwner` to be considered valid.
Threshold uint32 `json:"threshold"`
// The 20-byte addresses that are allowed to sign to authenticate a `PChainOwner`.
// Note: It is required for:
// - len(Addresses) == 0 if `Threshold` is 0.
// - len(Addresses) >= `Threshold`
// - The values in Addresses to be sorted in ascending order.
Addresses []ids.ShortID `json:"addresses"`
}
type L1Validator struct {
// NodeID of this validator
NodeID []byte `json:"nodeID"`
// Weight of this validator used when sampling
Weight uint64 `json:"weight"`
// Initial balance for this validator
Balance uint64 `json:"balance"`
// [Signer] is the BLS public key and proof-of-possession for this validator.
// Note: We do not enforce that the BLS key is unique across all validators.
// This means that validators can share a key if they so choose.
// However, a NodeID + L1 does uniquely map to a BLS key
Signer signer.ProofOfPossession `json:"signer"`
// Leftover $AVAX from the [Balance] will be issued to this
// owner once it is removed from the validator set.
RemainingBalanceOwner PChainOwner `json:"remainingBalanceOwner"`
// The only owner allowed to disable this validator on the P-Chain.
DisableOwner PChainOwner `json:"disableOwner"`
}
type ConvertSubnetToL1Tx struct {
// Metadata, inputs and outputs
BaseTx
// ID of the Subnet to transform
// Restrictions:
// - Must not be the Primary Network ID
Subnet ids.ID `json:"subnetID"`
// BlockchainID where the validator manager lives
ChainID ids.ID `json:"chainID"`
// Address of the validator manager
Address []byte `json:"address"`
// Initial continuous-fee-paying validators for the L1
Validators []L1Validator `json:"validators"`
// Authorizes this conversion
SubnetAuth verify.Verifiable `json:"subnetAuthorization"`
}
```
After this transaction is accepted, `CreateChainTx` and `AddSubnetValidatorTx` are disabled on the Subnet. The only action that the `Owner` key is able to take is removing Subnet validators with `RemoveSubnetValidatorTx` that had been added using `AddSubnetValidatorTx`. Unless removed by the `Owner` key, any Subnet validators added previously with an `AddSubnetValidatorTx` will continue to validate the Subnet until their [`End`](https://github.com/ava-labs/avalanchego/blob/a1721541754f8ee23502b456af86fea8c766352a/vms/platformvm/txs/validator.go#L27) time is reached. Once all Subnet validators added with `AddSubnetValidatorTx` are no longer in the validator set, the `Owner` key is powerless. `RegisterL1ValidatorTx` and `SetL1ValidatorWeightTx` must be used to manage the L1's validator set.
The `validationID` for validators added through `ConvertSubnetToL1Tx` is defined as the SHA256 hash of the 36 bytes resulting from concatenating the 32 byte `subnetID` with the 4 byte `validatorIndex` (index in the `Validators` array within the transaction).
Once this transaction is accepted, the P-Chain must be willing sign a `SubnetToL1ConversionMessage` with a `conversionID` corresponding to `ConversionData` populated with the values from this transaction.
#### `RegisterL1ValidatorTx`
After a `ConvertSubnetToL1Tx` has been accepted, new validators can only be added by using a `RegisterL1ValidatorTx`. The specification of this transaction is:
```go
type RegisterL1ValidatorTx struct {
// Metadata, inputs and outputs
BaseTx
// Balance <= sum($AVAX inputs) - sum($AVAX outputs) - TxFee.
Balance uint64 `json:"balance"`
// [Signer] is a BLS signature proving ownership of the BLS public key specified
// below in `Message` for this validator.
// Note: We do not enforce that the BLS key is unique across all validators.
// This means that validators can share a key if they so choose.
// However, a NodeID + L1 does uniquely map to a BLS key
Signer [96]byte `json:"signer"`
// A RegisterL1ValidatorMessage payload
Message warp.Message `json:"message"`
}
```
The `validationID` of validators added via `RegisterL1ValidatorTx` is defined as the SHA256 hash of the `Payload` of the `AddressedCall` in `Message`.
When a `RegisterL1ValidatorTx` is accepted on the P-Chain, the validator is added to the L1's validator set. A `minNonce` field corresponding to the `validationID` will be stored on addition to the validator set (initially set to `0`). This field will be used when validating the `SetL1ValidatorWeightTx` defined below.
This `validationID` will be used for replay protection. Used `validationID`s will be stored on the P-Chain. If a `RegisterL1ValidatorTx`'s `validationID` has already been used, the transaction will be considered invalid. To prevent storing an unbounded number of `validationID`s, the `expiry` of the `RegisterL1ValidatorMessage` is required to be no more than 24 hours in the future of the time the transaction is issued on the P-Chain. Any `validationIDs` corresponding to an expired timestamp can be flushed from the P-Chain's state.
L1s are responsible for defining the procedure on how to retrieve the above information from prospective validators.
An EVM-compatible L1 may choose to implement this step like so:
- Use the number of tokens the user has staked into a smart contract on the L1 to determine the weight of their validator
- Require the user to submit an on-chain transaction with their validator information
- Generate the Warp message
For a `RegisterL1ValidatorTx` to be valid, `Signer` must be a valid proof-of-possession of the `blsPublicKey` defined in the `RegisterL1ValidatorMessage` contained in the transaction.
After a `RegisterL1ValidatorTx` is accepted, the P-Chain must be willing to sign an `L1ValidatorRegistrationMessage` for the given `validationID` with `registered` set to `true`. This remains the case until the time at which the validator is removed from the validator set using a `SetL1ValidatorWeightTx`, as described below.
When it is known that a given `validationID` _is not and never will be_ registered, the P-Chain must be willing to sign an `L1ValidatorRegistrationMessage` for the `validationID` with `registered` set to `false`. This could be the case if the `expiry` time of the message has passed prior to the message being delivered in a `RegisterL1ValidatorTx`, or if the validator was successfully registered and then later removed. This enables the P-Chain to prove to validator managers that a validator has been removed or never added. The P-Chain must refuse to sign any `L1ValidatorRegistrationMessage` where the `validationID` does not correspond to an active validator and the `expiry` is in the future.
#### `SetL1ValidatorWeightTx`
`SetL1ValidatorWeightTx` is used to modify the voting weight of a validator. The specification of this transaction is:
```go
type SetL1ValidatorWeightTx struct {
// Metadata, inputs and outputs
BaseTx
// An L1ValidatorWeightMessage payload
Message warp.Message `json:"message"`
}
```
Applications of this transaction could include:
- Increase the voting weight of a validator if a delegation is made on the L1
- Increase the voting weight of a validator if the stake amount is increased (by staking rewards for example)
- Decrease the voting weight of a misbehaving validator
- Remove an inactive validator
The validation criteria for `L1ValidatorWeightMessage` is:
- `nonce >= minNonce`. Note that `nonce` is not required to be incremented by `1` with each successive validator weight update.
- When `minNonce == MaxUint64`, `nonce` must be `MaxUint64` and `weight` must be `0`. This prevents L1s from being unable to remove `nodeID` in a subsequent transaction.
- If `weight == 0`, the validator being removed must not be the last one in the set. If all validators are removed, there are no valid Warp messages that can be produced to register new validators through `RegisterL1ValidatorMessage`. With no validators, block production will halt and the L1 is unrecoverable. This validation criteria serves as a guardrail against this situation. A future ACP can remove this guardrail as users get more familiar with the new L1 mechanics and tooling matures to fork an L1.
When `weight != 0`, the weight of the validator is updated to `weight` and `minNonce` is updated to `nonce + 1`.
When `weight == 0`, the validator is removed from the validator set. All state related to the validator, including the `minNonce` and `validationID`, are reaped from the P-Chain state. Tracking these post-removal is not required since `validationID` can never be re-initialized due to the replay protection provided by `expiry` in `RegisterL1ValidatorTx`. Any unspent $AVAX in the validator's `Balance` will be issued in a single UTXO to the `RemainingBalanceOwner` for this validator. Recall that `RemainingBalanceOwner` is specified when the validator is first added to the L1's validator set (in either `ConvertSubnetToL1Tx` or `RegisterL1ValidatorTx`).
Note: There is no explicit `EndTime` for L1 validators added in a `ConvertSubnetToL1Tx` or `RegisterL1ValidatorTx`. The only time when L1 validators are removed from the L1's validator set is through this transaction when `weight == 0`.
#### `DisableL1ValidatorTx`
L1 validators can use `DisableL1ValidatorTx` to mark their validator as inactive. The specification of this transaction is:
```go
type DisableL1ValidatorTx struct {
// Metadata, inputs and outputs
BaseTx
// ID corresponding to the validator
ValidationID ids.ID `json:"validationID"`
// Authorizes this validator to be disabled
DisableAuth verify.Verifiable `json:"disableAuthorization"`
}
```
The `DisableOwner` specified for this validator must sign the transaction. Any unspent $AVAX in the validator's `Balance` will be issued in a single UTXO to the `RemainingBalanceOwner` for this validator. Recall that both `DisableOwner` and `RemainingBalanceOwner` are specified when the validator is first added to the L1's validator set (in either `ConvertSubnetToL1Tx` or `RegisterL1ValidatorTx`).
For full removal from an L1's validator set, a `SetL1ValidatorWeightTx` must be issued with weight `0`. To do so, a Warp message is required from the L1's validator manager. However, to support the ability to claim the unspent `Balance` for a validator without authorization is critical for failed L1s.
Note that this does not modify an L1's total staking weight. This transaction marks the validator as inactive, but does not remove it from the L1's validator set. Inactive validators can re-activate at any time by increasing their balance with an `IncreaseL1ValidatorBalanceTx`.
L1 creators should be aware that there is no notion of `MinStakeDuration` that is enforced by the P-Chain. It is expected that L1s who choose to enforce a `MinStakeDuration` will lock the validator's Stake for the L1's desired `MinStakeDuration`.
#### `IncreaseL1ValidatorBalanceTx`
L1 validators are required to maintain a non-zero balance used to pay the continuous fee on the P-Chain in order to be considered active. The `IncreaseL1ValidatorBalanceTx` can be used by anybody to add additional $AVAX to the `Balance` to a validator. The specification of this transaction is:
```go
type IncreaseL1ValidatorBalanceTx struct {
// Metadata, inputs and outputs
BaseTx
// ID corresponding to the validator
ValidationID ids.ID `json:"validationID"`
// Balance <= sum($AVAX inputs) - sum($AVAX outputs) - TxFee
Balance uint64 `json:"balance"`
}
```
If the validator corresponding to `ValidationID` is currently inactive (`Balance` was exhausted or `DisableL1ValidatorTx` was issued), this transaction will move them back to the active validator set.
Note: The $AVAX added to `Balance` can be claimed at any time by the validator using `DisableL1ValidatorTx`.
### Bootstrapping L1 Nodes
Bootstrapping a node/validator is the process of securely recreating the latest state of the blockchain locally. At the end of this process, the local state of a node/validator must be in sync with the local state of other virtuous nodes/validators. The node/validator can then verify new incoming transactions and reach consensus with other nodes/validators.
To bootstrap a node/validator, a few critical questions must be answered: How does one discover peers in the network? How does one determine that a discovered peer is honestly participating in the network?
For standalone networks like the Avalanche Primary Network, this is done by connecting to a hardcoded [set](https://github.com/ava-labs/avalanchego/blob/master/genesis/bootstrappers.json) of trusted bootstrappers to then discover new peers. Ethereum calls their set [bootnodes](https://ethereum.org/developers/docs/nodes-and-clients/bootnodes).
Since L1 validators are not required to be Primary Network validators, a list of validator IPs to connect to (the functional bootstrappers of the L1) cannot be provided by simply connecting to the Primary Network validators. However, the Primary Network can enable nodes tracking an L1 to seamlessly connect to the validators by tracking and gossiping L1 validator IPs. L1s will not need to operate and maintain a set of bootstrappers and can rely on the Primary Network for peer discovery.
### Sidebar: L1 Sovereignty
After this ACP is activated, the P-Chain will no longer support staking of any assets other than $AVAX for the Primary Network. The P-Chain will not support the distribution of staking rewards for L1s. All staking-related operations for L1 validation must be managed by the L1's validator manager. The P-Chain simply requires a continuous fee per validator. If an L1 would like to manage their validator's balances on the P-Chain, it can cover the cost for all L1 validators by posting the $AVAX balance on the P-Chain. L1s can implement any mechanism they want to pay the continuous fee charged by the P-Chain for its participants.
The L1 has full ownership over its validator set, not the P-Chain. There are no restrictions on what requirements an L1 can have for validators to join. Any stake that is required to join the L1's validator set is not locked on the P-Chain. If a validator is removed from the L1's validator set via a `SetL1ValidatorWeightTx` with weight `0`, the stake will continue to be locked outside of the P-Chain. How each L1 handles stake associated with the validator is entirely left up to the L1 and can be treated independently to what happens on the P-Chain.
The relationship between the P-Chain and L1s provides a dynamic where L1s can use the P-Chain as an impartial judge to modify parameters (in addition to its existing role of helping to validate incoming Avalanche Warp Messages). If a validator is misbehaving, the L1 validators can collectively generate a BLS multisig to reduce the voting weight of a misbehaving validator. This operation is fully secured by the Avalanche Primary Network (225M $AVAX or $8.325B at the time of writing).
Follow-up ACPs could extend the P-Chain <-> L1 relationship to include parametrization of the 67% threshold to enable L1s to choose a different threshold based on their security model (e.g. a simple majority of 51%).
### Continuous Fee Mechanism
Every additional validator on the P-Chain adds persistent load to the Avalanche Network. When a validator transaction is issued on the P-Chain, it is charged for the computational cost of the transaction itself but is not charged for the cost of an active validator over the time they are validating on the network (which may be indefinitely). This is a common problem in blockchains, spawning many state rent proposals in the broader blockchain space to address it. The following fee mechanism takes advantage of the fact that each L1 validator uses the same amount of computation and charges each L1 validator the dynamic base fee for every discrete unit of time it is active.
To charge each L1 validator, the notion of a `Balance` is introduced. The `Balance` of a validator will be continuously charged during the time they are active to cover the cost of storing the associated validator properties (BLS key, weight, nonce) in memory and to track IPs (in addition to other services provided by the Primary Network). This `Balance` is initialized with the `RegisterL1ValidatorTx` that added them to the active validator set. `Balance` can be increased at any time using the `IncreaseL1ValidatorBalanceTx`. When this `Balance` reaches `0`, the validator will be considered "inactive" and will no longer participate in validating the L1. Inactive validators can be moved back to the active validator set at any time using the same `IncreaseL1ValidatorBalanceTx`. Once a validator is considered inactive, the P-Chain will remove these properties from memory and only retain them on disk. All messages from that validator will be considered invalid until it is revived using the `IncreaseL1ValidatorBalanceTx`. L1s can reduce the amount of inactive weight by removing inactive validators with the `SetL1ValidatorWeightTx` (`Weight` = 0).
Since each L1 validator is charged the same amount at each point in time, tracking the fees for the entire validator set is straight-forward. The accumulated dynamic base fee for the entire network is tracked in a single uint. This accumulated value should be equal to the fee charged if a validator was active from the time the accumulator was instantiated. The validator set is maintained in a priority queue. A pseudocode implementation of the continuous fee mechanism is provided below.
```python
# Pseudocode
class ValidatorQueue:
def __init__(self, fee_getter):
self.acc = 0
self.queue = PriorityQueue()
self.fee_getter = fee_getter
# At each time period, increment the accumulator and
# pop all validators from the top of the queue that
# ran out of funds.
# Note: The amount of work done in a single block
# should be bounded to prevent a large number of
# validator operations from happening at the same
# time.
def time_elapse(self, t):
self.acc = self.acc + self.fee_getter(t)
while True:
vdr = self.queue.peek()
if vdr.balance < self.acc:
self.queue.pop()
continue
return
# Validator was added
def validator_enter(self, vdr):
vdr.balance = vdr.balance + self.acc
self.queue.add(vdr)
# Validator was removed
def validator_remove(self, vdrNodeID):
vdr = find_and_remove(self.queue, vdrNodeID)
vdr.balance = vdr.balance - self.acc
vdr.refund() # Refund [vdr.balance] to [RemainingBalanceOwner]
self.queue.remove()
# Validator's balance was topped up
def validator_increase(self, vdrNodeID, balance):
vdr = find_and_remove(self.queue, vdrNodeID)
vdr.balance = vdr.balance + balance
self.queue.add(vdr)
```
#### Fee Algorithm
[ACP-103](https://github.com/avalanche-foundation/ACPs/blob/main/ACPs/103-dynamic-fees/README.md) proposes a dynamic fee mechanism for transactions on the P-Chain. This mechanism is repurposed with minor modifications for the active L1 validator continuous fee.
At activation, the number of excess active L1 validators $x$ is set to `0`.
The fee rate per second for an active L1 validator is:
$$M \cdot \exp\left(\frac{x}{K}\right)$$
Where:
- $M$ is the minimum price for an active L1 validator
- $\exp\left(x\right)$ is an approximation of $e^x$ following the EIP-4844 specification
```python
# Approximates factor * e ** (numerator / denominator) using Taylor expansion
def fake_exponential(factor: int, numerator: int, denominator: int) -> int:
i = 1
output = 0
numerator_accum = factor * denominator
while numerator_accum > 0:
output += numerator_accum
numerator_accum = (numerator_accum * numerator) // (denominator * i)
i += 1
return output // denominator
```
- $K$ is a constant to control the rate of change for the L1 validator price
After every second, $x$ will be updated:
$$x = \max(x + (V - T), 0)$$
Where:
- $V$ is the number of active L1 validators
- $T$ is the target number of active L1 validators
Whenever $x$ increases by $K$, the price per active L1 validator increases by a factor of `~2.7`. If the price per active L1 validator gets too expensive, some active L1 validators will exit the active validator set, decreasing $x$, dropping the price. The price per active L1 validator constantly adjusts to make sure that, on average, the P-Chain has no more than $T$ active L1 validators.
#### Block Processing
Before processing the transactions inside a block, all validators that no longer have a sufficient (non-zero) balance are deactivated.
After processing the transactions inside a block, all validators that do not have a sufficient balance for the next second are deactivated.
##### Block Timestamp Validity Change
To ensure that validators are charged accurately, blocks are only considered valid if advancing the chain times would not cause a validator to have a negative balance.
This upholds the expectation that the number of L1 validators remains constant between blocks.
The block building protocol is modified to account for this change by first checking if the wall clock time removes any validator due to a lack of funds. If the wall clock time does not remove any L1 validators, the wall clock time is used to build the block. If it does, the time at which the first validator gets removed is used.
##### Fee Calculation
The total validator fee assessed in $\Delta t$ is:
```python
# Calculate the fee to charge over Δt
def cost_over_time(V:int, T:int, x:int, Δt: int) -> int:
cost = 0
for _ in range(Δt):
x = max(x + V - T, 0)
cost += fake_exponential(M, x, K)
return cost
```
#### Parameters
The parameters at activation are:
| Parameter | Definition | Value |
| --------- | ------------------------------------------- | ------------- |
| $T$ | target number of validators | 10_000 |
| $C$ | capacity number of validators | 20_000 |
| $M$ | minimum fee rate | 512 nAVAX/s |
| $K$ | constant to control the rate of fee changes | 1_246_488_515 |
An $M$ of 512 nAVAX/s equates to ~1.33 AVAX/month to run an L1 validator, so long as the total number of continuous-fee-paying L1 validators stays at or below $T$.
$K$ was chosen to set the maximum fee doubling rate to ~24 hours. This is in the extreme case that the network has $C$ validators for prolonged periods of time; if the network has $T$+1 validators for example, the fee rate would double every ~27 years.
A future ACP can adjust the parameters to increase $T$, reduce $M$, and/or modify $K$.
#### User Experience
L1 validators are continuously charged a fee, albeit a small one. This poses a challenge for L1 validators: How do they maintain the balance over time?
Node clients should expose an API to track how much balance is remaining in the validator's account. This will provide a way for L1 validators to track how quickly it is going down and top-up when needed. A nice byproduct of the above design is the balance in the validator's account is claimable. This means users can top-up as much $AVAX as they want and rest-assured knowing they can always retrieve it if there is an excessive amount.
The expectation is that most users will not interact with node clients or track when or how much they need to top-up their validator account. Wallet providers will abstract away most of this process. For users who desire more convenience, L1-as-a-Service providers will abstract away all of this process.
## Backwards Compatibility
This new design for Subnets proposes a large rework to all L1-related mechanics. Rollout should be done on a going-forward basis to not cause any service disruption for live Subnets. All current Subnet validators will be able to continue validating both the Primary Network and whatever Subnets they are validating.
Any state execution changes must be coordinated through a mandatory upgrade. Implementors must take care to continue to verify the existing ruleset until the upgrade is activated. After activation, nodes should verify the new ruleset. Implementors must take care to only verify the presence of 2000 $AVAX prior to activation.
### Deactivated Transactions
- P-Chain
- `TransformSubnetTx`
After this ACP is activated, Elastic Subnets will be disabled. `TransformSubnetTx` will not be accepted post-activation. As there are no Mainnet Elastic Subnets, there should be no production impact with this deactivation.
### New Transactions
- P-Chain
- `ConvertSubnetToL1Tx`
- `RegisterL1ValidatorTx`
- `SetL1ValidatorWeightTx`
- `DisableL1ValidatorTx`
- `IncreaseL1ValidatorBalanceTx`
## Reference Implementation
ACP-77 was implemented and will be merged into AvalancheGo behind the `Etna` upgrade flag. The full body of work can be found tagged with the `acp77` label [here](https://github.com/ava-labs/avalanchego/issues?q=sort%3Aupdated-desc+label%3Aacp77).
Since Etna is not yet activated, all new transactions introduced in ACP-77 will be rejected by AvalancheGo. If any modifications are made to ACP-77 as part of the ACP process, the implementation must be updated prior to activation.
## Security Considerations
This ACP introduces Avalanche Layer 1s, a new network type that costs significantly less than Avalanche Subnets. This can lead to a large increase in the number of networks and, by extension, the number of validators. Each additional validator adds consistent RAM usage to the P-Chain. However, this should be appropriately metered by the continuous fee mechanism outlined above.
With the sovereignty L1s have from the P-Chain, L1 staking tokens are not locked on the P-Chain. This poses a security consideration for L1 validators: Malicious chains can choose to remove validators at will and take any funds that the validator has locked on the L1. The P-Chain only provides the guarantee that L1 validators can retrieve the remaining $AVAX Balance for their validator via a `DisableL1ValidatorTx`. Any assets on the L1 is entirely under the purview of the L1. The onus is on L1 validators to vet the L1's security for any assets transferred onto the L1.
With a long window of expiry (24 hours) for the Warp message in `RegisterL1ValidatorTx`, spam of validator registration could lead to high memory pressure on the P-Chain. A future ACP can reduce the window of expiry if 24 hours proves to be a problem.
NodeIDs can be added to an L1's validator set involuntarily. However, it is important to note that any stake/rewards are _not_ at risk. For a node operator who was added to a validator set involuntarily, they would only need to generate a new NodeID via key rotation as there is no lock-up of any stake to create a NodeID. This is an explicit tradeoff for easier on-boarding of NodeIDs. This mirrors the Primary Network validators guarantee of no stake/rewards at risk.
The continuous fee mechanism outlined above does not apply to inactive L1 validators since they are not stored in memory. However, inactive L1 validators are persisted on disk which can lead to persistent P-Chain state growth. A future ACP can introduce a mechanism to decrease the rate of P-Chain state growth or provide a state expiry path to reduce the amount of P-Chain state.
## Acknowledgements
Special thanks to [@StephenButtolph](https://github.com/StephenButtolph), [@aaronbuchwald](https://github.com/aaronbuchwald), and [@patrick-ogrady](https://github.com/patrick-ogrady) for their feedback on these ideas. Thank you to the broader Ava Labs Platform Engineering Group for their feedback on this ACP prior to publication.
## Copyright
Copyright and related rights waived via [CC0](https://creativecommons.org/publicdomain/zero/1.0/).
# ACP-83: Dynamic Multidimensional Fees (/docs/acps/83-dynamic-multidimensional-fees)
---
title: "ACP-83: Dynamic Multidimensional Fees"
description: "Details for Avalanche Community Proposal 83: Dynamic Multidimensional Fees"
edit_url: https://github.com/avalanche-foundation/ACPs/edit/main/ACPs/83-dynamic-multidimensional-fees/README.md
---
| ACP | 83 |
| :--- | :--- |
| **Title** | Dynamic multidimensional fees for P-chain and X-chain |
| **Author(s)** | Alberto Benegiamo ([@abi87](https://github.com/abi87)) |
| **Status** | Stale |
| **Track** | Standards |
| **Superseded-By** | [ACP-103](https://github.com/avalanche-foundation/ACPs/blob/main/ACPs/103-dynamic-fees/README.md) |
## Abstract
Introduce a dynamic and multidimensional fees scheme for the P-chain and X-chain.
Dynamic fees helps to preserve the stability of the chain as it provides a feedback mechanism that increases the cost of resources when the network operates above its target utilization.
Multidimensional fees ensures that high demand for orthogonal resources does not drive up the price of underutilized resources. For example, networks provide and consume orthogonal resources including, but not limited to, bandwidth, chain state, read/write throughput, and CPU. By independently metering each resource, they can be granularly priced and stay closer to optimal resource utilization.
## Motivation
The P-Chain and X-Chain currently have fixed fees and in some cases those fees are fixed to zero.
This makes transaction issuance predictable, but does not provide feedback mechanism to preserve chain stability under high load. In contrast, the C-Chain, which has the highest and most regular load among the chains on the Primary Network, already supports dynamic fees. This ACP proposes to introduce a similar dynamic fee mechanism for the P-Chain and X-Chain to further improve the Primary Network's stability and resilience under load.
However, unlike the C-Chain, we propose a multidimensional fee scheme with an exponential update rule for each fee dimension. The [HyperSDK](https://github.com/ava-labs/hypersdk) already utilizes a multidimensional fee scheme with optional priority fees and its efficiency is backed by [academic research](https://arxiv.org/abs/2208.07919).
Finally, we split the fee into two parts: a `base fee` and a `priority fee`. The `base fee` is calculated by the network each block to accurately price each resource at a given point in time. Whatever amount greater than the base fee is burnt is treated as the `priority fee` to prioritize faster transaction inclusion.
## Specification
We introduce the multidimensional scheme first and then how to apply the dynamic fee update rule for each fee dimension. Finally we list the new block verification rules, valid once the new fee scheme activates.
### Multidimensional scheme components
We define four fee dimensions, `Bandwidth`, `Reads`, `Writes`, `Compute`, to describe transactions complexity. In more details:
- `Bandwidth` measures the transaction size in bytes, as encoded by the AvalancheGo codec. Byte length is a proxy for the network resources needed to disseminate the transaction.
- `Reads` measures the number of DB reads needed to verify the transactions. DB reads include UTXOs reads and any other state quantity relevant for the specific transaction.
- `Writes` measures the number of DB writes following the transaction verification. DB writes include UTXOs generated as outputs of the transactions and any other state quantity relevant for the specific transaction.
- `Compute` measures the number of signatures to be verified, including UTXOs ones and those related to authorization of specific operations.
For each fee dimension $i$, we define:
- *fee rate* $r_i$ as the price, denominated in AVAX, to be paid for a transaction with complexity $u_i$ along the fee dimension $i$.
- *base fee* as the minimal fee needed to accept a transaction. Base fee is given be the formula
$$base \ fee = \sum_{i=0}^3 r_i \times u_i$$
- *priority fee* as an optional fee paid on top of the base fee to speed up the transaction inclusion in a block.
### Dynamic scheme components
Fee rates are updated in time, to allow a fee increase when network is getting congested. Each new block is a potential source of congestion, as its transactions carry complexity that each validator must process to verify and eventually accept the block. The more complexity carries a block, and the more rapidly blocks are produced, the higher the congestion.
We seek a scheme that rapidly increases the fees when blocks complexity goes above a defined threshold and that equally rapidly decreases the fees once complexity goes down (because blocks carry less/simpler transactions, or because they are produced more slowly). We define the desired threshold as a *target complexity rate* $T$: we would want to process every second a block whose complexity is $T$. Any complexity more than that causes some congestion that we want to penalize via fees.
In order to update fees rates we track, per each block and each fee dimension, a parameter called cumulative excess complexity. Fee rates applied to a block will be defined in terms of cumulative excess complexity as we show in the following.
Suppose that a block $B_t$ is the current chain tip. $B_t$ has the following features:
- $t$ is its timestamp.
- $\Delta C_t$ is the cumulative excess complexity along fee dimension $i$.
Say a new block $B_{t + \Delta T}$ is built on top of $B$, with the following features:
- $t + \Delta T$ is its timestamp
- $C_{t + \Delta T}$ is its complexity along fee dimension $i$.
Then the fee rate $r_{t + \Delta T}$ applied for the block $B_{t + \Delta T}$ along dimension $i$ will be:
$$ r_{t + \Delta T} = r^{min} \times e^{\frac{max(0, \Delta C_t - T \times \Delta T)}{Denom}} $$
where
- $r^{min}$ is the minimal fee rate along fee dimension $i$
- $T$ is the target complexity rate along fee dimension $i$
- $Denom$ is a normalization constant for the fee dimension $i$
Moreover, once the block $B_{t + \Delta T}$ is accepted, the cumulative excess complexity is updated as follows:
$$\Delta C_{t + \Delta T} = max\large(0, \Delta C_{t} - T \times \Delta T\large) + C_{t + \Delta T}$$
The fee rate update formula guarantees that fee rates increase if incoming blocks are complex (large $C_{t + \Delta T}$) and if blocks are emitted rapidly (small $\Delta T$). Symmetrically, fee rates decrease to the minimum if incoming blocks are less complex and if blocks are produced less frequently.
The update formula has a few paramenters to be tuned, independently, for each fee dimension. We defer discussion about tuning to the [implementation section](#tuning-the-update-formula).
## Block verification rules
Upon activation of the dynamic multidimensional fees scheme we modify block processing as follows:
- **Bound block complexity**. For each fee dimension $i$, we define a *maximal block complexity* $Max$. A block is only valid if the block complexity $C$ is less than the maximum block complexity: $C \leq Max$.
- **Verify transaction fee**. When verifying each transaction in a block, we confirm that it can cover its own base fee. Note that both base fee and optional priority fees are burned.
## User Experience
### How will the wallets estimate the fees?
AvalancheGo nodes will provide new APIs exposing the current and expected fee rates, as they are likely to change block by block. Wallets can then use the fees rates to select UTXOs to pay the transaction fees. Moreover, the AvalancheGo implementation proposed above offers a `fees.Calculator` struct that can be reused by wallets and downstream projects to evaluate calculate fees.
### How will wallets be able to re-issue Txs at a higher fee?
Wallets should be able to simply re-issue the transaction since current AvalancheGo implementation drops mempool transactions whose fee rate is lower than current one. More specifically, a transaction may be valid the moment it enters the mempool and it won’t be re-verified as long as it stays in there. However, as soon as the transaction is selected to be included in the next block, it is re-verified against the latest preferred tip. If fees are not enough by this time, the transaction is dropped and the wallet can simply re-issue it at a higher fee, or wait for the fee rate to go down. Note that priority fees offer some buffer space against an increase in the fee rate. A transaction paying just the base fee will be evicted from the mempool in the face of a fee rate increase, while a transaction paying some extra priority fee may have enough buffer room to stay valid after some amount of fee increase.
### How does priority fees guarantee a faster block inclusion?
AvalancheGo mempool will be restructured to order transactions by priority fees. Transactions paying priority fees will be selected for block inclusion first, without violating any spend dependency.
## Backwards Compatibility
Modifying the fee scheme for P-Chain and X-Chain requires a mandatory upgrade for activation. Moreover, wallets must be modified to properly handle the new fee scheme once activated.
## Reference Implementation
The implementation is split across multiple PRs:
- P-Chain work is tracked in this issue: [https://github.com/ava-labs/avalanchego/issues/2707](https://github.com/ava-labs/avalanchego/issues/2707)
- X-Chain work is tracked in this issue: [https://github.com/ava-labs/avalanchego/issues/2708](https://github.com/ava-labs/avalanchego/issues/2708)
A very important implementation step is tuning the update formula parameters for each chain and each fee dimension. We show here the principles we followed for tuning and a simulation based on historical data.
### Tuning the update formula
The basic idea is to measure the complexity of blocks already accepted and derive the parameters from it. You can find the historical data in [this repo](https://github.com/abi87/complexities).
To simplify the exposition I am purposefully ignoring chain specifics (like P-chain proposal blocks). We can account for chain specifics while processing the historical data. Here are the principles:
- **Target block complexity rate $T$**: calculate the distribution of block complexity and pick a high enough quantile.
- **Max block complexity $Max$**: this is probably the trickiest parameter to set.
Historically we had [pretty big transactions](https://subnets.avax.network/p-chain/tx/27pjHPRCvd3zaoQUYMesqtkVfZ188uP93zetNSqk3kSH1WjED1) (more than $1.000$ referenced utxos). Setting a max block complexity so high that these big transactions are allowed is akin to setting no complexity cap.
On the other side, we still want to allow, even encourage, UTXO consolidation, so we may want to allow transactions [like this](https://subnets.avax.network/p-chain/tx/2LxyHzbi2AGJ4GAcHXth6pj5DwVLWeVmog2SAfh4WrqSBdENhV).
A principled way to set max block complexity may be the following:
- calculate the target block complexity rate (see previous point)
- calculate the median time elapsed among consecutive blocks
- The product of these two quantities should gives us something like a target block complexity.
- Set the max block complexity to say $\times 50$ the target value.
- **Normalization coefficient $Denom$**: I suggest we size it as follows:
- Find the largest historical peak, i.e. the sequence of consecutive blocks which contained the most complexity in the shortest period of time
- Tune $Denom$ so that it would cause a $\times 10000$ increase in the fee rate for such a peak. This increase would push fees from the milliAVAX we normally pay under stable network condition up to tens of AVAX.
- **Minimal fee rates $r^{min}$**: we could size them so that transactions fees do not change very much with respect to the currently fixed values.
We simulate below how the update formula would behave on an peak period from Avalanche mainnet.
---
## Specification
Note: The following is pseudocode.
### P2P
#### Aggregation
```diff
+ message GetAcceptanceSignatureRequest {
+ bytes chain_id = 1;
+ uint32 request_id = 2;
+ bytes block_id = 3;
+ }
```
The `GetAcceptanceSignatureRequest` message is sent to a peer to request their signature for a given block id.
```diff
+ message GetAcceptanceSignatureResponse {
+ bytes chain_id = 1;
+ uint32 request_id = 2;
+ bytes bls_signature = 3;
+ }
```
`GetAcceptanceSignatureResponse` is sent to a peer as a response for `GetAcceptanceSignatureRequest`. `bls_signature` is the peer’s signature using their registered primary network BLS staking key over the requested `block_id`. An empty `bls_signature` field indicates that the block was not accepted yet.
## Security Considerations
Nodes that bootstrap using state sync may not have the entire history of the
P-Chain and therefore will not be able to provide the entire history for a block
that is referenced in a block that they propose. This would be needed to unblock a node that is attempting to fast-forward their P-Chain, as they require the entire ancestry between their current accepted tip and the block they are attempting to forward to. It is assumed that nodes will have some minimum amount of recent state so that the requester can eventually be unblocked by retrying, as only one node with the requested ancestry is required to unblock the requester.
An alternative is to make a churn assumption and validate the proposed block's proof with a stale validator set to avoid complexity, but this introduces more security concerns.
## Copyright
Copyright and related rights waived via [CC0](https://creativecommons.org/publicdomain/zero/1.0/).
# ACP-77: Reinventing Subnets (/docs/acps/77-reinventing-subnets)
---
title: "ACP-77: Reinventing Subnets"
description: "Details for Avalanche Community Proposal 77: Reinventing Subnets"
edit_url: https://github.com/avalanche-foundation/ACPs/edit/main/ACPs/77-reinventing-subnets/README.md
---
| ACP | 77 |
| :------------ | :---------------------------------------------------------------------------------------- |
| **Title** | Reinventing Subnets |
| **Author(s)** | Dhruba Basu ([@dhrubabasu](https://github.com/dhrubabasu)) |
| **Status** | Activated ([Discussion](https://github.com/avalanche-foundation/ACPs/discussions/78)) |
| **Track** | Standards |
| **Replaces** | [ACP-13](https://github.com/avalanche-foundation/ACPs/blob/main/ACPs/13-subnet-only-validators/README.md) |
## Abstract
Overhaul Subnet creation and management to unlock increased flexibility for Subnet creators by:
- Separating Subnet validators from Primary Network validators (Primary Network Partial Sync, Removal of 2000 $AVAX requirement)
- Moving ownership of Subnet validator set management from P-Chain to Subnets (ERC-20/ERC-721/Arbitrary Staking, Staking Reward Management)
- Introducing a continuous P-Chain fee mechanism for Subnet validators (Continuous Subnet Staking)
This ACP supersedes [ACP-13](https://github.com/avalanche-foundation/ACPs/blob/main/ACPs/13-subnet-only-validators/README.md) and borrows some of its language.
## Motivation
Each node operator must stake at least 2000 $AVAX ($70k at time of writing) to first become a Primary Network validator before they qualify to become a Subnet validator. Most Subnets aim to launch with at least 8 Subnet validators, which requires staking 16000 $AVAX ($560k at time of writing). All Subnet validators, to satisfy their role as Primary Network validators, must also [allocate 8 AWS vCPU, 16 GB RAM, and 1 TB storage](https://github.com/ava-labs/avalanchego/blob/master/README.md#installation) to sync the entire Primary Network (X-Chain, P-Chain, and C-Chain) and participate in its consensus, in addition to whatever resources are required for each Subnet they are validating.
Regulated entities that are prohibited from validating permissionless, smart contract-enabled blockchains (like the C-Chain) cannot launch a Subnet because they cannot opt-out of Primary Network Validation. This deployment blocker prevents a large cohort of Real World Asset (RWA) issuers from bringing unique, valuable tokens to the Avalanche Ecosystem (that could move between C-Chain <-> Subnets using Avalanche Warp Messaging/Teleporter).
A widely validated Subnet that is not properly metered could destabilize the Primary Network if usage spikes unexpectedly. Underprovisioned Primary Network validators running such a Subnet may exit with an OOM exception, see degraded disk performance, or find it difficult to allocate CPU time to P/X/C-Chain validation. The inverse also holds for Subnets with the Primary Network (where some undefined behavior could bring a Subnet offline).
Although the fee paid to the Primary Network to operate a Subnet does not go up with the amount of activity on the Subnet, the fixed, upfront cost of setting up a Subnet validator on the Primary Network deters new projects that prefer smaller, even variable, costs until demand is observed. _Unlike L2s that pay some increasing fee (usually denominated in units per transaction byte) to an external chain for data availability and security as activity scales, Subnets provide their own security/data availability and the only cost operators must pay from processing more activity is the hardware cost of supporting additional load._
Elastic Subnets, introduced in [Banff](https://medium.com/avalancheavax/banff-elastic-subnets-44042f41e34c), enabled Subnet creators to activate Proof-of-Stake validation and uptime-based rewards using their own token. However, this token is required to be an ANT (created on the X-Chain) and locked on the P-Chain. All staking rewards were distributed on the P-Chain with the reward curve being defined in the `TransformSubnetTx` and, once set, was unable to be modified.
With no Elastic Subnets live on Mainnet, it is clear that Permissionless Subnets as they stand today could be more desirable. There are many successful Permissioned Subnets in production but many Subnet creators have raised the above as points of concern. In summary, the Avalanche community could benefit from a more flexible and affordable mechanism to launch Permissionless Subnets.
### A Note on Nomenclature
Avalanche Subnets are subnetworks validated by a subset of the Primary Network validator set. The new network creation flow outlined in this ACP does not require any intersection between the new network's validator set and the Primary Network's validator set. Moreover, the new networks have greater functionality and sovereignty than Subnets. To distinguish between these two kinds of networks, the community has been referring to these new networks as _Avalanche Layer 1s_, or L1s for short.
All networks created through the old network creation flow will continue to be referred to as Avalanche Subnets.
## Specification
At a high-level, L1s can manage their validator sets externally to the P-Chain by setting the blockchain ID and address of their _validator manager_. The P-Chain will consume Warp messages that modify the L1's validator set. To confirm modification of the L1's validator set, the P-Chain will also produce Warp messages. L1 validators are not required to validate the Primary Network, and do not have the same 2000 $AVAX stake requirement that Subnet validators have. To maintain an active L1 validator, a continuous fee denominated in $AVAX is assessed. L1 validators are only required to sync the P-Chain (not X/C-Chain) in order to track validator set changes and support cross-L1 communication.
### P-Chain Warp Message Payloads
To enable management of an L1's validator set externally to the P-Chain, Warp message verification will be added to the [`PlatformVM`](https://github.com/ava-labs/avalanchego/tree/master/vms/platformvm). For a Warp message to be considered valid by the P-Chain, at least 67% of the `sourceChainID`'s weight must have participated in the aggregate BLS signature. This is equivalent to the threshold set for the C-Chain. A future ACP may be proposed to support modification of this threshold on a per-L1 basis.
The following Warp message payloads are introduced on the P-Chain:
- `SubnetToL1ConversionMessage`
- `RegisterL1ValidatorMessage`
- `L1ValidatorRegistrationMessage`
- `L1ValidatorWeightMessage`
The method of requesting signatures for these messages is left unspecified. A viable option for supporting this functionality is laid out in [ACP-118](https://github.com/avalanche-foundation/ACPs/blob/main/ACPs/118-warp-signature-request/README.md) with the `SignatureRequest` message.
All node IDs contained within the message specifications are represented as variable length arrays such that they can support new node IDs types should the P-Chain add support for them in the future.
The serialization of each of these messages is as follows.
#### `SubnetToL1ConversionMessage`
The P-Chain can produce a `SubnetToL1ConversionMessage` for consumers (i.e. validator managers) to be aware of the initial validator set.
The following serialization is defined as the `ValidatorData`:
| Field | Type | Size |
| -------------: | ---------: | -----------------------: |
| `nodeID` | `[]byte` | 4 + len(`nodeID`) bytes |
| `blsPublicKey` | `[48]byte` | 48 bytes |
| `weight` | `uint64` | 8 bytes |
| | | 60 + len(`nodeID`) bytes |
The following serialization is defined as the `ConversionData`:
| Field | Type | Size |
| ---------------: | ----------------: | ---------------------------------------------------------: |
| `codecID` | `uint16` | 2 bytes |
| `subnetID` | `[32]byte` | 32 bytes |
| `managerChainID` | `[32]byte` | 32 bytes |
| `managerAddress` | `[]byte` | 4 + len(`managerAddress`) bytes |
| `validators` | `[]ValidatorData` | 4 + sum(`validatorLengths`) bytes |
| | | 74 + len(`managerAddress`) + sum(`validatorLengths`) bytes |
- `codecID` is the codec version used to serialize the payload, and is hardcoded to `0x0000`
- `sum(validatorLengths)` is the sum of the lengths of `ValidatorData` serializations included in `validators`.
- `subnetID` identifies the Subnet that is being converted to an L1 (described further below).
- `managerChainID` and `managerAddress` identify the validator manager for the newly created L1. This is the (blockchain ID, address) tuple allowed to send Warp messages to modify the L1's validator set.
- `validators` are the initial continuous-fee-paying validators for the given L1.
The `SubnetToL1ConversionMessage` is specified as an `AddressedCall` with `sourceChainID` set to the P-Chain ID, the `sourceAddress` set to an empty byte array, and a payload of:
| Field | Type | Size |
| -------------: | ---------: | -------: |
| `codecID` | `uint16` | 2 bytes |
| `typeID` | `uint32` | 4 bytes |
| `conversionID` | `[32]byte` | 32 bytes |
| | | 38 bytes |
- `codecID` is the codec version used to serialize the payload, and is hardcoded to `0x0000`
- `typeID` is the payload type identifier and is `0x00000000` for this message
- `conversionID` is the SHA256 hash of the `ConversionData` from a given `ConvertSubnetToL1Tx`
#### `RegisterL1ValidatorMessage`
The P-Chain can consume a `RegisterL1ValidatorMessage` from validator managers through a `RegisterL1ValidatorTx` to register an addition to the L1's validator set.
The following is the serialization of a `PChainOwner`:
| Field | Type | Size |
| ----------: | -----------: | -------------------------------: |
| `threshold` | `uint32` | 4 bytes |
| `addresses` | `[][20]byte` | 4 + len(`addresses`) \\* 20 bytes |
| | | 8 + len(`addresses`) \\* 20 bytes |
- `threshold` is the number of `addresses` that must provide a signature for the `PChainOwner` to authorize an action.
- Validation criteria:
- If `threshold` is `0`, `addresses` must be empty
- `threshold` <= len(`addresses`)
- Entries of `addresses` must be unique and sorted in ascending order
The `RegisterL1ValidatorMessage` is specified as an `AddressedCall` with a payload of:
| Field | Type | Size |
| ----------------------: | ------------: | ------------------------------------------------------------------------: |
| `codecID` | `uint16` | 2 bytes |
| `typeID` | `uint32` | 4 bytes |
| `subnetID` | `[32]byte` | 32 bytes |
| `nodeID` | `[]byte` | 4 + len(`nodeID`) bytes |
| `blsPublicKey` | `[48]byte` | 48 bytes |
| `expiry` | `uint64` | 8 bytes |
| `remainingBalanceOwner` | `PChainOwner` | 8 + len(`addresses`) \\* 20 bytes |
| `disableOwner` | `PChainOwner` | 8 + len(`addresses`) \\* 20 bytes |
| `weight` | `uint64` | 8 bytes |
| | | 122 + len(`nodeID`) + (len(`addresses1`) + len(`addresses2`)) \\* 20 bytes |
- `codecID` is the codec version used to serialize the payload, and is hardcoded to `0x0000`
- `typeID` is the payload type identifier and is `0x00000001` for this payload
- `subnetID`, `nodeID`, `weight`, and `blsPublicKey` are for the validator being added
- `expiry` is the time at which this message becomes invalid. As of a P-Chain timestamp `>= expiry`, this Avalanche Warp Message can no longer be used to add the `nodeID` to the validator set of `subnetID`
- `remainingBalanceOwner` is the P-Chain owner where leftover $AVAX from the validator's Balance will be issued to when this validator it is removed from the validator set.
- `disableOwner` is the only P-Chain owner allowed to disable the validator using `DisableL1ValidatorTx`, specified below.
#### `L1ValidatorRegistrationMessage`
The P-Chain can produce an `L1ValidatorRegistrationMessage` for consumers to verify that a validation period has either begun or has been invalidated.
The `L1ValidatorRegistrationMessage` is specified as an `AddressedCall` with `sourceChainID` set to the P-Chain ID, the `sourceAddress` set to an empty byte array, and a payload of:
| Field | Type | Size |
| -------------: | ---------: | -------: |
| `codecID` | `uint16` | 2 bytes |
| `typeID` | `uint32` | 4 bytes |
| `validationID` | `[32]byte` | 32 bytes |
| `registered` | `bool` | 1 byte |
| | | 39 bytes |
- `codecID` is the codec version used to serialize the payload, and is hardcoded to `0x0000`
- `typeID` is the payload type identifier and is `0x00000002` for this message
- `validationID` identifies the validator for the message
- `registered` is a boolean representing the status of the `validationID`. If true, the `validationID` corresponds to a validator in the current validator set. If false, the `validationID` does not correspond to a validator in the current validator set, and never will in the future.
#### `L1ValidatorWeightMessage`
The P-Chain can consume an `L1ValidatorWeightMessage` through a `SetL1ValidatorWeightTx` to update the weight of an existing validator. The P-Chain can also produce an `L1ValidatorWeightMessage` for consumers to verify that the validator weight update has been effectuated.
The `L1ValidatorWeightMessage` is specified as an `AddressedCall` with the following payload. When sent from the P-Chain, the `sourceChainID` is set to the P-Chain ID, and the `sourceAddress` is set to an empty byte array.
| Field | Type | Size |
| -------------: | ---------: | -------: |
| `codecID` | `uint16` | 2 bytes |
| `typeID` | `uint32` | 4 bytes |
| `validationID` | `[32]byte` | 32 bytes |
| `nonce` | `uint64` | 8 bytes |
| `weight` | `uint64` | 8 bytes |
| | | 54 bytes |
- `codecID` is the codec version used to serialize the payload, and is hardcoded to `0x0000`
- `typeID` is the payload type identifier and is `0x00000003` for this message
- `validationID` identifies the validator for the message
- `nonce` is a strictly increasing number that denotes the latest validator weight update and provides replay protection for this transaction
- `weight` is the new `weight` of the validator
### New P-Chain Transaction Types
Both before and after this ACP, to create a Subnet, a `CreateSubnetTx` must be issued on the P-Chain. This transaction includes an `Owner` field which defines the key that today can be used to authorize any validator set additions (`AddSubnetValidatorTx`) or removals (`RemoveSubnetValidatorTx`).
To be considered a permissionless network, or Avalanche Layer 1:
- This `Owner` key must no longer have the ability to modify the validator set.
- New transaction types must support modification of the validator set via Warp messages.
The following new transaction types are introduced on the P-Chain to support this functionality:
- `ConvertSubnetToL1Tx`
- `RegisterL1ValidatorTx`
- `SetL1ValidatorWeightTx`
- `DisableL1ValidatorTx`
- `IncreaseL1ValidatorBalanceTx`
#### `ConvertSubnetToL1Tx`
To convert a Subnet into an L1, a `ConvertSubnetToL1Tx` must be issued to set the `(chainID, address)` pair that will manage the L1's validator set. The `Owner` key defined in `CreateSubnetTx` must provide a signature to authorize this conversion.
The `ConvertSubnetToL1Tx` specification is:
```go
type PChainOwner struct {
// The threshold number of `Addresses` that must provide a signature in order for
// the `PChainOwner` to be considered valid.
Threshold uint32 `json:"threshold"`
// The 20-byte addresses that are allowed to sign to authenticate a `PChainOwner`.
// Note: It is required for:
// - len(Addresses) == 0 if `Threshold` is 0.
// - len(Addresses) >= `Threshold`
// - The values in Addresses to be sorted in ascending order.
Addresses []ids.ShortID `json:"addresses"`
}
type L1Validator struct {
// NodeID of this validator
NodeID []byte `json:"nodeID"`
// Weight of this validator used when sampling
Weight uint64 `json:"weight"`
// Initial balance for this validator
Balance uint64 `json:"balance"`
// [Signer] is the BLS public key and proof-of-possession for this validator.
// Note: We do not enforce that the BLS key is unique across all validators.
// This means that validators can share a key if they so choose.
// However, a NodeID + L1 does uniquely map to a BLS key
Signer signer.ProofOfPossession `json:"signer"`
// Leftover $AVAX from the [Balance] will be issued to this
// owner once it is removed from the validator set.
RemainingBalanceOwner PChainOwner `json:"remainingBalanceOwner"`
// The only owner allowed to disable this validator on the P-Chain.
DisableOwner PChainOwner `json:"disableOwner"`
}
type ConvertSubnetToL1Tx struct {
// Metadata, inputs and outputs
BaseTx
// ID of the Subnet to transform
// Restrictions:
// - Must not be the Primary Network ID
Subnet ids.ID `json:"subnetID"`
// BlockchainID where the validator manager lives
ChainID ids.ID `json:"chainID"`
// Address of the validator manager
Address []byte `json:"address"`
// Initial continuous-fee-paying validators for the L1
Validators []L1Validator `json:"validators"`
// Authorizes this conversion
SubnetAuth verify.Verifiable `json:"subnetAuthorization"`
}
```
After this transaction is accepted, `CreateChainTx` and `AddSubnetValidatorTx` are disabled on the Subnet. The only action that the `Owner` key is able to take is removing Subnet validators with `RemoveSubnetValidatorTx` that had been added using `AddSubnetValidatorTx`. Unless removed by the `Owner` key, any Subnet validators added previously with an `AddSubnetValidatorTx` will continue to validate the Subnet until their [`End`](https://github.com/ava-labs/avalanchego/blob/a1721541754f8ee23502b456af86fea8c766352a/vms/platformvm/txs/validator.go#L27) time is reached. Once all Subnet validators added with `AddSubnetValidatorTx` are no longer in the validator set, the `Owner` key is powerless. `RegisterL1ValidatorTx` and `SetL1ValidatorWeightTx` must be used to manage the L1's validator set.
The `validationID` for validators added through `ConvertSubnetToL1Tx` is defined as the SHA256 hash of the 36 bytes resulting from concatenating the 32 byte `subnetID` with the 4 byte `validatorIndex` (index in the `Validators` array within the transaction).
Once this transaction is accepted, the P-Chain must be willing sign a `SubnetToL1ConversionMessage` with a `conversionID` corresponding to `ConversionData` populated with the values from this transaction.
#### `RegisterL1ValidatorTx`
After a `ConvertSubnetToL1Tx` has been accepted, new validators can only be added by using a `RegisterL1ValidatorTx`. The specification of this transaction is:
```go
type RegisterL1ValidatorTx struct {
// Metadata, inputs and outputs
BaseTx
// Balance <= sum($AVAX inputs) - sum($AVAX outputs) - TxFee.
Balance uint64 `json:"balance"`
// [Signer] is a BLS signature proving ownership of the BLS public key specified
// below in `Message` for this validator.
// Note: We do not enforce that the BLS key is unique across all validators.
// This means that validators can share a key if they so choose.
// However, a NodeID + L1 does uniquely map to a BLS key
Signer [96]byte `json:"signer"`
// A RegisterL1ValidatorMessage payload
Message warp.Message `json:"message"`
}
```
The `validationID` of validators added via `RegisterL1ValidatorTx` is defined as the SHA256 hash of the `Payload` of the `AddressedCall` in `Message`.
When a `RegisterL1ValidatorTx` is accepted on the P-Chain, the validator is added to the L1's validator set. A `minNonce` field corresponding to the `validationID` will be stored on addition to the validator set (initially set to `0`). This field will be used when validating the `SetL1ValidatorWeightTx` defined below.
This `validationID` will be used for replay protection. Used `validationID`s will be stored on the P-Chain. If a `RegisterL1ValidatorTx`'s `validationID` has already been used, the transaction will be considered invalid. To prevent storing an unbounded number of `validationID`s, the `expiry` of the `RegisterL1ValidatorMessage` is required to be no more than 24 hours in the future of the time the transaction is issued on the P-Chain. Any `validationIDs` corresponding to an expired timestamp can be flushed from the P-Chain's state.
L1s are responsible for defining the procedure on how to retrieve the above information from prospective validators.
An EVM-compatible L1 may choose to implement this step like so:
- Use the number of tokens the user has staked into a smart contract on the L1 to determine the weight of their validator
- Require the user to submit an on-chain transaction with their validator information
- Generate the Warp message
For a `RegisterL1ValidatorTx` to be valid, `Signer` must be a valid proof-of-possession of the `blsPublicKey` defined in the `RegisterL1ValidatorMessage` contained in the transaction.
After a `RegisterL1ValidatorTx` is accepted, the P-Chain must be willing to sign an `L1ValidatorRegistrationMessage` for the given `validationID` with `registered` set to `true`. This remains the case until the time at which the validator is removed from the validator set using a `SetL1ValidatorWeightTx`, as described below.
When it is known that a given `validationID` _is not and never will be_ registered, the P-Chain must be willing to sign an `L1ValidatorRegistrationMessage` for the `validationID` with `registered` set to `false`. This could be the case if the `expiry` time of the message has passed prior to the message being delivered in a `RegisterL1ValidatorTx`, or if the validator was successfully registered and then later removed. This enables the P-Chain to prove to validator managers that a validator has been removed or never added. The P-Chain must refuse to sign any `L1ValidatorRegistrationMessage` where the `validationID` does not correspond to an active validator and the `expiry` is in the future.
#### `SetL1ValidatorWeightTx`
`SetL1ValidatorWeightTx` is used to modify the voting weight of a validator. The specification of this transaction is:
```go
type SetL1ValidatorWeightTx struct {
// Metadata, inputs and outputs
BaseTx
// An L1ValidatorWeightMessage payload
Message warp.Message `json:"message"`
}
```
Applications of this transaction could include:
- Increase the voting weight of a validator if a delegation is made on the L1
- Increase the voting weight of a validator if the stake amount is increased (by staking rewards for example)
- Decrease the voting weight of a misbehaving validator
- Remove an inactive validator
The validation criteria for `L1ValidatorWeightMessage` is:
- `nonce >= minNonce`. Note that `nonce` is not required to be incremented by `1` with each successive validator weight update.
- When `minNonce == MaxUint64`, `nonce` must be `MaxUint64` and `weight` must be `0`. This prevents L1s from being unable to remove `nodeID` in a subsequent transaction.
- If `weight == 0`, the validator being removed must not be the last one in the set. If all validators are removed, there are no valid Warp messages that can be produced to register new validators through `RegisterL1ValidatorMessage`. With no validators, block production will halt and the L1 is unrecoverable. This validation criteria serves as a guardrail against this situation. A future ACP can remove this guardrail as users get more familiar with the new L1 mechanics and tooling matures to fork an L1.
When `weight != 0`, the weight of the validator is updated to `weight` and `minNonce` is updated to `nonce + 1`.
When `weight == 0`, the validator is removed from the validator set. All state related to the validator, including the `minNonce` and `validationID`, are reaped from the P-Chain state. Tracking these post-removal is not required since `validationID` can never be re-initialized due to the replay protection provided by `expiry` in `RegisterL1ValidatorTx`. Any unspent $AVAX in the validator's `Balance` will be issued in a single UTXO to the `RemainingBalanceOwner` for this validator. Recall that `RemainingBalanceOwner` is specified when the validator is first added to the L1's validator set (in either `ConvertSubnetToL1Tx` or `RegisterL1ValidatorTx`).
Note: There is no explicit `EndTime` for L1 validators added in a `ConvertSubnetToL1Tx` or `RegisterL1ValidatorTx`. The only time when L1 validators are removed from the L1's validator set is through this transaction when `weight == 0`.
#### `DisableL1ValidatorTx`
L1 validators can use `DisableL1ValidatorTx` to mark their validator as inactive. The specification of this transaction is:
```go
type DisableL1ValidatorTx struct {
// Metadata, inputs and outputs
BaseTx
// ID corresponding to the validator
ValidationID ids.ID `json:"validationID"`
// Authorizes this validator to be disabled
DisableAuth verify.Verifiable `json:"disableAuthorization"`
}
```
The `DisableOwner` specified for this validator must sign the transaction. Any unspent $AVAX in the validator's `Balance` will be issued in a single UTXO to the `RemainingBalanceOwner` for this validator. Recall that both `DisableOwner` and `RemainingBalanceOwner` are specified when the validator is first added to the L1's validator set (in either `ConvertSubnetToL1Tx` or `RegisterL1ValidatorTx`).
For full removal from an L1's validator set, a `SetL1ValidatorWeightTx` must be issued with weight `0`. To do so, a Warp message is required from the L1's validator manager. However, to support the ability to claim the unspent `Balance` for a validator without authorization is critical for failed L1s.
Note that this does not modify an L1's total staking weight. This transaction marks the validator as inactive, but does not remove it from the L1's validator set. Inactive validators can re-activate at any time by increasing their balance with an `IncreaseL1ValidatorBalanceTx`.
L1 creators should be aware that there is no notion of `MinStakeDuration` that is enforced by the P-Chain. It is expected that L1s who choose to enforce a `MinStakeDuration` will lock the validator's Stake for the L1's desired `MinStakeDuration`.
#### `IncreaseL1ValidatorBalanceTx`
L1 validators are required to maintain a non-zero balance used to pay the continuous fee on the P-Chain in order to be considered active. The `IncreaseL1ValidatorBalanceTx` can be used by anybody to add additional $AVAX to the `Balance` to a validator. The specification of this transaction is:
```go
type IncreaseL1ValidatorBalanceTx struct {
// Metadata, inputs and outputs
BaseTx
// ID corresponding to the validator
ValidationID ids.ID `json:"validationID"`
// Balance <= sum($AVAX inputs) - sum($AVAX outputs) - TxFee
Balance uint64 `json:"balance"`
}
```
If the validator corresponding to `ValidationID` is currently inactive (`Balance` was exhausted or `DisableL1ValidatorTx` was issued), this transaction will move them back to the active validator set.
Note: The $AVAX added to `Balance` can be claimed at any time by the validator using `DisableL1ValidatorTx`.
### Bootstrapping L1 Nodes
Bootstrapping a node/validator is the process of securely recreating the latest state of the blockchain locally. At the end of this process, the local state of a node/validator must be in sync with the local state of other virtuous nodes/validators. The node/validator can then verify new incoming transactions and reach consensus with other nodes/validators.
To bootstrap a node/validator, a few critical questions must be answered: How does one discover peers in the network? How does one determine that a discovered peer is honestly participating in the network?
For standalone networks like the Avalanche Primary Network, this is done by connecting to a hardcoded [set](https://github.com/ava-labs/avalanchego/blob/master/genesis/bootstrappers.json) of trusted bootstrappers to then discover new peers. Ethereum calls their set [bootnodes](https://ethereum.org/developers/docs/nodes-and-clients/bootnodes).
Since L1 validators are not required to be Primary Network validators, a list of validator IPs to connect to (the functional bootstrappers of the L1) cannot be provided by simply connecting to the Primary Network validators. However, the Primary Network can enable nodes tracking an L1 to seamlessly connect to the validators by tracking and gossiping L1 validator IPs. L1s will not need to operate and maintain a set of bootstrappers and can rely on the Primary Network for peer discovery.
### Sidebar: L1 Sovereignty
After this ACP is activated, the P-Chain will no longer support staking of any assets other than $AVAX for the Primary Network. The P-Chain will not support the distribution of staking rewards for L1s. All staking-related operations for L1 validation must be managed by the L1's validator manager. The P-Chain simply requires a continuous fee per validator. If an L1 would like to manage their validator's balances on the P-Chain, it can cover the cost for all L1 validators by posting the $AVAX balance on the P-Chain. L1s can implement any mechanism they want to pay the continuous fee charged by the P-Chain for its participants.
The L1 has full ownership over its validator set, not the P-Chain. There are no restrictions on what requirements an L1 can have for validators to join. Any stake that is required to join the L1's validator set is not locked on the P-Chain. If a validator is removed from the L1's validator set via a `SetL1ValidatorWeightTx` with weight `0`, the stake will continue to be locked outside of the P-Chain. How each L1 handles stake associated with the validator is entirely left up to the L1 and can be treated independently to what happens on the P-Chain.
The relationship between the P-Chain and L1s provides a dynamic where L1s can use the P-Chain as an impartial judge to modify parameters (in addition to its existing role of helping to validate incoming Avalanche Warp Messages). If a validator is misbehaving, the L1 validators can collectively generate a BLS multisig to reduce the voting weight of a misbehaving validator. This operation is fully secured by the Avalanche Primary Network (225M $AVAX or $8.325B at the time of writing).
Follow-up ACPs could extend the P-Chain <-> L1 relationship to include parametrization of the 67% threshold to enable L1s to choose a different threshold based on their security model (e.g. a simple majority of 51%).
### Continuous Fee Mechanism
Every additional validator on the P-Chain adds persistent load to the Avalanche Network. When a validator transaction is issued on the P-Chain, it is charged for the computational cost of the transaction itself but is not charged for the cost of an active validator over the time they are validating on the network (which may be indefinitely). This is a common problem in blockchains, spawning many state rent proposals in the broader blockchain space to address it. The following fee mechanism takes advantage of the fact that each L1 validator uses the same amount of computation and charges each L1 validator the dynamic base fee for every discrete unit of time it is active.
To charge each L1 validator, the notion of a `Balance` is introduced. The `Balance` of a validator will be continuously charged during the time they are active to cover the cost of storing the associated validator properties (BLS key, weight, nonce) in memory and to track IPs (in addition to other services provided by the Primary Network). This `Balance` is initialized with the `RegisterL1ValidatorTx` that added them to the active validator set. `Balance` can be increased at any time using the `IncreaseL1ValidatorBalanceTx`. When this `Balance` reaches `0`, the validator will be considered "inactive" and will no longer participate in validating the L1. Inactive validators can be moved back to the active validator set at any time using the same `IncreaseL1ValidatorBalanceTx`. Once a validator is considered inactive, the P-Chain will remove these properties from memory and only retain them on disk. All messages from that validator will be considered invalid until it is revived using the `IncreaseL1ValidatorBalanceTx`. L1s can reduce the amount of inactive weight by removing inactive validators with the `SetL1ValidatorWeightTx` (`Weight` = 0).
Since each L1 validator is charged the same amount at each point in time, tracking the fees for the entire validator set is straight-forward. The accumulated dynamic base fee for the entire network is tracked in a single uint. This accumulated value should be equal to the fee charged if a validator was active from the time the accumulator was instantiated. The validator set is maintained in a priority queue. A pseudocode implementation of the continuous fee mechanism is provided below.
```python
# Pseudocode
class ValidatorQueue:
def __init__(self, fee_getter):
self.acc = 0
self.queue = PriorityQueue()
self.fee_getter = fee_getter
# At each time period, increment the accumulator and
# pop all validators from the top of the queue that
# ran out of funds.
# Note: The amount of work done in a single block
# should be bounded to prevent a large number of
# validator operations from happening at the same
# time.
def time_elapse(self, t):
self.acc = self.acc + self.fee_getter(t)
while True:
vdr = self.queue.peek()
if vdr.balance < self.acc:
self.queue.pop()
continue
return
# Validator was added
def validator_enter(self, vdr):
vdr.balance = vdr.balance + self.acc
self.queue.add(vdr)
# Validator was removed
def validator_remove(self, vdrNodeID):
vdr = find_and_remove(self.queue, vdrNodeID)
vdr.balance = vdr.balance - self.acc
vdr.refund() # Refund [vdr.balance] to [RemainingBalanceOwner]
self.queue.remove()
# Validator's balance was topped up
def validator_increase(self, vdrNodeID, balance):
vdr = find_and_remove(self.queue, vdrNodeID)
vdr.balance = vdr.balance + balance
self.queue.add(vdr)
```
#### Fee Algorithm
[ACP-103](https://github.com/avalanche-foundation/ACPs/blob/main/ACPs/103-dynamic-fees/README.md) proposes a dynamic fee mechanism for transactions on the P-Chain. This mechanism is repurposed with minor modifications for the active L1 validator continuous fee.
At activation, the number of excess active L1 validators $x$ is set to `0`.
The fee rate per second for an active L1 validator is:
$$M \cdot \exp\left(\frac{x}{K}\right)$$
Where:
- $M$ is the minimum price for an active L1 validator
- $\exp\left(x\right)$ is an approximation of $e^x$ following the EIP-4844 specification
```python
# Approximates factor * e ** (numerator / denominator) using Taylor expansion
def fake_exponential(factor: int, numerator: int, denominator: int) -> int:
i = 1
output = 0
numerator_accum = factor * denominator
while numerator_accum > 0:
output += numerator_accum
numerator_accum = (numerator_accum * numerator) // (denominator * i)
i += 1
return output // denominator
```
- $K$ is a constant to control the rate of change for the L1 validator price
After every second, $x$ will be updated:
$$x = \max(x + (V - T), 0)$$
Where:
- $V$ is the number of active L1 validators
- $T$ is the target number of active L1 validators
Whenever $x$ increases by $K$, the price per active L1 validator increases by a factor of `~2.7`. If the price per active L1 validator gets too expensive, some active L1 validators will exit the active validator set, decreasing $x$, dropping the price. The price per active L1 validator constantly adjusts to make sure that, on average, the P-Chain has no more than $T$ active L1 validators.
#### Block Processing
Before processing the transactions inside a block, all validators that no longer have a sufficient (non-zero) balance are deactivated.
After processing the transactions inside a block, all validators that do not have a sufficient balance for the next second are deactivated.
##### Block Timestamp Validity Change
To ensure that validators are charged accurately, blocks are only considered valid if advancing the chain times would not cause a validator to have a negative balance.
This upholds the expectation that the number of L1 validators remains constant between blocks.
The block building protocol is modified to account for this change by first checking if the wall clock time removes any validator due to a lack of funds. If the wall clock time does not remove any L1 validators, the wall clock time is used to build the block. If it does, the time at which the first validator gets removed is used.
##### Fee Calculation
The total validator fee assessed in $\Delta t$ is:
```python
# Calculate the fee to charge over Δt
def cost_over_time(V:int, T:int, x:int, Δt: int) -> int:
cost = 0
for _ in range(Δt):
x = max(x + V - T, 0)
cost += fake_exponential(M, x, K)
return cost
```
#### Parameters
The parameters at activation are:
| Parameter | Definition | Value |
| --------- | ------------------------------------------- | ------------- |
| $T$ | target number of validators | 10_000 |
| $C$ | capacity number of validators | 20_000 |
| $M$ | minimum fee rate | 512 nAVAX/s |
| $K$ | constant to control the rate of fee changes | 1_246_488_515 |
An $M$ of 512 nAVAX/s equates to ~1.33 AVAX/month to run an L1 validator, so long as the total number of continuous-fee-paying L1 validators stays at or below $T$.
$K$ was chosen to set the maximum fee doubling rate to ~24 hours. This is in the extreme case that the network has $C$ validators for prolonged periods of time; if the network has $T$+1 validators for example, the fee rate would double every ~27 years.
A future ACP can adjust the parameters to increase $T$, reduce $M$, and/or modify $K$.
#### User Experience
L1 validators are continuously charged a fee, albeit a small one. This poses a challenge for L1 validators: How do they maintain the balance over time?
Node clients should expose an API to track how much balance is remaining in the validator's account. This will provide a way for L1 validators to track how quickly it is going down and top-up when needed. A nice byproduct of the above design is the balance in the validator's account is claimable. This means users can top-up as much $AVAX as they want and rest-assured knowing they can always retrieve it if there is an excessive amount.
The expectation is that most users will not interact with node clients or track when or how much they need to top-up their validator account. Wallet providers will abstract away most of this process. For users who desire more convenience, L1-as-a-Service providers will abstract away all of this process.
## Backwards Compatibility
This new design for Subnets proposes a large rework to all L1-related mechanics. Rollout should be done on a going-forward basis to not cause any service disruption for live Subnets. All current Subnet validators will be able to continue validating both the Primary Network and whatever Subnets they are validating.
Any state execution changes must be coordinated through a mandatory upgrade. Implementors must take care to continue to verify the existing ruleset until the upgrade is activated. After activation, nodes should verify the new ruleset. Implementors must take care to only verify the presence of 2000 $AVAX prior to activation.
### Deactivated Transactions
- P-Chain
- `TransformSubnetTx`
After this ACP is activated, Elastic Subnets will be disabled. `TransformSubnetTx` will not be accepted post-activation. As there are no Mainnet Elastic Subnets, there should be no production impact with this deactivation.
### New Transactions
- P-Chain
- `ConvertSubnetToL1Tx`
- `RegisterL1ValidatorTx`
- `SetL1ValidatorWeightTx`
- `DisableL1ValidatorTx`
- `IncreaseL1ValidatorBalanceTx`
## Reference Implementation
ACP-77 was implemented and will be merged into AvalancheGo behind the `Etna` upgrade flag. The full body of work can be found tagged with the `acp77` label [here](https://github.com/ava-labs/avalanchego/issues?q=sort%3Aupdated-desc+label%3Aacp77).
Since Etna is not yet activated, all new transactions introduced in ACP-77 will be rejected by AvalancheGo. If any modifications are made to ACP-77 as part of the ACP process, the implementation must be updated prior to activation.
## Security Considerations
This ACP introduces Avalanche Layer 1s, a new network type that costs significantly less than Avalanche Subnets. This can lead to a large increase in the number of networks and, by extension, the number of validators. Each additional validator adds consistent RAM usage to the P-Chain. However, this should be appropriately metered by the continuous fee mechanism outlined above.
With the sovereignty L1s have from the P-Chain, L1 staking tokens are not locked on the P-Chain. This poses a security consideration for L1 validators: Malicious chains can choose to remove validators at will and take any funds that the validator has locked on the L1. The P-Chain only provides the guarantee that L1 validators can retrieve the remaining $AVAX Balance for their validator via a `DisableL1ValidatorTx`. Any assets on the L1 is entirely under the purview of the L1. The onus is on L1 validators to vet the L1's security for any assets transferred onto the L1.
With a long window of expiry (24 hours) for the Warp message in `RegisterL1ValidatorTx`, spam of validator registration could lead to high memory pressure on the P-Chain. A future ACP can reduce the window of expiry if 24 hours proves to be a problem.
NodeIDs can be added to an L1's validator set involuntarily. However, it is important to note that any stake/rewards are _not_ at risk. For a node operator who was added to a validator set involuntarily, they would only need to generate a new NodeID via key rotation as there is no lock-up of any stake to create a NodeID. This is an explicit tradeoff for easier on-boarding of NodeIDs. This mirrors the Primary Network validators guarantee of no stake/rewards at risk.
The continuous fee mechanism outlined above does not apply to inactive L1 validators since they are not stored in memory. However, inactive L1 validators are persisted on disk which can lead to persistent P-Chain state growth. A future ACP can introduce a mechanism to decrease the rate of P-Chain state growth or provide a state expiry path to reduce the amount of P-Chain state.
## Acknowledgements
Special thanks to [@StephenButtolph](https://github.com/StephenButtolph), [@aaronbuchwald](https://github.com/aaronbuchwald), and [@patrick-ogrady](https://github.com/patrick-ogrady) for their feedback on these ideas. Thank you to the broader Ava Labs Platform Engineering Group for their feedback on this ACP prior to publication.
## Copyright
Copyright and related rights waived via [CC0](https://creativecommons.org/publicdomain/zero/1.0/).
# ACP-83: Dynamic Multidimensional Fees (/docs/acps/83-dynamic-multidimensional-fees)
---
title: "ACP-83: Dynamic Multidimensional Fees"
description: "Details for Avalanche Community Proposal 83: Dynamic Multidimensional Fees"
edit_url: https://github.com/avalanche-foundation/ACPs/edit/main/ACPs/83-dynamic-multidimensional-fees/README.md
---
| ACP | 83 |
| :--- | :--- |
| **Title** | Dynamic multidimensional fees for P-chain and X-chain |
| **Author(s)** | Alberto Benegiamo ([@abi87](https://github.com/abi87)) |
| **Status** | Stale |
| **Track** | Standards |
| **Superseded-By** | [ACP-103](https://github.com/avalanche-foundation/ACPs/blob/main/ACPs/103-dynamic-fees/README.md) |
## Abstract
Introduce a dynamic and multidimensional fees scheme for the P-chain and X-chain.
Dynamic fees helps to preserve the stability of the chain as it provides a feedback mechanism that increases the cost of resources when the network operates above its target utilization.
Multidimensional fees ensures that high demand for orthogonal resources does not drive up the price of underutilized resources. For example, networks provide and consume orthogonal resources including, but not limited to, bandwidth, chain state, read/write throughput, and CPU. By independently metering each resource, they can be granularly priced and stay closer to optimal resource utilization.
## Motivation
The P-Chain and X-Chain currently have fixed fees and in some cases those fees are fixed to zero.
This makes transaction issuance predictable, but does not provide feedback mechanism to preserve chain stability under high load. In contrast, the C-Chain, which has the highest and most regular load among the chains on the Primary Network, already supports dynamic fees. This ACP proposes to introduce a similar dynamic fee mechanism for the P-Chain and X-Chain to further improve the Primary Network's stability and resilience under load.
However, unlike the C-Chain, we propose a multidimensional fee scheme with an exponential update rule for each fee dimension. The [HyperSDK](https://github.com/ava-labs/hypersdk) already utilizes a multidimensional fee scheme with optional priority fees and its efficiency is backed by [academic research](https://arxiv.org/abs/2208.07919).
Finally, we split the fee into two parts: a `base fee` and a `priority fee`. The `base fee` is calculated by the network each block to accurately price each resource at a given point in time. Whatever amount greater than the base fee is burnt is treated as the `priority fee` to prioritize faster transaction inclusion.
## Specification
We introduce the multidimensional scheme first and then how to apply the dynamic fee update rule for each fee dimension. Finally we list the new block verification rules, valid once the new fee scheme activates.
### Multidimensional scheme components
We define four fee dimensions, `Bandwidth`, `Reads`, `Writes`, `Compute`, to describe transactions complexity. In more details:
- `Bandwidth` measures the transaction size in bytes, as encoded by the AvalancheGo codec. Byte length is a proxy for the network resources needed to disseminate the transaction.
- `Reads` measures the number of DB reads needed to verify the transactions. DB reads include UTXOs reads and any other state quantity relevant for the specific transaction.
- `Writes` measures the number of DB writes following the transaction verification. DB writes include UTXOs generated as outputs of the transactions and any other state quantity relevant for the specific transaction.
- `Compute` measures the number of signatures to be verified, including UTXOs ones and those related to authorization of specific operations.
For each fee dimension $i$, we define:
- *fee rate* $r_i$ as the price, denominated in AVAX, to be paid for a transaction with complexity $u_i$ along the fee dimension $i$.
- *base fee* as the minimal fee needed to accept a transaction. Base fee is given be the formula
$$base \ fee = \sum_{i=0}^3 r_i \times u_i$$
- *priority fee* as an optional fee paid on top of the base fee to speed up the transaction inclusion in a block.
### Dynamic scheme components
Fee rates are updated in time, to allow a fee increase when network is getting congested. Each new block is a potential source of congestion, as its transactions carry complexity that each validator must process to verify and eventually accept the block. The more complexity carries a block, and the more rapidly blocks are produced, the higher the congestion.
We seek a scheme that rapidly increases the fees when blocks complexity goes above a defined threshold and that equally rapidly decreases the fees once complexity goes down (because blocks carry less/simpler transactions, or because they are produced more slowly). We define the desired threshold as a *target complexity rate* $T$: we would want to process every second a block whose complexity is $T$. Any complexity more than that causes some congestion that we want to penalize via fees.
In order to update fees rates we track, per each block and each fee dimension, a parameter called cumulative excess complexity. Fee rates applied to a block will be defined in terms of cumulative excess complexity as we show in the following.
Suppose that a block $B_t$ is the current chain tip. $B_t$ has the following features:
- $t$ is its timestamp.
- $\Delta C_t$ is the cumulative excess complexity along fee dimension $i$.
Say a new block $B_{t + \Delta T}$ is built on top of $B$, with the following features:
- $t + \Delta T$ is its timestamp
- $C_{t + \Delta T}$ is its complexity along fee dimension $i$.
Then the fee rate $r_{t + \Delta T}$ applied for the block $B_{t + \Delta T}$ along dimension $i$ will be:
$$ r_{t + \Delta T} = r^{min} \times e^{\frac{max(0, \Delta C_t - T \times \Delta T)}{Denom}} $$
where
- $r^{min}$ is the minimal fee rate along fee dimension $i$
- $T$ is the target complexity rate along fee dimension $i$
- $Denom$ is a normalization constant for the fee dimension $i$
Moreover, once the block $B_{t + \Delta T}$ is accepted, the cumulative excess complexity is updated as follows:
$$\Delta C_{t + \Delta T} = max\large(0, \Delta C_{t} - T \times \Delta T\large) + C_{t + \Delta T}$$
The fee rate update formula guarantees that fee rates increase if incoming blocks are complex (large $C_{t + \Delta T}$) and if blocks are emitted rapidly (small $\Delta T$). Symmetrically, fee rates decrease to the minimum if incoming blocks are less complex and if blocks are produced less frequently.
The update formula has a few paramenters to be tuned, independently, for each fee dimension. We defer discussion about tuning to the [implementation section](#tuning-the-update-formula).
## Block verification rules
Upon activation of the dynamic multidimensional fees scheme we modify block processing as follows:
- **Bound block complexity**. For each fee dimension $i$, we define a *maximal block complexity* $Max$. A block is only valid if the block complexity $C$ is less than the maximum block complexity: $C \leq Max$.
- **Verify transaction fee**. When verifying each transaction in a block, we confirm that it can cover its own base fee. Note that both base fee and optional priority fees are burned.
## User Experience
### How will the wallets estimate the fees?
AvalancheGo nodes will provide new APIs exposing the current and expected fee rates, as they are likely to change block by block. Wallets can then use the fees rates to select UTXOs to pay the transaction fees. Moreover, the AvalancheGo implementation proposed above offers a `fees.Calculator` struct that can be reused by wallets and downstream projects to evaluate calculate fees.
### How will wallets be able to re-issue Txs at a higher fee?
Wallets should be able to simply re-issue the transaction since current AvalancheGo implementation drops mempool transactions whose fee rate is lower than current one. More specifically, a transaction may be valid the moment it enters the mempool and it won’t be re-verified as long as it stays in there. However, as soon as the transaction is selected to be included in the next block, it is re-verified against the latest preferred tip. If fees are not enough by this time, the transaction is dropped and the wallet can simply re-issue it at a higher fee, or wait for the fee rate to go down. Note that priority fees offer some buffer space against an increase in the fee rate. A transaction paying just the base fee will be evicted from the mempool in the face of a fee rate increase, while a transaction paying some extra priority fee may have enough buffer room to stay valid after some amount of fee increase.
### How does priority fees guarantee a faster block inclusion?
AvalancheGo mempool will be restructured to order transactions by priority fees. Transactions paying priority fees will be selected for block inclusion first, without violating any spend dependency.
## Backwards Compatibility
Modifying the fee scheme for P-Chain and X-Chain requires a mandatory upgrade for activation. Moreover, wallets must be modified to properly handle the new fee scheme once activated.
## Reference Implementation
The implementation is split across multiple PRs:
- P-Chain work is tracked in this issue: [https://github.com/ava-labs/avalanchego/issues/2707](https://github.com/ava-labs/avalanchego/issues/2707)
- X-Chain work is tracked in this issue: [https://github.com/ava-labs/avalanchego/issues/2708](https://github.com/ava-labs/avalanchego/issues/2708)
A very important implementation step is tuning the update formula parameters for each chain and each fee dimension. We show here the principles we followed for tuning and a simulation based on historical data.
### Tuning the update formula
The basic idea is to measure the complexity of blocks already accepted and derive the parameters from it. You can find the historical data in [this repo](https://github.com/abi87/complexities).
To simplify the exposition I am purposefully ignoring chain specifics (like P-chain proposal blocks). We can account for chain specifics while processing the historical data. Here are the principles:
- **Target block complexity rate $T$**: calculate the distribution of block complexity and pick a high enough quantile.
- **Max block complexity $Max$**: this is probably the trickiest parameter to set.
Historically we had [pretty big transactions](https://subnets.avax.network/p-chain/tx/27pjHPRCvd3zaoQUYMesqtkVfZ188uP93zetNSqk3kSH1WjED1) (more than $1.000$ referenced utxos). Setting a max block complexity so high that these big transactions are allowed is akin to setting no complexity cap.
On the other side, we still want to allow, even encourage, UTXO consolidation, so we may want to allow transactions [like this](https://subnets.avax.network/p-chain/tx/2LxyHzbi2AGJ4GAcHXth6pj5DwVLWeVmog2SAfh4WrqSBdENhV).
A principled way to set max block complexity may be the following:
- calculate the target block complexity rate (see previous point)
- calculate the median time elapsed among consecutive blocks
- The product of these two quantities should gives us something like a target block complexity.
- Set the max block complexity to say $\times 50$ the target value.
- **Normalization coefficient $Denom$**: I suggest we size it as follows:
- Find the largest historical peak, i.e. the sequence of consecutive blocks which contained the most complexity in the shortest period of time
- Tune $Denom$ so that it would cause a $\times 10000$ increase in the fee rate for such a peak. This increase would push fees from the milliAVAX we normally pay under stable network condition up to tens of AVAX.
- **Minimal fee rates $r^{min}$**: we could size them so that transactions fees do not change very much with respect to the currently fixed values.
We simulate below how the update formula would behave on an peak period from Avalanche mainnet.
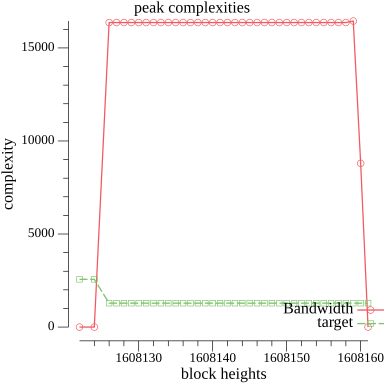 />
/>
 />
/>
Avalanche L1s
Discover how to build sovereign networks with custom rules and token economics.
Data APIs
Access data APIs for the C-Chain, P-Chain, and X-Chain.
Console
Access developer tools, deploy contracts, and manage your blockchain infrastructure.
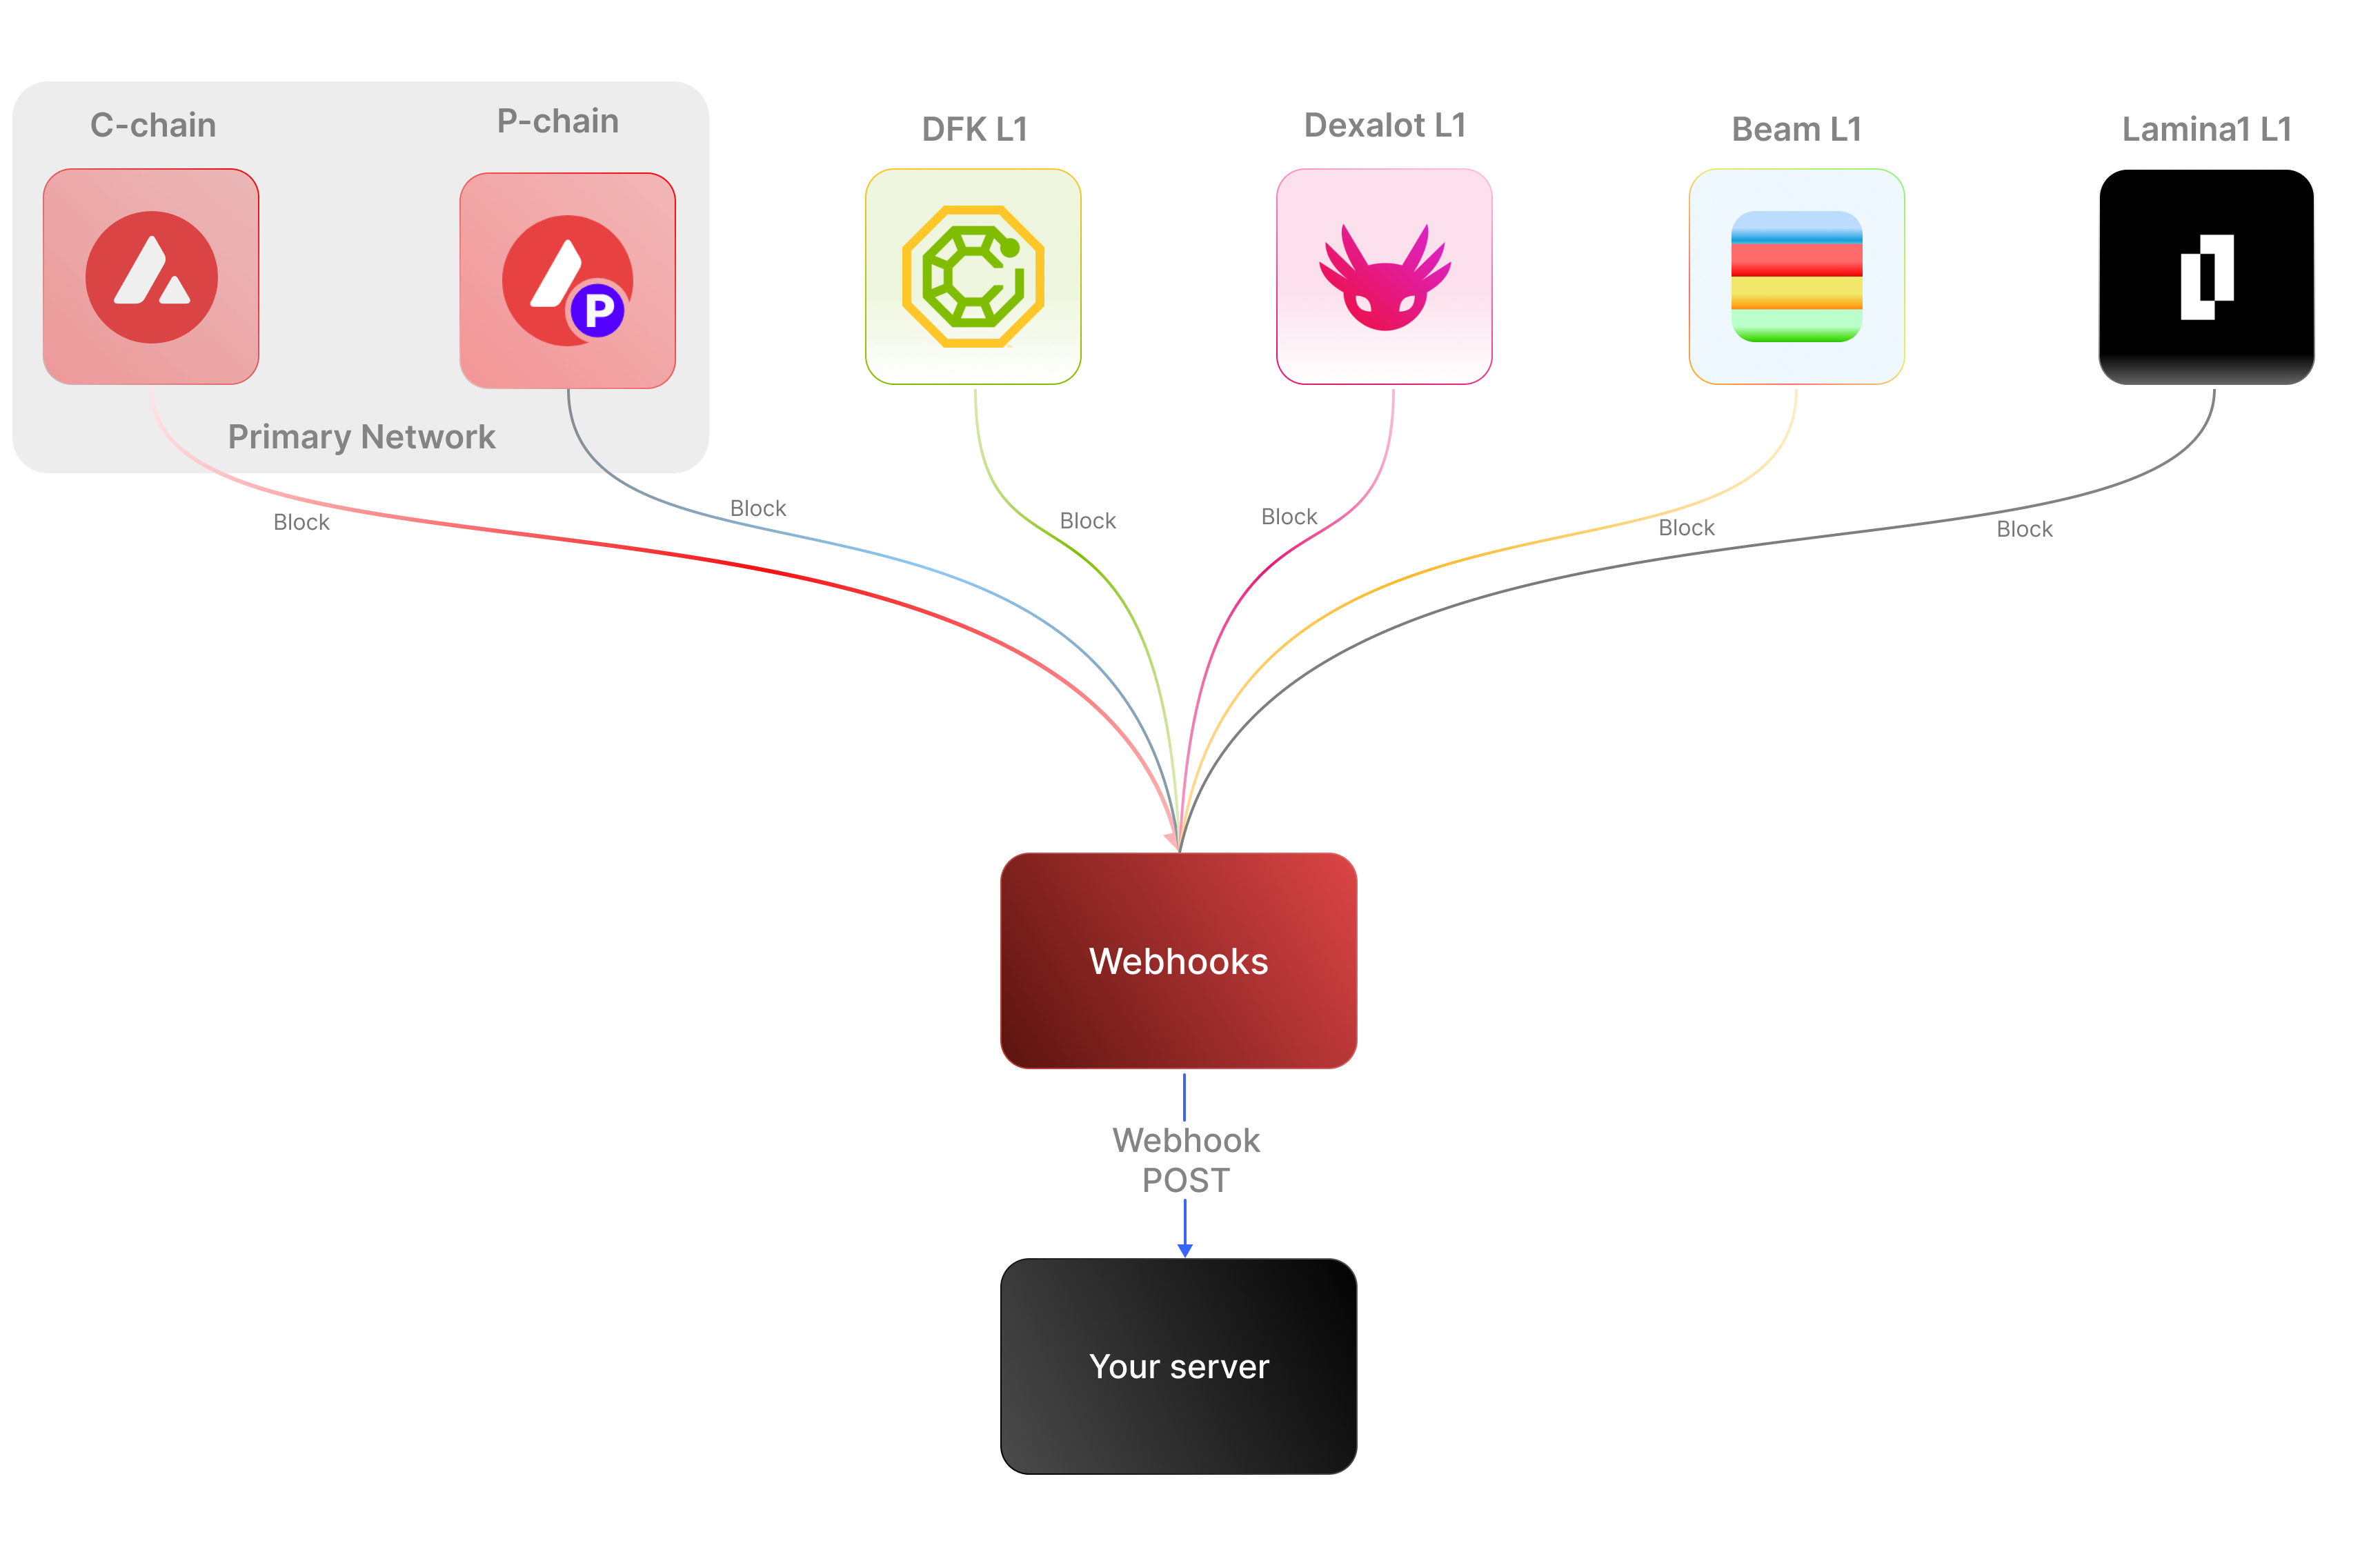 ### Key Features:
* **Real-time notifications:** Receive immediate updates on specified on-chain activities without polling.
* **Customizable:** Specify the desired event type to listen for, customizing notifications based on your individual requirements.
* **Secure:** Employ shared secrets and signature-based verification to ensure that notifications originate from a trusted source.
* **Broad Coverage:**
* **C-chain:** Mainnet and testnet, covering smart contract events, NFT transfers, and wallet-to-wallet transactions.
* **Platform Chain (P and X chains):** Address and validator events, staking activities, and other platform-level transactions.
By supporting both the C-chain and the Platform Chain, you can monitor an even wider range of Avalanche activities.
### Use cases
* **NFT marketplace transactions**: Get alerts for NFT minting, transfers, auctions, bids, sales, and other interactions within NFT marketplaces.
* **Wallet notifications**: Receive alerts when an address performs actions such as sending, receiving, swapping, or burning assets.
* **DeFi activities**: Receive notifications for various DeFi activities such as liquidity provisioning, yield farming, borrowing, lending, and liquidations.
* **Staking rewards:** Get real-time notifications when a validator stakes, receives delegation, or earns staking rewards on the P-Chain, enabling seamless monitoring of validator earnings and participation.
## APIs for continuous polling vs. Webhooks for events data
The following example uses the address activity webhook topic to illustrate the difference between polling an API for wallet event data versus subscribing to a webhook topic to receive wallet events.
### Key Features:
* **Real-time notifications:** Receive immediate updates on specified on-chain activities without polling.
* **Customizable:** Specify the desired event type to listen for, customizing notifications based on your individual requirements.
* **Secure:** Employ shared secrets and signature-based verification to ensure that notifications originate from a trusted source.
* **Broad Coverage:**
* **C-chain:** Mainnet and testnet, covering smart contract events, NFT transfers, and wallet-to-wallet transactions.
* **Platform Chain (P and X chains):** Address and validator events, staking activities, and other platform-level transactions.
By supporting both the C-chain and the Platform Chain, you can monitor an even wider range of Avalanche activities.
### Use cases
* **NFT marketplace transactions**: Get alerts for NFT minting, transfers, auctions, bids, sales, and other interactions within NFT marketplaces.
* **Wallet notifications**: Receive alerts when an address performs actions such as sending, receiving, swapping, or burning assets.
* **DeFi activities**: Receive notifications for various DeFi activities such as liquidity provisioning, yield farming, borrowing, lending, and liquidations.
* **Staking rewards:** Get real-time notifications when a validator stakes, receives delegation, or earns staking rewards on the P-Chain, enabling seamless monitoring of validator earnings and participation.
## APIs for continuous polling vs. Webhooks for events data
The following example uses the address activity webhook topic to illustrate the difference between polling an API for wallet event data versus subscribing to a webhook topic to receive wallet events.
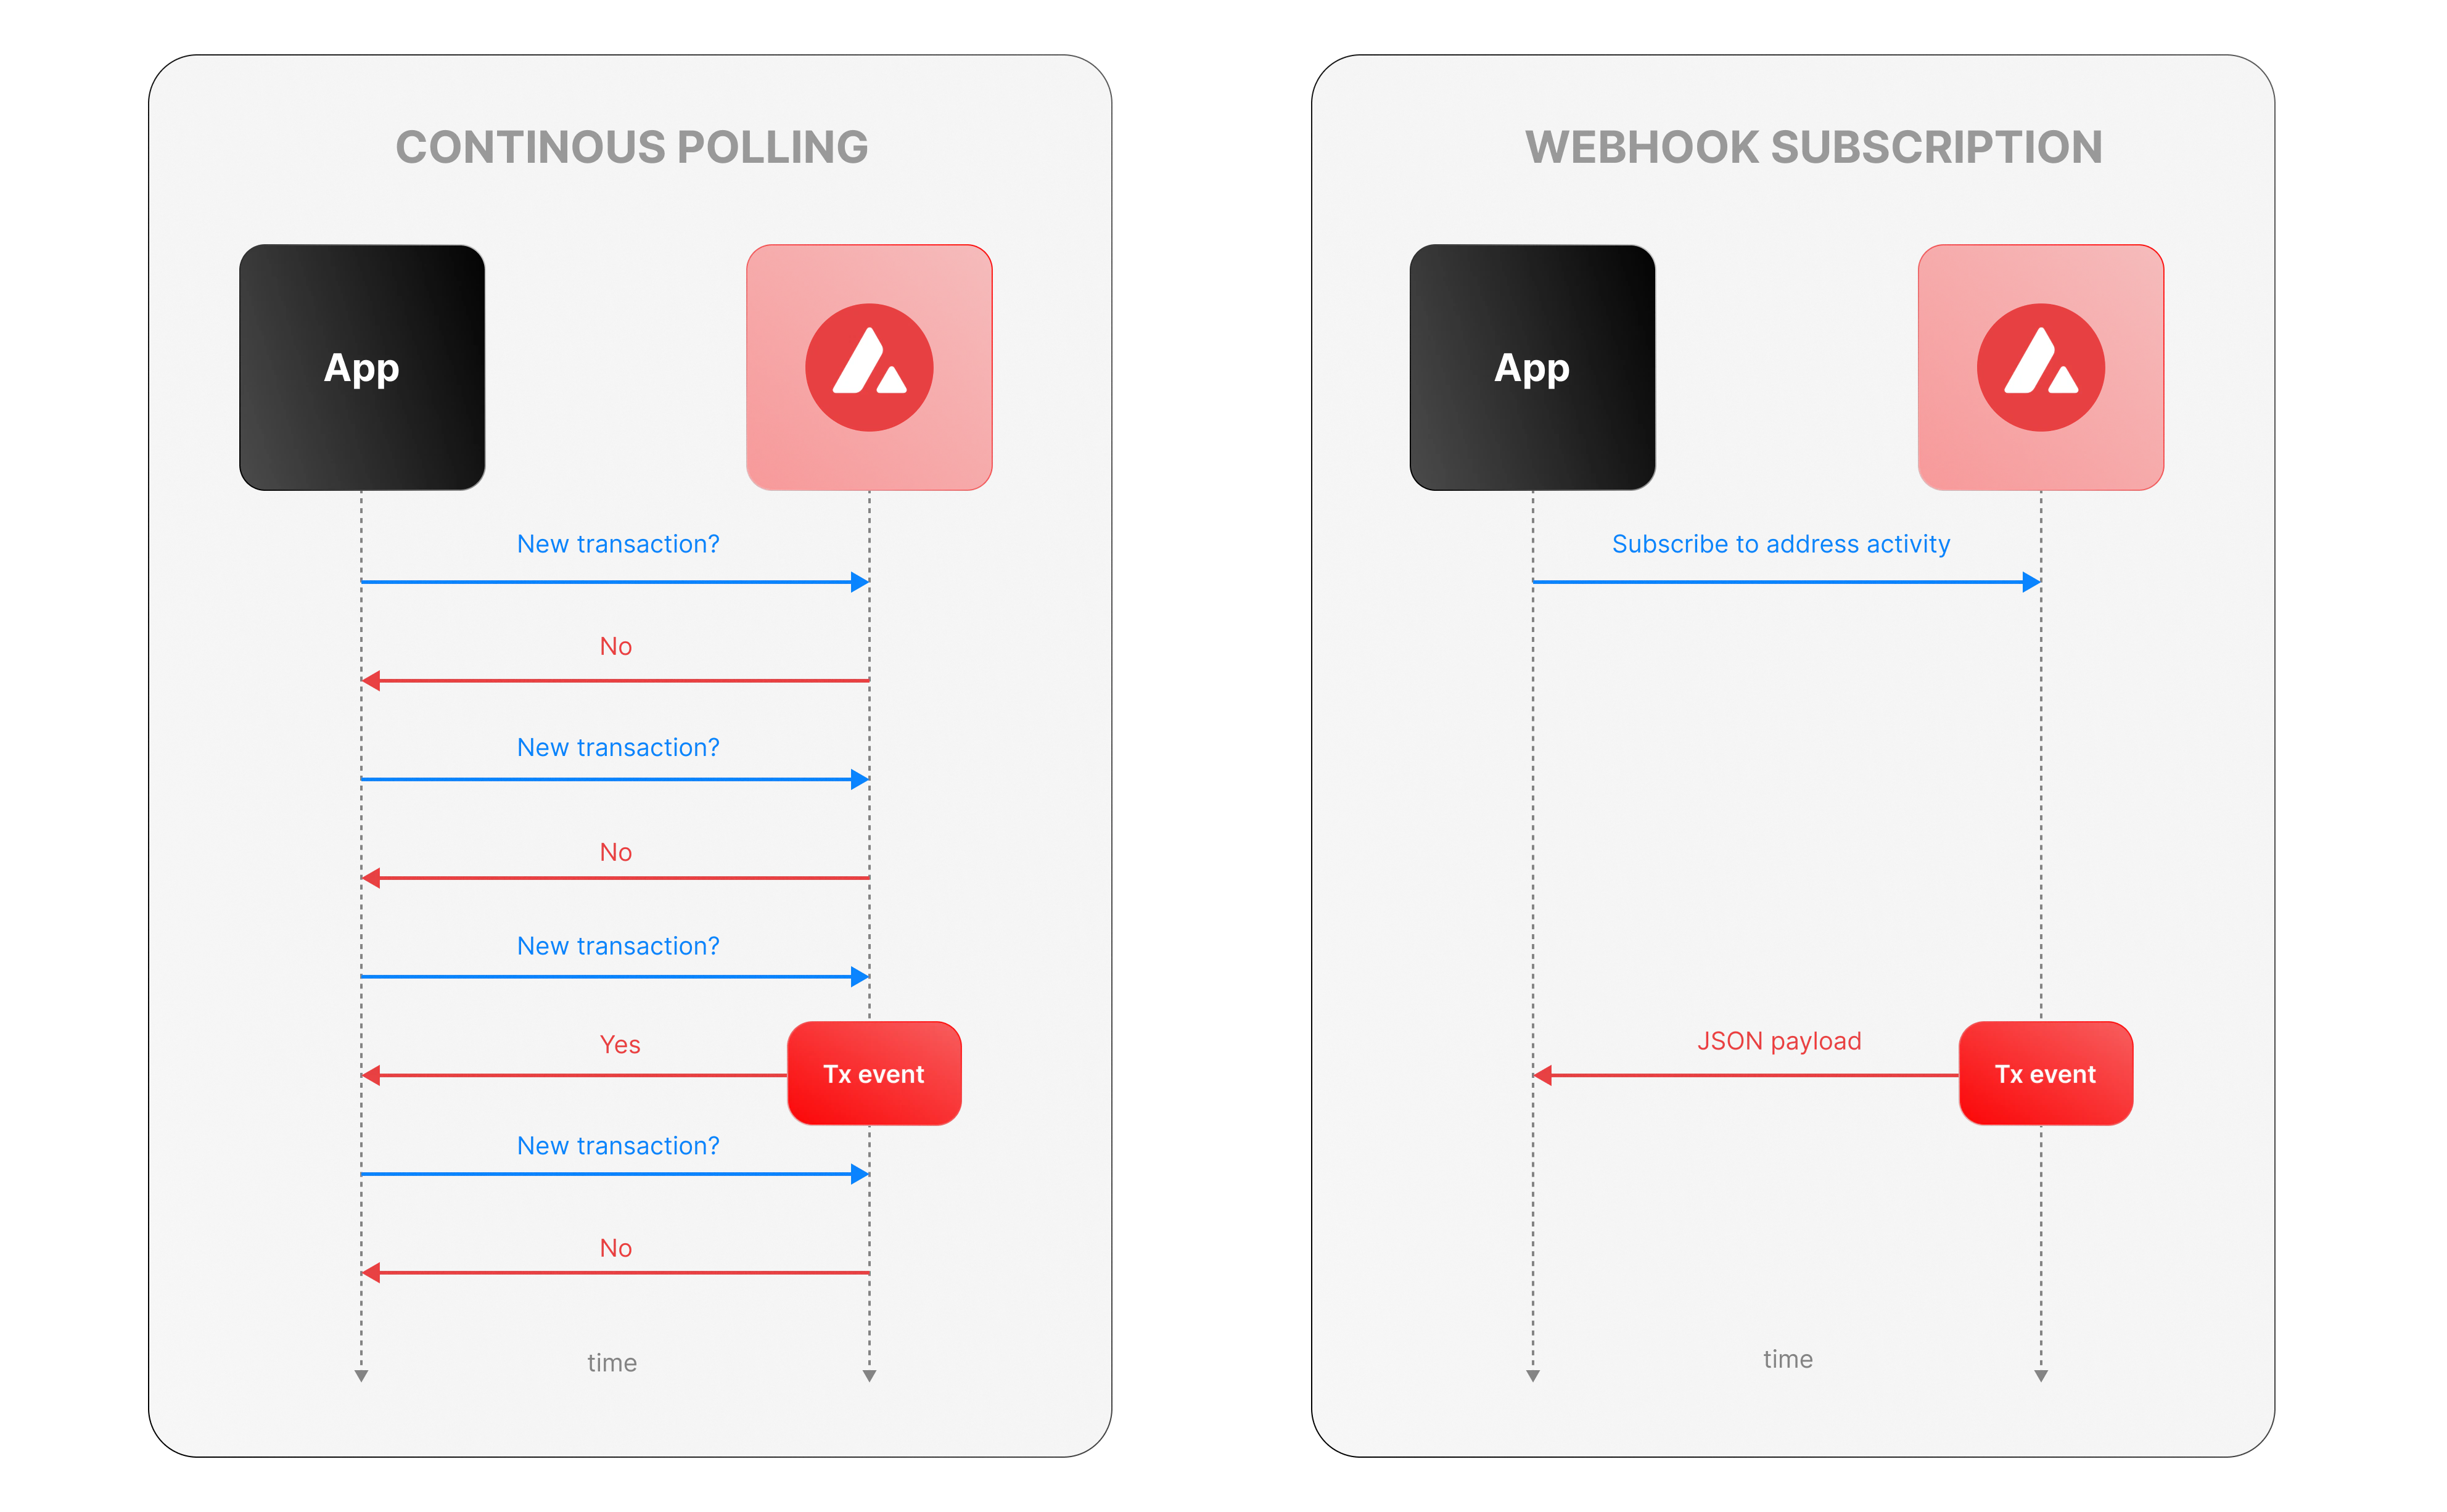 ### Continous polling
Continuous polling is a method where your application repeatedly sends requests to an API at fixed intervals to check for new data or events. Think of it like checking your mailbox every five minutes to see if new mail has arrived, whether or not anything is there.
* You want to track new transactions for a specific wallet.
* Your application calls an API every few seconds (e.g., every 5 seconds) with a query like, “Are there any new transactions for this wallet since my last check?”
* The API responds with either new transaction data or a confirmation that nothing has changed.
**Downsides of continuous polling**
* **Inefficiency:** Your app makes requests even when no new transactions occur, wasting computational resources, bandwidth, and potentially incurring higher API costs.
For example, if no transactions happen for an hour, your app still sends hundreds of unnecessary requests.
* **Delayed updates:**
Since polling happens at set intervals, there’s a potential delay in detecting events. If a transaction occurs just after a poll, your app won’t know until the next check—up to 5 seconds later in our example.
This lag can be critical for time-sensitive applications, like trading or notifications.
* **Scalability challenges:** Monitoring one wallet might be manageable, but if you’re tracking dozens or hundreds of wallets, the number of requests multiplies quickly.
### Webhook subscription
Webhooks are an event-driven alternative where your application subscribes to specific events, and the Avalanche service notifies you instantly when those events occur. It’s like signing up for a delivery alert—when the package (event) arrives, you get a text message right away, instead of checking the tracking site repeatedly.
* Your app registers a webhook specifying an endpoint (e.g., `https://your-app.com/webhooks/transactions`) and the event type (e.g., `address_activity`).
* When a new transaction occurs we send a POST request to your endpoint with the transaction details.
* Your app receives the data only when something happens, with no need to ask repeatedly.
**Benefits of Avalanche webhooks**
* **Real-Time updates:** Notifications arrive the moment a transaction is processed, eliminating delays inherent in polling. This is ideal for applications needing immediate responses, like alerting users or triggering automated actions.
* **Efficiency:** Your app doesn’t waste resources making requests when there’s no new data. Data flows only when events occur. This reduces server load, bandwidth usage, and API call quotas.
* **Scalability:** You can subscribe to events for multiple wallets or event types (e.g., transactions, smart contract calls) without increasing the number of requests your app makes. We handle the event detection and delivery, so your app scales effortlessly as monitoring needs grow.
## Event payload structure
The Event structure always begins with the following parameters:
```json theme={null}
{
"webhookId": "6d1bd383-aa8d-47b5-b793-da6d8a115fde",
"eventType": "address_activity",
"messageId": "8e4e7284-852a-478b-b425-27631c8d22d2",
"event": {
}
}
```
**Parameters:**
* `webhookId`: Unique identifier for the webhook in your account.
* `eventType`: The event that caused the webhook to be triggered. In the future, there will be multiple types of events, for the time being only the address\_activity event is supported. The address\_activity event gets triggered whenever the specified addresses participate in a token or AVAX transaction.
* `messageId`: Unique identifier per event sent.
* `event`: Event payload. It contains details about the transaction, logs, and traces. By default logs and internal transactions are not included, if you want to include them use `"includeLogs": true`, and `"includeInternalTxs": true`.
### Address Activity webhook
The address activity webhook allows you to track any interaction with an address (any address). Here is an example of this type of event:
```json theme={null}
{
"webhookId": "263942d1-74a4-4416-aeb4-948b9b9bb7cc",
"eventType": "address_activity",
"messageId": "94df1881-5d93-49d1-a1bd-607830608de2",
"event": {
"transaction": {
"blockHash": "0xbd093536009f7dd785e9a5151d80069a93cc322f8b2df63d373865af4f6ee5be",
"blockNumber": "44568834",
"from": "0xf73166f0c75a3DF444fAbdFDC7e5EE4a73fA51C7",
"gas": "651108",
"gasPrice": "31466275484",
"maxFeePerGas": "31466275484",
"maxPriorityFeePerGas": "31466275484",
"txHash": "0xf6a791920652e87ccc91d2f1b20c1505a94452b88f359acdeb5a6fa8205638c4",
"txStatus": "1",
"input": "0xb80c2f090000000000000000000000000000000000000000000000000000000000000000000000000000000000000000eeeeeeeeeeeeeeeeeeeeeeeeeeeeeeeeeeeeeeee000000000000000000000000b97ef9ef8734c71904d8002f8b6bc66dd9c48a6e000000000000000000000000000000000000000000000000006ca0c737b131f2000000000000000000000000000000000000000000000000000000000011554e000000000000000000000000000000000000000000000000000000006627dadc0000000000000000000000000000000000000000000000000000000000000120000000000000000000000000000000000000000000000000000000000000016000000000000000000000000000000000000000000000000000000000000004600000000000000000000000000000000000000000000000000000000000000001000000000000000000000000000000000000000000000000006ca0c737b131f2000000000000000000000000000000000000000000000000000000000000000100000000000000000000000000000000000000000000000000000000000000200000000000000000000000000000000000000000000000000000000000000001000000000000000000000000000000000000000000000000000000000000002000000000000000000000000000000000000000000000000000000000000000a000000000000000000000000000000000000000000000000000000000000000e000000000000000000000000000000000000000000000000000000000000001200000000000000000000000000000000000000000000000000000000000000160000000000000000000000000b31f66aa3c1e785363f0875a1b74e27b85fd66c70000000000000000000000000000000000000000000000000000000000000001000000000000000000000000be882fb094143b59dc5335d32cecb711570ebdd40000000000000000000000000000000000000000000000000000000000000001000000000000000000000000be882fb094143b59dc5335d32cecb711570ebdd400000000000000000000000000000000000000000000000000000000000000010000000000000000000027100e663593657b064e1bae76d28625df5d0ebd44210000000000000000000000000000000000000000000000000000000000000001000000000000000000000000000000000000000000000000000000000000002000000000000000000000000000000000000000000000000000000000000000c0000000000000000000000000000000000000000000000000000000000000000000000000000000000000000000000000000000000000000000000000000000400000000000000000000000000000000000000000000000000000000000000060000000000000000000000000b31f66aa3c1e785363f0875a1b74e27b85fd66c7000000000000000000000000b97ef9ef8734c71904d8002f8b6bc66dd9c48a6e0000000000000000000000000000000000000000000000000000000000000bb80000000000000000000000000000000000000000000000000000000000000000",
"nonce": "4",
"to": "0x1dac23e41fc8ce857e86fd8c1ae5b6121c67d96d",
"transactionIndex": 0,
"value": "30576074978046450",
"type": 0,
"chainId": "43114",
"receiptCumulativeGasUsed": "212125",
"receiptGasUsed": "212125",
"receiptEffectiveGasPrice": "31466275484",
"receiptRoot": "0xf355b81f3e76392e1b4926429d6abf8ec24601cc3d36d0916de3113aa80dd674",
"erc20Transfers": [
{
"transactionHash": "0xf6a791920652e87ccc91d2f1b20c1505a94452b88f359acdeb5a6fa8205638c4",
"type": "ERC20",
"from": "0x1daC23e41Fc8ce857E86fD8C1AE5b6121C67D96d",
"to": "0xbe882fb094143B59Dc5335D32cEcB711570EbDD4",
"value": "30576074978046450",
"blockTimestamp": 1713884373,
"logIndex": 2,
"erc20Token": {
"address": "0xB31f66AA3C1e785363F0875A1B74E27b85FD66c7",
"name": "Wrapped AVAX",
"symbol": "WAVAX",
"decimals": 18,
"valueWithDecimals": "0.030576074978046448"
}
},
{
"transactionHash": "0xf6a791920652e87ccc91d2f1b20c1505a94452b88f359acdeb5a6fa8205638c4",
"type": "ERC20",
"from": "0x0E663593657B064e1baE76d28625Df5D0eBd4421",
"to": "0xf73166f0c75a3DF444fAbdFDC7e5EE4a73fA51C7",
"value": "1195737",
"blockTimestamp": 1713884373,
"logIndex": 3,
"erc20Token": {
"address": "0xB97EF9Ef8734C71904D8002F8b6Bc66Dd9c48a6E",
"name": "USD Coin",
"symbol": "USDC",
"decimals": 6,
"valueWithDecimals": "1.195737"
}
},
{
"transactionHash": "0xf6a791920652e87ccc91d2f1b20c1505a94452b88f359acdeb5a6fa8205638c4",
"type": "ERC20",
"from": "0xbe882fb094143B59Dc5335D32cEcB711570EbDD4",
"to": "0x0E663593657B064e1baE76d28625Df5D0eBd4421",
"value": "30576074978046450",
"blockTimestamp": 1713884373,
"logIndex": 4,
"erc20Token": {
"address": "0xB31f66AA3C1e785363F0875A1B74E27b85FD66c7",
"name": "Wrapped AVAX",
"symbol": "WAVAX",
"decimals": 18,
"valueWithDecimals": "0.030576074978046448"
}
}
],
"erc721Transfers": [],
"erc1155Transfers": [],
"internalTransactions": [
{
"from": "0xf73166f0c75a3DF444fAbdFDC7e5EE4a73fA51C7",
"to": "0x1daC23e41Fc8ce857E86fD8C1AE5b6121C67D96d",
"internalTxType": "CALL",
"value": "30576074978046450",
"gasUsed": "212125",
"gasLimit": "651108",
"transactionHash": "0xf6a791920652e87ccc91d2f1b20c1505a94452b88f359acdeb5a6fa8205638c4"
},
{
"from": "0x1daC23e41Fc8ce857E86fD8C1AE5b6121C67D96d",
"to": "0xF2781Bb34B6f6Bb9a6B5349b24de91487E653119",
"internalTxType": "DELEGATECALL",
"value": "30576074978046450",
"gasUsed": "176417",
"gasLimit": "605825",
"transactionHash": "0xf6a791920652e87ccc91d2f1b20c1505a94452b88f359acdeb5a6fa8205638c4"
},
{
"from": "0x1daC23e41Fc8ce857E86fD8C1AE5b6121C67D96d",
"to": "0xB97EF9Ef8734C71904D8002F8b6Bc66Dd9c48a6E",
"internalTxType": "STATICCALL",
"value": "0",
"gasUsed": "9750",
"gasLimit": "585767",
"transactionHash": "0xf6a791920652e87ccc91d2f1b20c1505a94452b88f359acdeb5a6fa8205638c4"
},
{
"from": "0xB97EF9Ef8734C71904D8002F8b6Bc66Dd9c48a6E",
"to": "0x30DFE0469803BcE76F8F62aC24b18d33D3d6FfE6",
"internalTxType": "DELEGATECALL",
"value": "0",
"gasUsed": "2553",
"gasLimit": "569571",
"transactionHash": "0xf6a791920652e87ccc91d2f1b20c1505a94452b88f359acdeb5a6fa8205638c4"
},
{
"from": "0x1daC23e41Fc8ce857E86fD8C1AE5b6121C67D96d",
"to": "0xB31f66AA3C1e785363F0875A1B74E27b85FD66c7",
"internalTxType": "CALL",
"value": "30576074978046450",
"gasUsed": "23878",
"gasLimit": "566542",
"transactionHash": "0xf6a791920652e87ccc91d2f1b20c1505a94452b88f359acdeb5a6fa8205638c4"
},
{
"from": "0x1daC23e41Fc8ce857E86fD8C1AE5b6121C67D96d",
"to": "0xB31f66AA3C1e785363F0875A1B74E27b85FD66c7",
"internalTxType": "CALL",
"value": "0",
"gasUsed": "25116",
"gasLimit": "540114",
"transactionHash": "0xf6a791920652e87ccc91d2f1b20c1505a94452b88f359acdeb5a6fa8205638c4"
},
{
"from": "0x1daC23e41Fc8ce857E86fD8C1AE5b6121C67D96d",
"to": "0xbe882fb094143B59Dc5335D32cEcB711570EbDD4",
"internalTxType": "CALL",
"value": "0",
"gasUsed": "81496",
"gasLimit": "511279",
"transactionHash": "0xf6a791920652e87ccc91d2f1b20c1505a94452b88f359acdeb5a6fa8205638c4"
},
{
"from": "0xbe882fb094143B59Dc5335D32cEcB711570EbDD4",
"to": "0xB31f66AA3C1e785363F0875A1B74E27b85FD66c7",
"internalTxType": "STATICCALL",
"value": "0",
"gasUsed": "491",
"gasLimit": "501085",
"transactionHash": "0xf6a791920652e87ccc91d2f1b20c1505a94452b88f359acdeb5a6fa8205638c4"
},
{
"from": "0xbe882fb094143B59Dc5335D32cEcB711570EbDD4",
"to": "0x0E663593657B064e1baE76d28625Df5D0eBd4421",
"internalTxType": "CALL",
"value": "0",
"gasUsed": "74900",
"gasLimit": "497032",
"transactionHash": "0xf6a791920652e87ccc91d2f1b20c1505a94452b88f359acdeb5a6fa8205638c4"
},
{
"from": "0x0E663593657B064e1baE76d28625Df5D0eBd4421",
"to": "0xB97EF9Ef8734C71904D8002F8b6Bc66Dd9c48a6E",
"internalTxType": "CALL",
"value": "0",
"gasUsed": "32063",
"gasLimit": "463431",
"transactionHash": "0xf6a791920652e87ccc91d2f1b20c1505a94452b88f359acdeb5a6fa8205638c4"
},
{
"from": "0xB97EF9Ef8734C71904D8002F8b6Bc66Dd9c48a6E",
"to": "0x30DFE0469803BcE76F8F62aC24b18d33D3d6FfE6",
"internalTxType": "DELEGATECALL",
"value": "0",
"gasUsed": "31363",
"gasLimit": "455542",
"transactionHash": "0xf6a791920652e87ccc91d2f1b20c1505a94452b88f359acdeb5a6fa8205638c4"
},
{
"from": "0x0E663593657B064e1baE76d28625Df5D0eBd4421",
"to": "0xB31f66AA3C1e785363F0875A1B74E27b85FD66c7",
"internalTxType": "STATICCALL",
"value": "0",
"gasUsed": "2491",
"gasLimit": "430998",
"transactionHash": "0xf6a791920652e87ccc91d2f1b20c1505a94452b88f359acdeb5a6fa8205638c4"
},
{
"from": "0x0E663593657B064e1baE76d28625Df5D0eBd4421",
"to": "0xbe882fb094143B59Dc5335D32cEcB711570EbDD4",
"internalTxType": "CALL",
"value": "0",
"gasUsed": "7591",
"gasLimit": "427775",
"transactionHash": "0xf6a791920652e87ccc91d2f1b20c1505a94452b88f359acdeb5a6fa8205638c4"
},
{
"from": "0xbe882fb094143B59Dc5335D32cEcB711570EbDD4",
"to": "0xB31f66AA3C1e785363F0875A1B74E27b85FD66c7",
"internalTxType": "CALL",
"value": "0",
"gasUsed": "6016",
"gasLimit": "419746",
"transactionHash": "0xf6a791920652e87ccc91d2f1b20c1505a94452b88f359acdeb5a6fa8205638c4"
},
{
"from": "0x0E663593657B064e1baE76d28625Df5D0eBd4421",
"to": "0xB31f66AA3C1e785363F0875A1B74E27b85FD66c7",
"internalTxType": "STATICCALL",
"value": "0",
"gasUsed": "491",
"gasLimit": "419670",
"transactionHash": "0xf6a791920652e87ccc91d2f1b20c1505a94452b88f359acdeb5a6fa8205638c4"
},
{
"from": "0x1daC23e41Fc8ce857E86fD8C1AE5b6121C67D96d",
"to": "0xB97EF9Ef8734C71904D8002F8b6Bc66Dd9c48a6E",
"internalTxType": "STATICCALL",
"value": "0",
"gasUsed": "3250",
"gasLimit": "430493",
"transactionHash": "0xf6a791920652e87ccc91d2f1b20c1505a94452b88f359acdeb5a6fa8205638c4"
},
{
"from": "0xB97EF9Ef8734C71904D8002F8b6Bc66Dd9c48a6E",
"to": "0x30DFE0469803BcE76F8F62aC24b18d33D3d6FfE6",
"internalTxType": "DELEGATECALL",
"value": "0",
"gasUsed": "2553",
"gasLimit": "423121",
"transactionHash": "0xf6a791920652e87ccc91d2f1b20c1505a94452b88f359acdeb5a6fa8205638c4"
},
{
"from": "0x1daC23e41Fc8ce857E86fD8C1AE5b6121C67D96d",
"to": "0xB97EF9Ef8734C71904D8002F8b6Bc66Dd9c48a6E",
"internalTxType": "STATICCALL",
"value": "0",
"gasUsed": "1250",
"gasLimit": "426766",
"transactionHash": "0xf6a791920652e87ccc91d2f1b20c1505a94452b88f359acdeb5a6fa8205638c4"
},
{
"from": "0xB97EF9Ef8734C71904D8002F8b6Bc66Dd9c48a6E",
"to": "0x30DFE0469803BcE76F8F62aC24b18d33D3d6FfE6",
"internalTxType": "DELEGATECALL",
"value": "0",
"gasUsed": "553",
"gasLimit": "419453",
"transactionHash": "0xf6a791920652e87ccc91d2f1b20c1505a94452b88f359acdeb5a6fa8205638c4"
}
],
"blockTimestamp": 1713884373
}
}
}
```
# Rate Limits (/docs/api-reference/webhook-api/rate-limits)
---
title: Rate Limits
description: Rate Limits for the Webhooks API
icon: Clock
---
Rate limiting is managed through a weighted scoring system, known as Compute Units (CUs). Each API request consumes a specified number of CUs, determined by the complexity of the request. This system is designed to accommodate basic requests while efficiently handling more computationally intensive operations.
## Rate Limit Tiers
The maximum CUs (rate-limiting score) for a user depends on their subscription level and is delineated in the following table:
| Subscription Level | Per Minute Limit (CUs) | Per Day Limit (CUs) |
| :----------------- | :--------------------- | :------------------ |
| Unauthenticated | 6,000 | 1,200,000 |
| Free | 8,000 | 2,000,000 |
| Base | 10,000 | 3,750,000 |
| Growth | 14,000 | 11,200,000 |
| Pro | 20,000 | 25,000,000 |
To update your subscription level use the [AvaCloud Portal](https://app.avacloud.io/)
### Continous polling
Continuous polling is a method where your application repeatedly sends requests to an API at fixed intervals to check for new data or events. Think of it like checking your mailbox every five minutes to see if new mail has arrived, whether or not anything is there.
* You want to track new transactions for a specific wallet.
* Your application calls an API every few seconds (e.g., every 5 seconds) with a query like, “Are there any new transactions for this wallet since my last check?”
* The API responds with either new transaction data or a confirmation that nothing has changed.
**Downsides of continuous polling**
* **Inefficiency:** Your app makes requests even when no new transactions occur, wasting computational resources, bandwidth, and potentially incurring higher API costs.
For example, if no transactions happen for an hour, your app still sends hundreds of unnecessary requests.
* **Delayed updates:**
Since polling happens at set intervals, there’s a potential delay in detecting events. If a transaction occurs just after a poll, your app won’t know until the next check—up to 5 seconds later in our example.
This lag can be critical for time-sensitive applications, like trading or notifications.
* **Scalability challenges:** Monitoring one wallet might be manageable, but if you’re tracking dozens or hundreds of wallets, the number of requests multiplies quickly.
### Webhook subscription
Webhooks are an event-driven alternative where your application subscribes to specific events, and the Avalanche service notifies you instantly when those events occur. It’s like signing up for a delivery alert—when the package (event) arrives, you get a text message right away, instead of checking the tracking site repeatedly.
* Your app registers a webhook specifying an endpoint (e.g., `https://your-app.com/webhooks/transactions`) and the event type (e.g., `address_activity`).
* When a new transaction occurs we send a POST request to your endpoint with the transaction details.
* Your app receives the data only when something happens, with no need to ask repeatedly.
**Benefits of Avalanche webhooks**
* **Real-Time updates:** Notifications arrive the moment a transaction is processed, eliminating delays inherent in polling. This is ideal for applications needing immediate responses, like alerting users or triggering automated actions.
* **Efficiency:** Your app doesn’t waste resources making requests when there’s no new data. Data flows only when events occur. This reduces server load, bandwidth usage, and API call quotas.
* **Scalability:** You can subscribe to events for multiple wallets or event types (e.g., transactions, smart contract calls) without increasing the number of requests your app makes. We handle the event detection and delivery, so your app scales effortlessly as monitoring needs grow.
## Event payload structure
The Event structure always begins with the following parameters:
```json theme={null}
{
"webhookId": "6d1bd383-aa8d-47b5-b793-da6d8a115fde",
"eventType": "address_activity",
"messageId": "8e4e7284-852a-478b-b425-27631c8d22d2",
"event": {
}
}
```
**Parameters:**
* `webhookId`: Unique identifier for the webhook in your account.
* `eventType`: The event that caused the webhook to be triggered. In the future, there will be multiple types of events, for the time being only the address\_activity event is supported. The address\_activity event gets triggered whenever the specified addresses participate in a token or AVAX transaction.
* `messageId`: Unique identifier per event sent.
* `event`: Event payload. It contains details about the transaction, logs, and traces. By default logs and internal transactions are not included, if you want to include them use `"includeLogs": true`, and `"includeInternalTxs": true`.
### Address Activity webhook
The address activity webhook allows you to track any interaction with an address (any address). Here is an example of this type of event:
```json theme={null}
{
"webhookId": "263942d1-74a4-4416-aeb4-948b9b9bb7cc",
"eventType": "address_activity",
"messageId": "94df1881-5d93-49d1-a1bd-607830608de2",
"event": {
"transaction": {
"blockHash": "0xbd093536009f7dd785e9a5151d80069a93cc322f8b2df63d373865af4f6ee5be",
"blockNumber": "44568834",
"from": "0xf73166f0c75a3DF444fAbdFDC7e5EE4a73fA51C7",
"gas": "651108",
"gasPrice": "31466275484",
"maxFeePerGas": "31466275484",
"maxPriorityFeePerGas": "31466275484",
"txHash": "0xf6a791920652e87ccc91d2f1b20c1505a94452b88f359acdeb5a6fa8205638c4",
"txStatus": "1",
"input": "0xb80c2f090000000000000000000000000000000000000000000000000000000000000000000000000000000000000000eeeeeeeeeeeeeeeeeeeeeeeeeeeeeeeeeeeeeeee000000000000000000000000b97ef9ef8734c71904d8002f8b6bc66dd9c48a6e000000000000000000000000000000000000000000000000006ca0c737b131f2000000000000000000000000000000000000000000000000000000000011554e000000000000000000000000000000000000000000000000000000006627dadc0000000000000000000000000000000000000000000000000000000000000120000000000000000000000000000000000000000000000000000000000000016000000000000000000000000000000000000000000000000000000000000004600000000000000000000000000000000000000000000000000000000000000001000000000000000000000000000000000000000000000000006ca0c737b131f2000000000000000000000000000000000000000000000000000000000000000100000000000000000000000000000000000000000000000000000000000000200000000000000000000000000000000000000000000000000000000000000001000000000000000000000000000000000000000000000000000000000000002000000000000000000000000000000000000000000000000000000000000000a000000000000000000000000000000000000000000000000000000000000000e000000000000000000000000000000000000000000000000000000000000001200000000000000000000000000000000000000000000000000000000000000160000000000000000000000000b31f66aa3c1e785363f0875a1b74e27b85fd66c70000000000000000000000000000000000000000000000000000000000000001000000000000000000000000be882fb094143b59dc5335d32cecb711570ebdd40000000000000000000000000000000000000000000000000000000000000001000000000000000000000000be882fb094143b59dc5335d32cecb711570ebdd400000000000000000000000000000000000000000000000000000000000000010000000000000000000027100e663593657b064e1bae76d28625df5d0ebd44210000000000000000000000000000000000000000000000000000000000000001000000000000000000000000000000000000000000000000000000000000002000000000000000000000000000000000000000000000000000000000000000c0000000000000000000000000000000000000000000000000000000000000000000000000000000000000000000000000000000000000000000000000000000400000000000000000000000000000000000000000000000000000000000000060000000000000000000000000b31f66aa3c1e785363f0875a1b74e27b85fd66c7000000000000000000000000b97ef9ef8734c71904d8002f8b6bc66dd9c48a6e0000000000000000000000000000000000000000000000000000000000000bb80000000000000000000000000000000000000000000000000000000000000000",
"nonce": "4",
"to": "0x1dac23e41fc8ce857e86fd8c1ae5b6121c67d96d",
"transactionIndex": 0,
"value": "30576074978046450",
"type": 0,
"chainId": "43114",
"receiptCumulativeGasUsed": "212125",
"receiptGasUsed": "212125",
"receiptEffectiveGasPrice": "31466275484",
"receiptRoot": "0xf355b81f3e76392e1b4926429d6abf8ec24601cc3d36d0916de3113aa80dd674",
"erc20Transfers": [
{
"transactionHash": "0xf6a791920652e87ccc91d2f1b20c1505a94452b88f359acdeb5a6fa8205638c4",
"type": "ERC20",
"from": "0x1daC23e41Fc8ce857E86fD8C1AE5b6121C67D96d",
"to": "0xbe882fb094143B59Dc5335D32cEcB711570EbDD4",
"value": "30576074978046450",
"blockTimestamp": 1713884373,
"logIndex": 2,
"erc20Token": {
"address": "0xB31f66AA3C1e785363F0875A1B74E27b85FD66c7",
"name": "Wrapped AVAX",
"symbol": "WAVAX",
"decimals": 18,
"valueWithDecimals": "0.030576074978046448"
}
},
{
"transactionHash": "0xf6a791920652e87ccc91d2f1b20c1505a94452b88f359acdeb5a6fa8205638c4",
"type": "ERC20",
"from": "0x0E663593657B064e1baE76d28625Df5D0eBd4421",
"to": "0xf73166f0c75a3DF444fAbdFDC7e5EE4a73fA51C7",
"value": "1195737",
"blockTimestamp": 1713884373,
"logIndex": 3,
"erc20Token": {
"address": "0xB97EF9Ef8734C71904D8002F8b6Bc66Dd9c48a6E",
"name": "USD Coin",
"symbol": "USDC",
"decimals": 6,
"valueWithDecimals": "1.195737"
}
},
{
"transactionHash": "0xf6a791920652e87ccc91d2f1b20c1505a94452b88f359acdeb5a6fa8205638c4",
"type": "ERC20",
"from": "0xbe882fb094143B59Dc5335D32cEcB711570EbDD4",
"to": "0x0E663593657B064e1baE76d28625Df5D0eBd4421",
"value": "30576074978046450",
"blockTimestamp": 1713884373,
"logIndex": 4,
"erc20Token": {
"address": "0xB31f66AA3C1e785363F0875A1B74E27b85FD66c7",
"name": "Wrapped AVAX",
"symbol": "WAVAX",
"decimals": 18,
"valueWithDecimals": "0.030576074978046448"
}
}
],
"erc721Transfers": [],
"erc1155Transfers": [],
"internalTransactions": [
{
"from": "0xf73166f0c75a3DF444fAbdFDC7e5EE4a73fA51C7",
"to": "0x1daC23e41Fc8ce857E86fD8C1AE5b6121C67D96d",
"internalTxType": "CALL",
"value": "30576074978046450",
"gasUsed": "212125",
"gasLimit": "651108",
"transactionHash": "0xf6a791920652e87ccc91d2f1b20c1505a94452b88f359acdeb5a6fa8205638c4"
},
{
"from": "0x1daC23e41Fc8ce857E86fD8C1AE5b6121C67D96d",
"to": "0xF2781Bb34B6f6Bb9a6B5349b24de91487E653119",
"internalTxType": "DELEGATECALL",
"value": "30576074978046450",
"gasUsed": "176417",
"gasLimit": "605825",
"transactionHash": "0xf6a791920652e87ccc91d2f1b20c1505a94452b88f359acdeb5a6fa8205638c4"
},
{
"from": "0x1daC23e41Fc8ce857E86fD8C1AE5b6121C67D96d",
"to": "0xB97EF9Ef8734C71904D8002F8b6Bc66Dd9c48a6E",
"internalTxType": "STATICCALL",
"value": "0",
"gasUsed": "9750",
"gasLimit": "585767",
"transactionHash": "0xf6a791920652e87ccc91d2f1b20c1505a94452b88f359acdeb5a6fa8205638c4"
},
{
"from": "0xB97EF9Ef8734C71904D8002F8b6Bc66Dd9c48a6E",
"to": "0x30DFE0469803BcE76F8F62aC24b18d33D3d6FfE6",
"internalTxType": "DELEGATECALL",
"value": "0",
"gasUsed": "2553",
"gasLimit": "569571",
"transactionHash": "0xf6a791920652e87ccc91d2f1b20c1505a94452b88f359acdeb5a6fa8205638c4"
},
{
"from": "0x1daC23e41Fc8ce857E86fD8C1AE5b6121C67D96d",
"to": "0xB31f66AA3C1e785363F0875A1B74E27b85FD66c7",
"internalTxType": "CALL",
"value": "30576074978046450",
"gasUsed": "23878",
"gasLimit": "566542",
"transactionHash": "0xf6a791920652e87ccc91d2f1b20c1505a94452b88f359acdeb5a6fa8205638c4"
},
{
"from": "0x1daC23e41Fc8ce857E86fD8C1AE5b6121C67D96d",
"to": "0xB31f66AA3C1e785363F0875A1B74E27b85FD66c7",
"internalTxType": "CALL",
"value": "0",
"gasUsed": "25116",
"gasLimit": "540114",
"transactionHash": "0xf6a791920652e87ccc91d2f1b20c1505a94452b88f359acdeb5a6fa8205638c4"
},
{
"from": "0x1daC23e41Fc8ce857E86fD8C1AE5b6121C67D96d",
"to": "0xbe882fb094143B59Dc5335D32cEcB711570EbDD4",
"internalTxType": "CALL",
"value": "0",
"gasUsed": "81496",
"gasLimit": "511279",
"transactionHash": "0xf6a791920652e87ccc91d2f1b20c1505a94452b88f359acdeb5a6fa8205638c4"
},
{
"from": "0xbe882fb094143B59Dc5335D32cEcB711570EbDD4",
"to": "0xB31f66AA3C1e785363F0875A1B74E27b85FD66c7",
"internalTxType": "STATICCALL",
"value": "0",
"gasUsed": "491",
"gasLimit": "501085",
"transactionHash": "0xf6a791920652e87ccc91d2f1b20c1505a94452b88f359acdeb5a6fa8205638c4"
},
{
"from": "0xbe882fb094143B59Dc5335D32cEcB711570EbDD4",
"to": "0x0E663593657B064e1baE76d28625Df5D0eBd4421",
"internalTxType": "CALL",
"value": "0",
"gasUsed": "74900",
"gasLimit": "497032",
"transactionHash": "0xf6a791920652e87ccc91d2f1b20c1505a94452b88f359acdeb5a6fa8205638c4"
},
{
"from": "0x0E663593657B064e1baE76d28625Df5D0eBd4421",
"to": "0xB97EF9Ef8734C71904D8002F8b6Bc66Dd9c48a6E",
"internalTxType": "CALL",
"value": "0",
"gasUsed": "32063",
"gasLimit": "463431",
"transactionHash": "0xf6a791920652e87ccc91d2f1b20c1505a94452b88f359acdeb5a6fa8205638c4"
},
{
"from": "0xB97EF9Ef8734C71904D8002F8b6Bc66Dd9c48a6E",
"to": "0x30DFE0469803BcE76F8F62aC24b18d33D3d6FfE6",
"internalTxType": "DELEGATECALL",
"value": "0",
"gasUsed": "31363",
"gasLimit": "455542",
"transactionHash": "0xf6a791920652e87ccc91d2f1b20c1505a94452b88f359acdeb5a6fa8205638c4"
},
{
"from": "0x0E663593657B064e1baE76d28625Df5D0eBd4421",
"to": "0xB31f66AA3C1e785363F0875A1B74E27b85FD66c7",
"internalTxType": "STATICCALL",
"value": "0",
"gasUsed": "2491",
"gasLimit": "430998",
"transactionHash": "0xf6a791920652e87ccc91d2f1b20c1505a94452b88f359acdeb5a6fa8205638c4"
},
{
"from": "0x0E663593657B064e1baE76d28625Df5D0eBd4421",
"to": "0xbe882fb094143B59Dc5335D32cEcB711570EbDD4",
"internalTxType": "CALL",
"value": "0",
"gasUsed": "7591",
"gasLimit": "427775",
"transactionHash": "0xf6a791920652e87ccc91d2f1b20c1505a94452b88f359acdeb5a6fa8205638c4"
},
{
"from": "0xbe882fb094143B59Dc5335D32cEcB711570EbDD4",
"to": "0xB31f66AA3C1e785363F0875A1B74E27b85FD66c7",
"internalTxType": "CALL",
"value": "0",
"gasUsed": "6016",
"gasLimit": "419746",
"transactionHash": "0xf6a791920652e87ccc91d2f1b20c1505a94452b88f359acdeb5a6fa8205638c4"
},
{
"from": "0x0E663593657B064e1baE76d28625Df5D0eBd4421",
"to": "0xB31f66AA3C1e785363F0875A1B74E27b85FD66c7",
"internalTxType": "STATICCALL",
"value": "0",
"gasUsed": "491",
"gasLimit": "419670",
"transactionHash": "0xf6a791920652e87ccc91d2f1b20c1505a94452b88f359acdeb5a6fa8205638c4"
},
{
"from": "0x1daC23e41Fc8ce857E86fD8C1AE5b6121C67D96d",
"to": "0xB97EF9Ef8734C71904D8002F8b6Bc66Dd9c48a6E",
"internalTxType": "STATICCALL",
"value": "0",
"gasUsed": "3250",
"gasLimit": "430493",
"transactionHash": "0xf6a791920652e87ccc91d2f1b20c1505a94452b88f359acdeb5a6fa8205638c4"
},
{
"from": "0xB97EF9Ef8734C71904D8002F8b6Bc66Dd9c48a6E",
"to": "0x30DFE0469803BcE76F8F62aC24b18d33D3d6FfE6",
"internalTxType": "DELEGATECALL",
"value": "0",
"gasUsed": "2553",
"gasLimit": "423121",
"transactionHash": "0xf6a791920652e87ccc91d2f1b20c1505a94452b88f359acdeb5a6fa8205638c4"
},
{
"from": "0x1daC23e41Fc8ce857E86fD8C1AE5b6121C67D96d",
"to": "0xB97EF9Ef8734C71904D8002F8b6Bc66Dd9c48a6E",
"internalTxType": "STATICCALL",
"value": "0",
"gasUsed": "1250",
"gasLimit": "426766",
"transactionHash": "0xf6a791920652e87ccc91d2f1b20c1505a94452b88f359acdeb5a6fa8205638c4"
},
{
"from": "0xB97EF9Ef8734C71904D8002F8b6Bc66Dd9c48a6E",
"to": "0x30DFE0469803BcE76F8F62aC24b18d33D3d6FfE6",
"internalTxType": "DELEGATECALL",
"value": "0",
"gasUsed": "553",
"gasLimit": "419453",
"transactionHash": "0xf6a791920652e87ccc91d2f1b20c1505a94452b88f359acdeb5a6fa8205638c4"
}
],
"blockTimestamp": 1713884373
}
}
}
```
# Rate Limits (/docs/api-reference/webhook-api/rate-limits)
---
title: Rate Limits
description: Rate Limits for the Webhooks API
icon: Clock
---
Rate limiting is managed through a weighted scoring system, known as Compute Units (CUs). Each API request consumes a specified number of CUs, determined by the complexity of the request. This system is designed to accommodate basic requests while efficiently handling more computationally intensive operations.
## Rate Limit Tiers
The maximum CUs (rate-limiting score) for a user depends on their subscription level and is delineated in the following table:
| Subscription Level | Per Minute Limit (CUs) | Per Day Limit (CUs) |
| :----------------- | :--------------------- | :------------------ |
| Unauthenticated | 6,000 | 1,200,000 |
| Free | 8,000 | 2,000,000 |
| Base | 10,000 | 3,750,000 |
| Growth | 14,000 | 11,200,000 |
| Pro | 20,000 | 25,000,000 |
To update your subscription level use the [AvaCloud Portal](https://app.avacloud.io/)
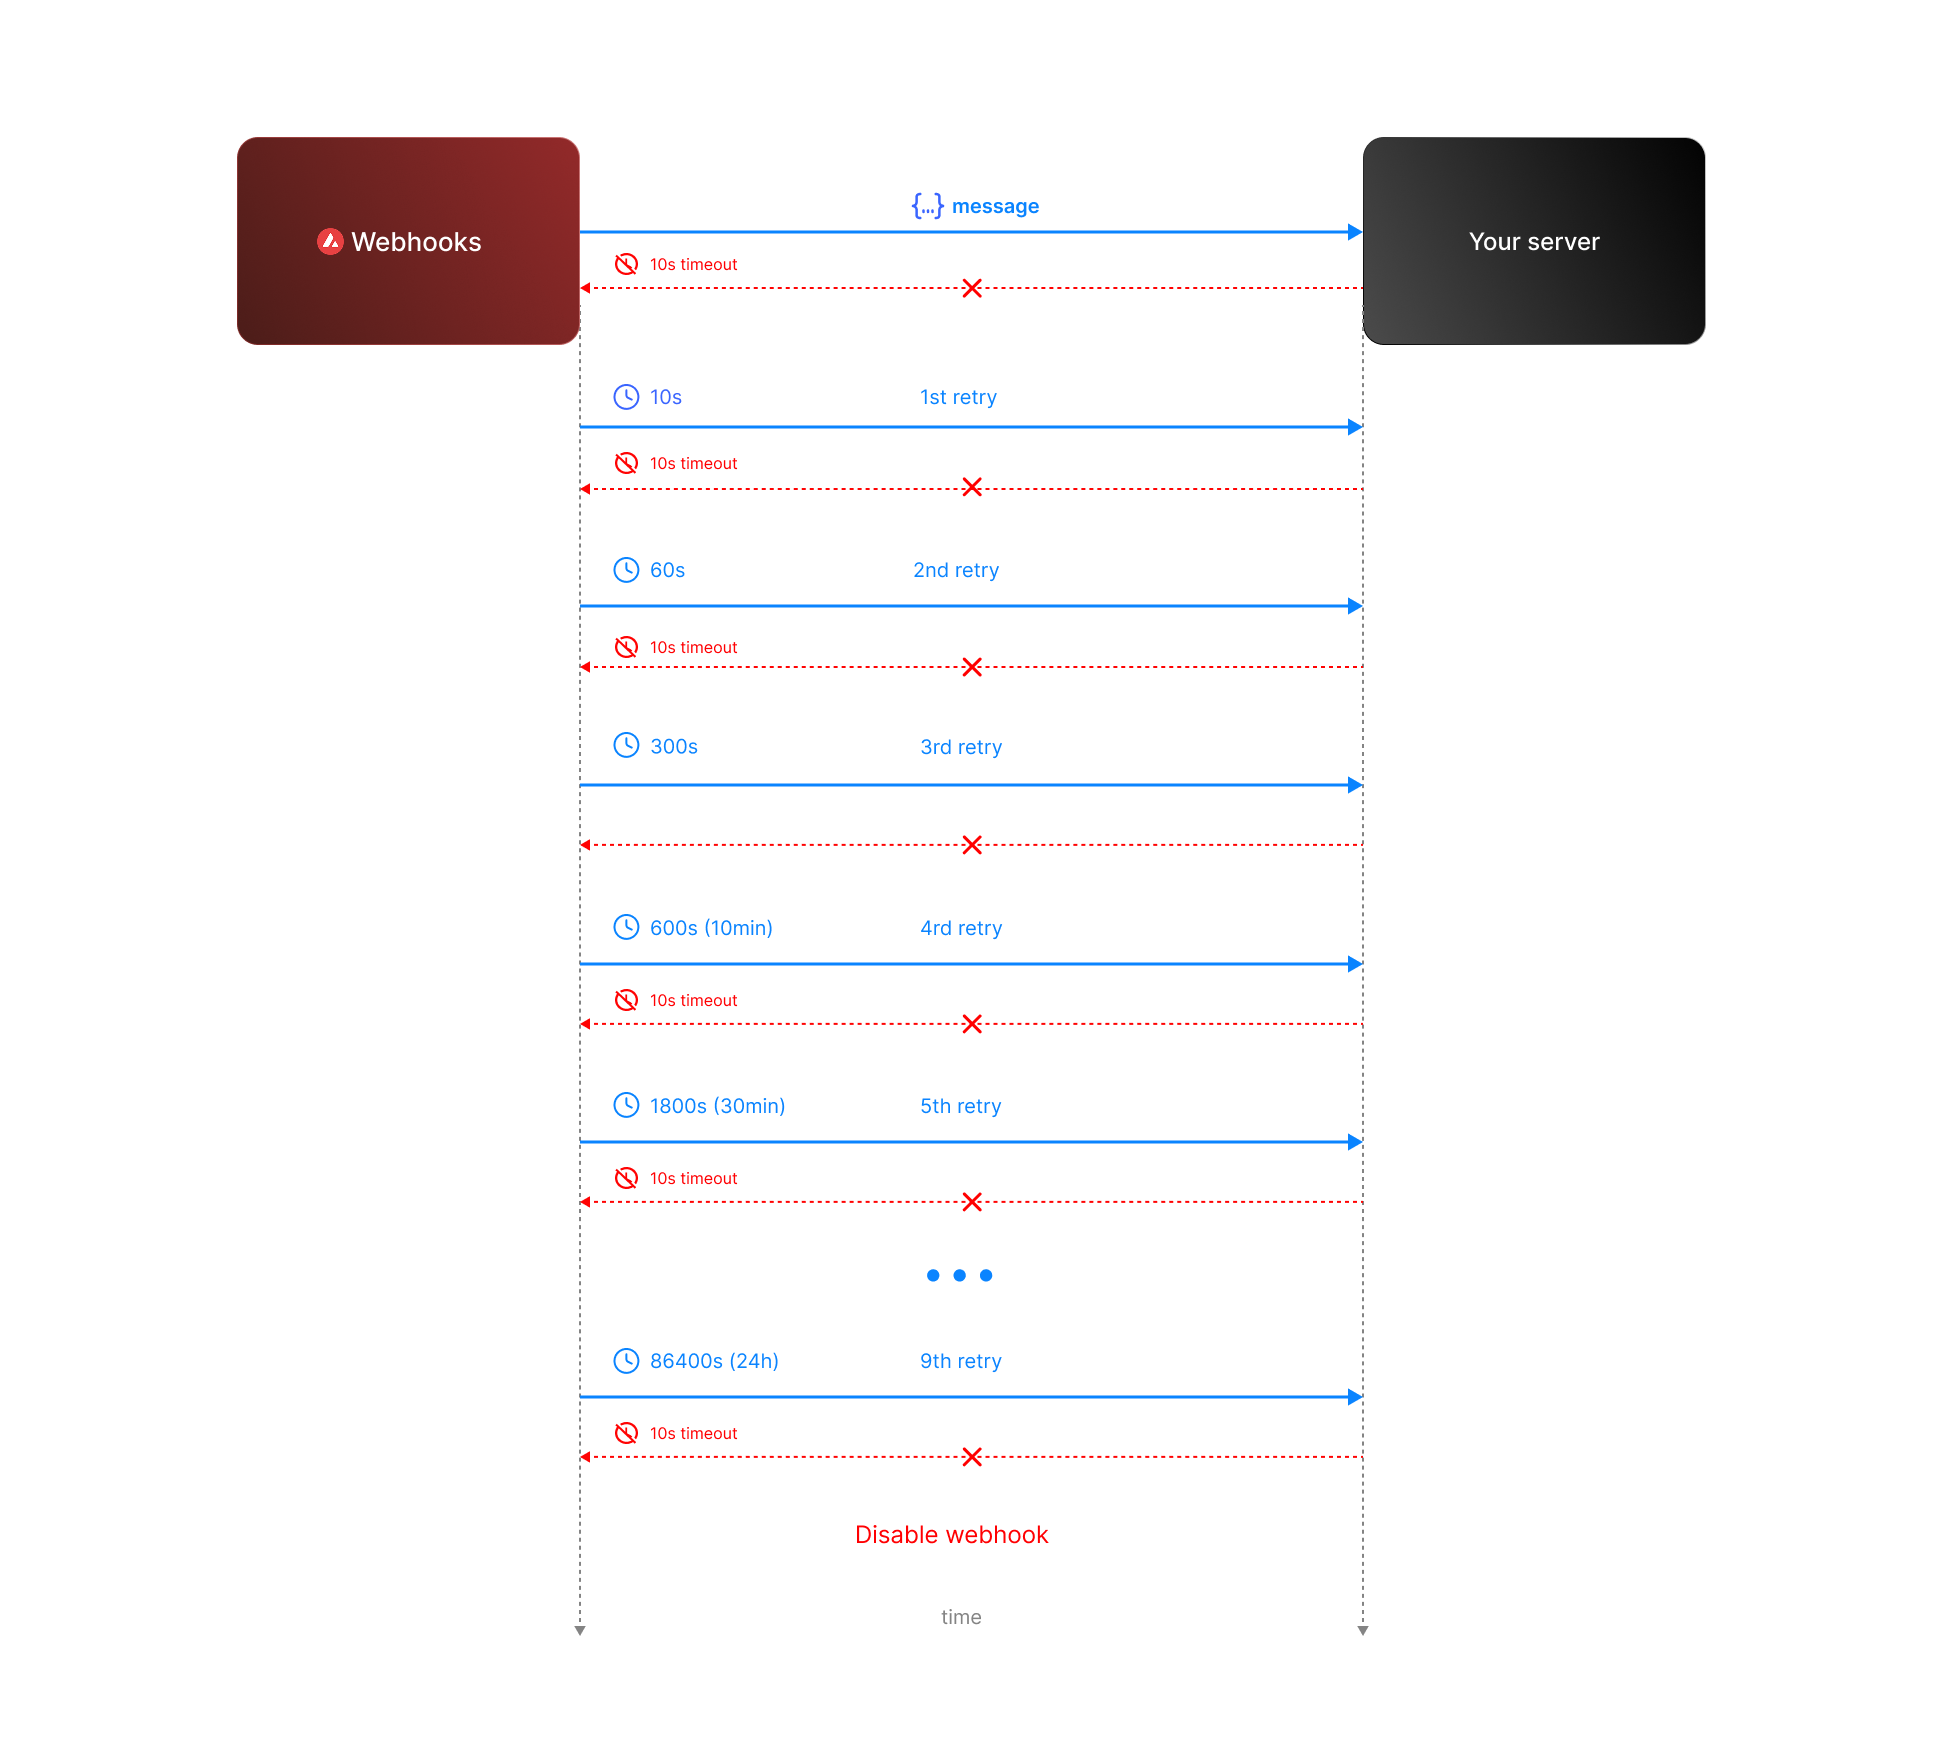 * **Attempt 1:** We send the message expecting a respose with `200` status code. If we do not receive a `200` status code within **10 seconds**, the attempt is considered failed. During this window, any non-`2xx` responses are ignored.
* **Attempt 2:** Occurs **10 seconds** after the first attempt, with another 10-second timeout and the same rule for ignoring non-`2xx` responses.
* **Retry Queue After Two Failed Attempts**
If both initial attempts fail, the message enters a **retry queue** with progressively longer intervals between attempts. Each retry attempt still has a 10-second timeout, and non-`2xx` responses are ignored during this window.
The retry schedule is as follows:
| Attempt | Interval |
| ------- | -------- |
| 3 | 1 min |
| 4 | 5 min |
| 5 | 10 min |
| 6 | 30 min |
| 7 | 2 hours |
| 8 | 6 hours |
| 9 | 12 hours |
| 10 | 24 hours |
**Total Retry Duration:** Up to approximately 44.8 hours (2,688 minutes) if all retries are exhausted.
**Interval Timing:** Each retry interval starts 10 seconds after the previous attempt is deemed failed. For example, if attempt 2 fails at t=20 seconds, attempt 3 will start at t=80 seconds (20s + 1 minute interval + 10s).
* **Attempt 1:** We send the message expecting a respose with `200` status code. If we do not receive a `200` status code within **10 seconds**, the attempt is considered failed. During this window, any non-`2xx` responses are ignored.
* **Attempt 2:** Occurs **10 seconds** after the first attempt, with another 10-second timeout and the same rule for ignoring non-`2xx` responses.
* **Retry Queue After Two Failed Attempts**
If both initial attempts fail, the message enters a **retry queue** with progressively longer intervals between attempts. Each retry attempt still has a 10-second timeout, and non-`2xx` responses are ignored during this window.
The retry schedule is as follows:
| Attempt | Interval |
| ------- | -------- |
| 3 | 1 min |
| 4 | 5 min |
| 5 | 10 min |
| 6 | 30 min |
| 7 | 2 hours |
| 8 | 6 hours |
| 9 | 12 hours |
| 10 | 24 hours |
**Total Retry Duration:** Up to approximately 44.8 hours (2,688 minutes) if all retries are exhausted.
**Interval Timing:** Each retry interval starts 10 seconds after the previous attempt is deemed failed. For example, if attempt 2 fails at t=20 seconds, attempt 3 will start at t=80 seconds (20s + 1 minute interval + 10s).
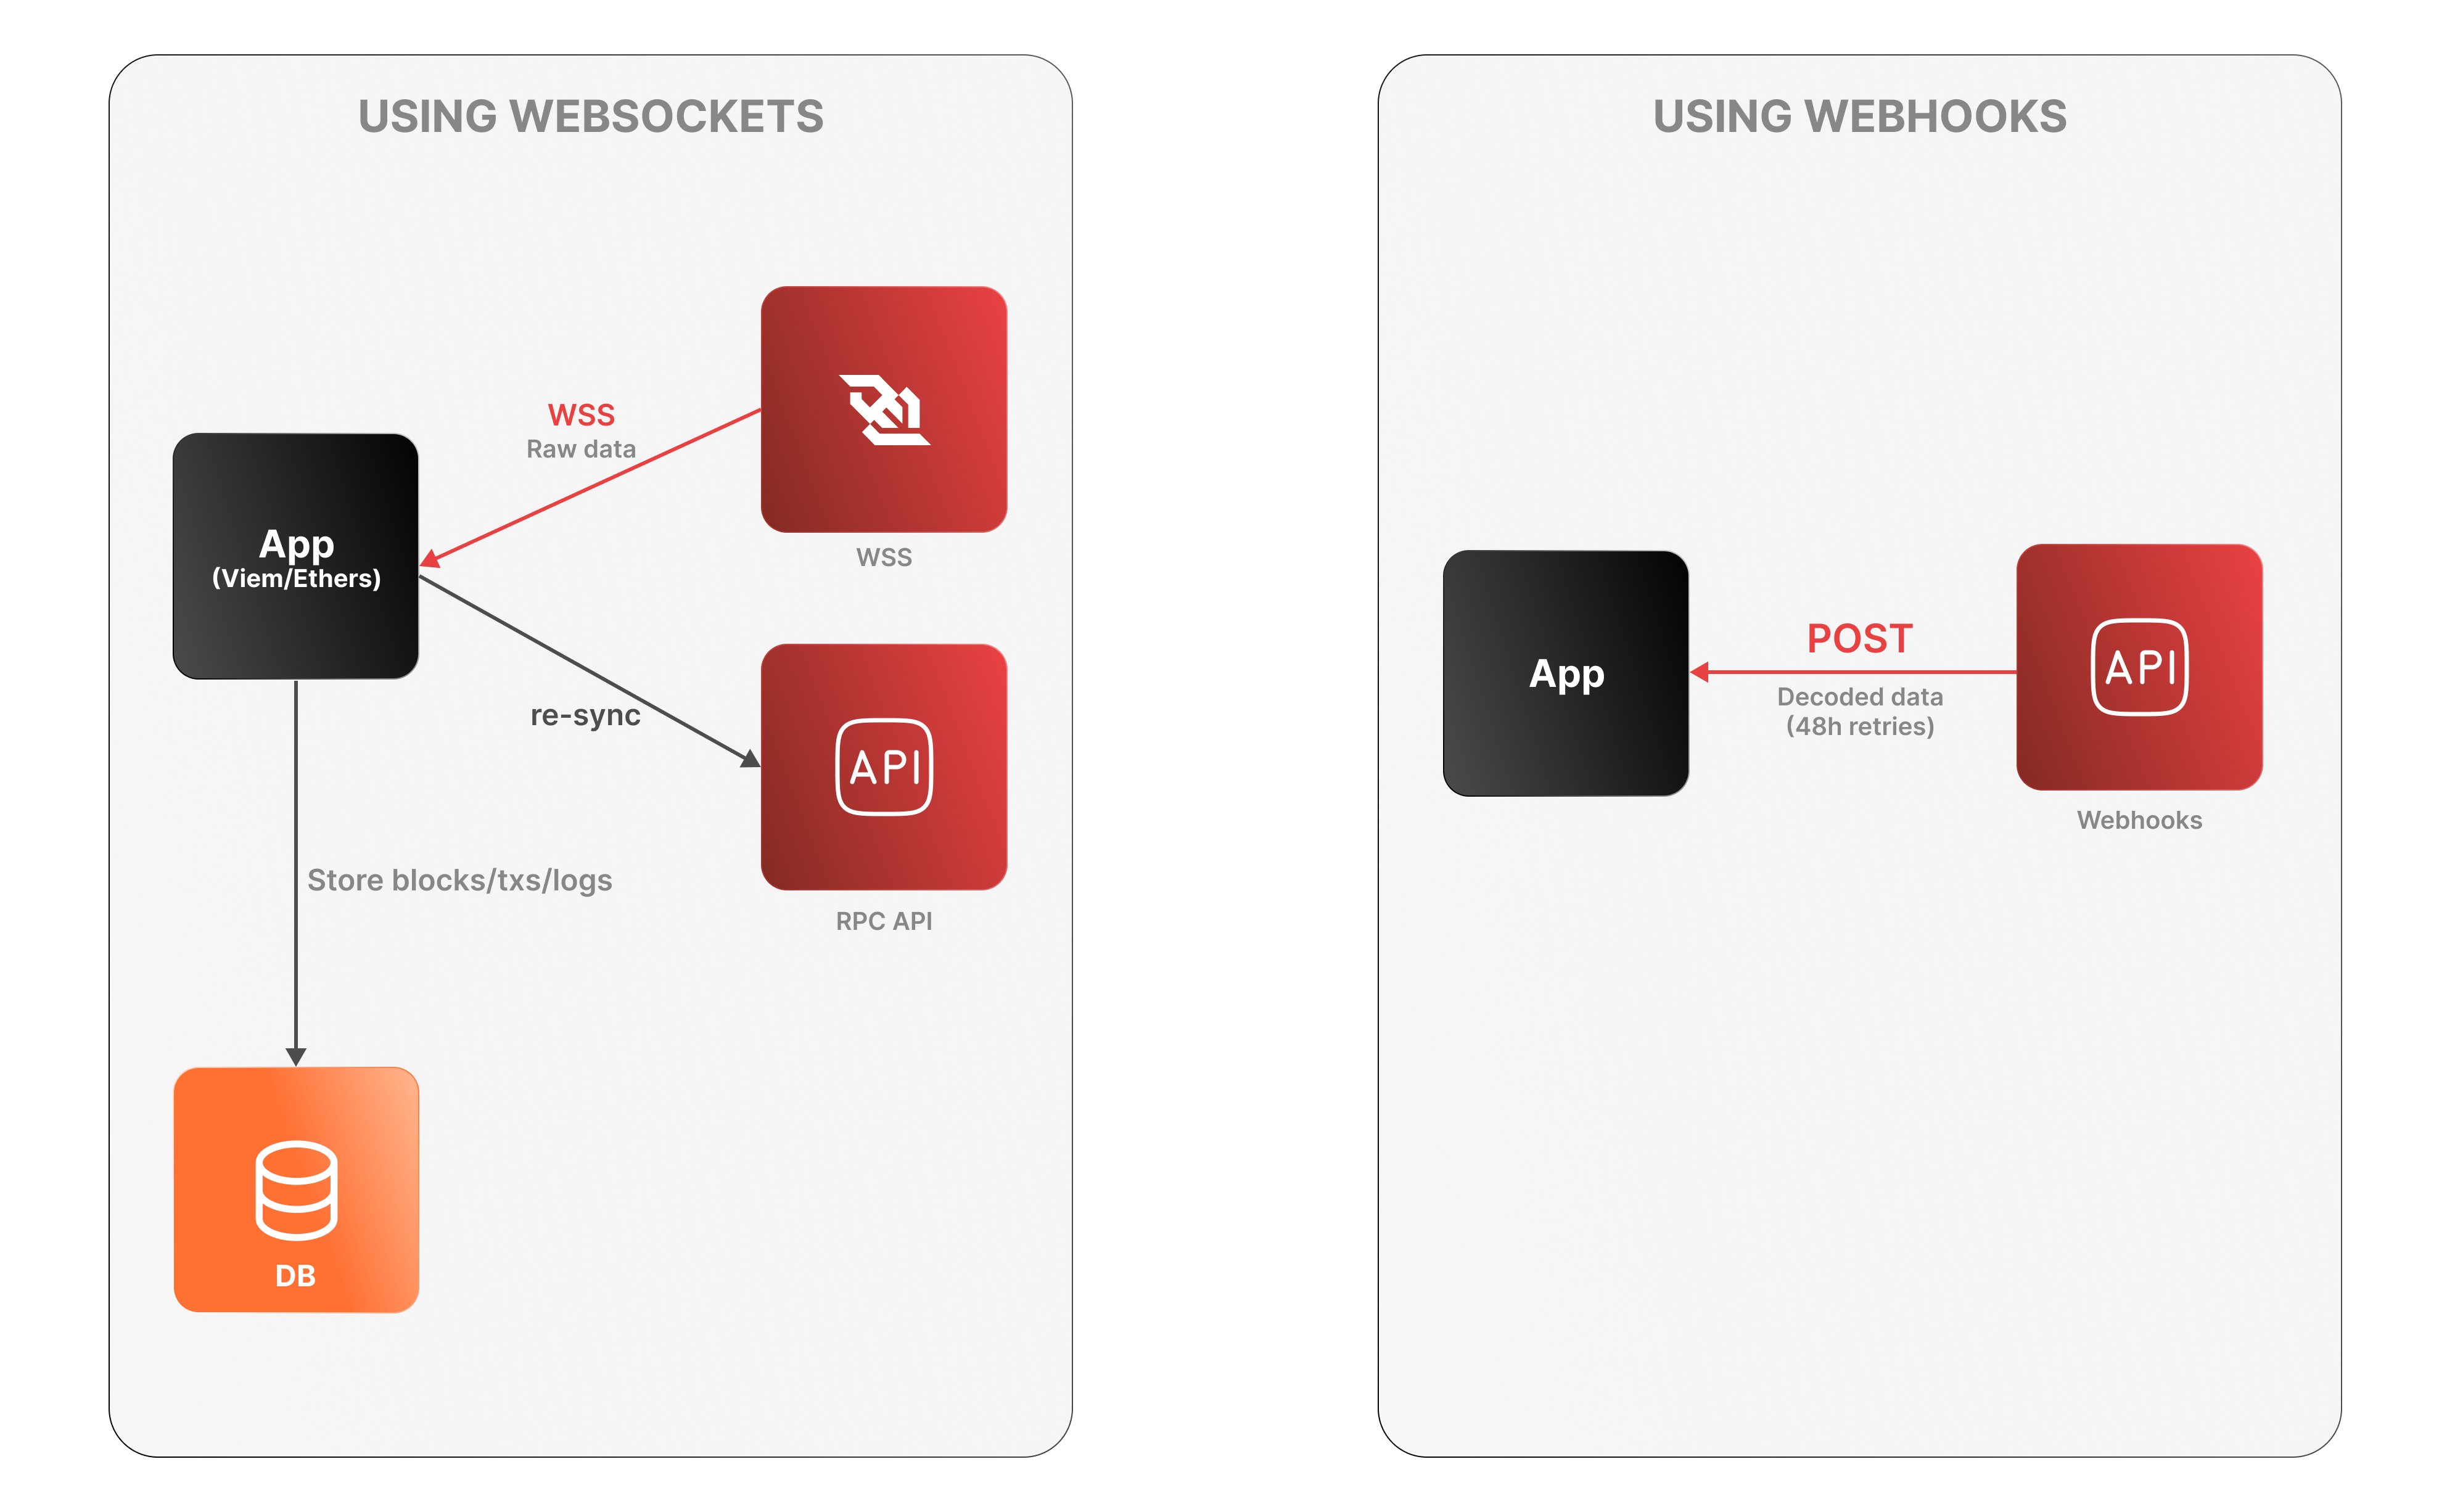 **WebSockets**
* The app connects to the Avalanche RPC API over WSS to receive raw log data.
* It must decode logs, manage connection state, and store data locally.
* On disconnection, it must re-sync via an external Data API or using standard `eth_*` RPC calls (e.g., `eth_getLogs`, `eth_getBlockByNumber`).
**WebSockets**
* The app connects to the Avalanche RPC API over WSS to receive raw log data.
* It must decode logs, manage connection state, and store data locally.
* On disconnection, it must re-sync via an external Data API or using standard `eth_*` RPC calls (e.g., `eth_getLogs`, `eth_getBlockByNumber`).
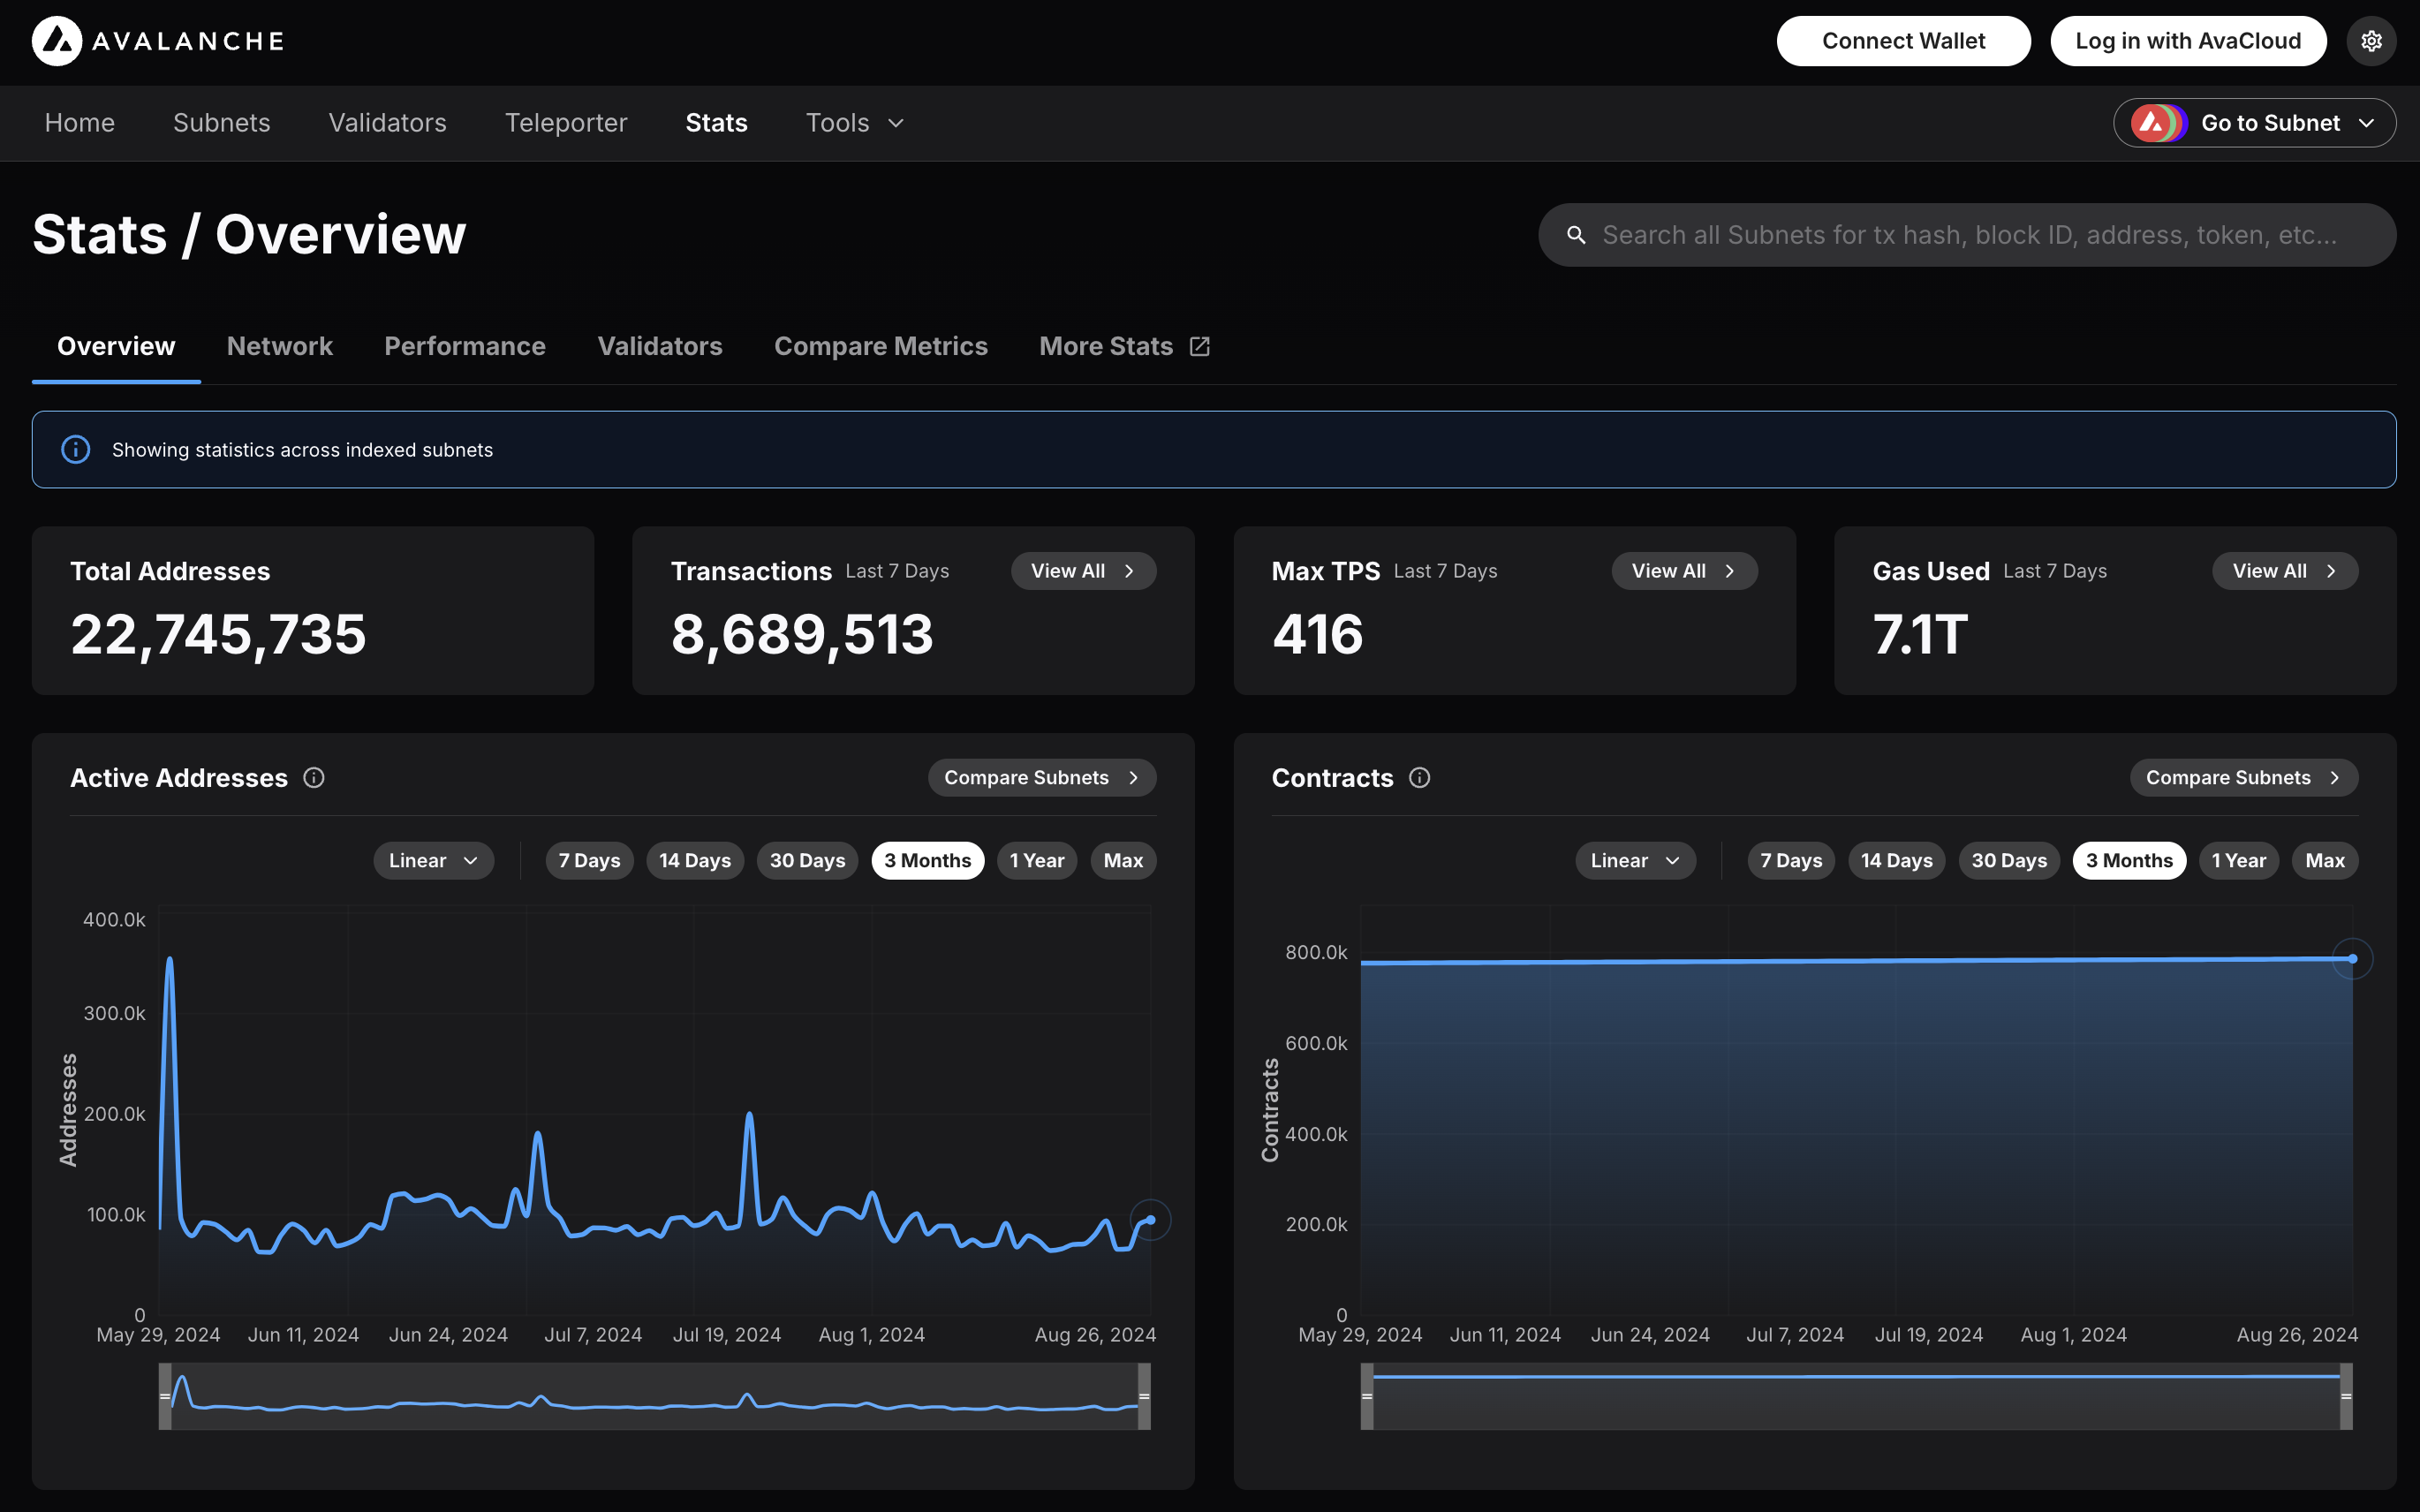 ### Features
* **Chain Throughput:** Retrieve detailed metrics on gas consumption, Transactions Per Second (TPS), and gas prices, including rolling windows of data for granular analysis.
* **Cumulative Metrics:** Access cumulative data on addresses, contracts, deployers, and transaction counts, providing insights into network growth over time.
* **Staking Information:** Obtain staking-related data, including the number of validators and delegators, along with their respective weights, across different subnets.
* **Blockchains and Subnets:** Get information about supported blockchains, including EVM Chain IDs, blockchain IDs, and subnet associations, facilitating multi-chain analytics.
* **Composite Queries:** Perform advanced queries by combining different metric types and conditions, enabling detailed and customizable data retrieval.
The Metrics API is designed to provide developers with powerful tools to analyze and monitor on-chain activity across Avalanche’s primary network, Avalanche L1s, and other supported EVM chains. Below is an overview of the key features available:
### Chain Throughput Metrics
* **Gas Consumption**
### Features
* **Chain Throughput:** Retrieve detailed metrics on gas consumption, Transactions Per Second (TPS), and gas prices, including rolling windows of data for granular analysis.
* **Cumulative Metrics:** Access cumulative data on addresses, contracts, deployers, and transaction counts, providing insights into network growth over time.
* **Staking Information:** Obtain staking-related data, including the number of validators and delegators, along with their respective weights, across different subnets.
* **Blockchains and Subnets:** Get information about supported blockchains, including EVM Chain IDs, blockchain IDs, and subnet associations, facilitating multi-chain analytics.
* **Composite Queries:** Perform advanced queries by combining different metric types and conditions, enabling detailed and customizable data retrieval.
The Metrics API is designed to provide developers with powerful tools to analyze and monitor on-chain activity across Avalanche’s primary network, Avalanche L1s, and other supported EVM chains. Below is an overview of the key features available:
### Chain Throughput Metrics
* **Gas Consumption** Track the average and maximum gas consumption per second, helping to understand network performance and efficiency.
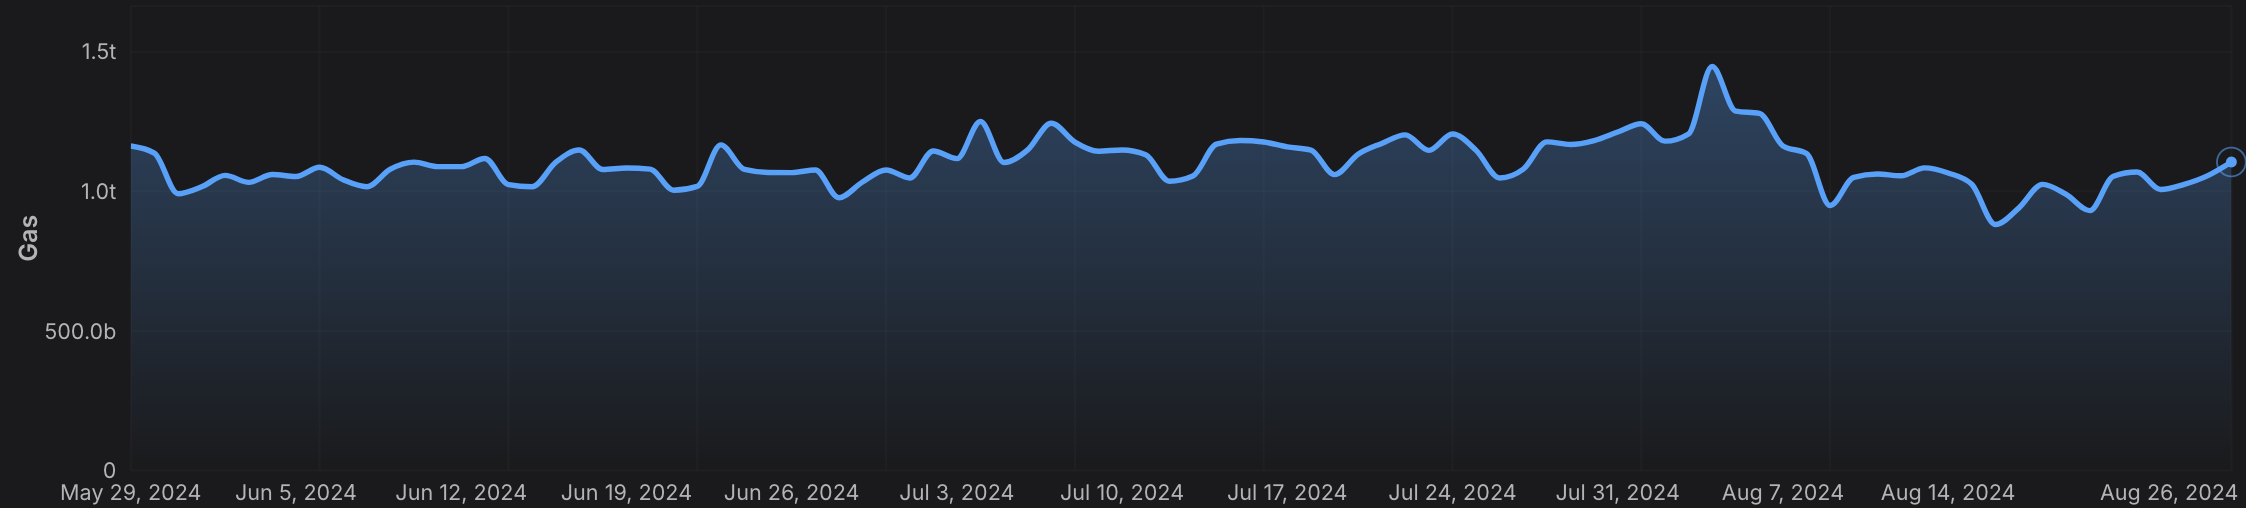 * **Transactions Per Second (TPS)**
 Monitor the average and peak TPS to assess the network’s capacity and utilization.
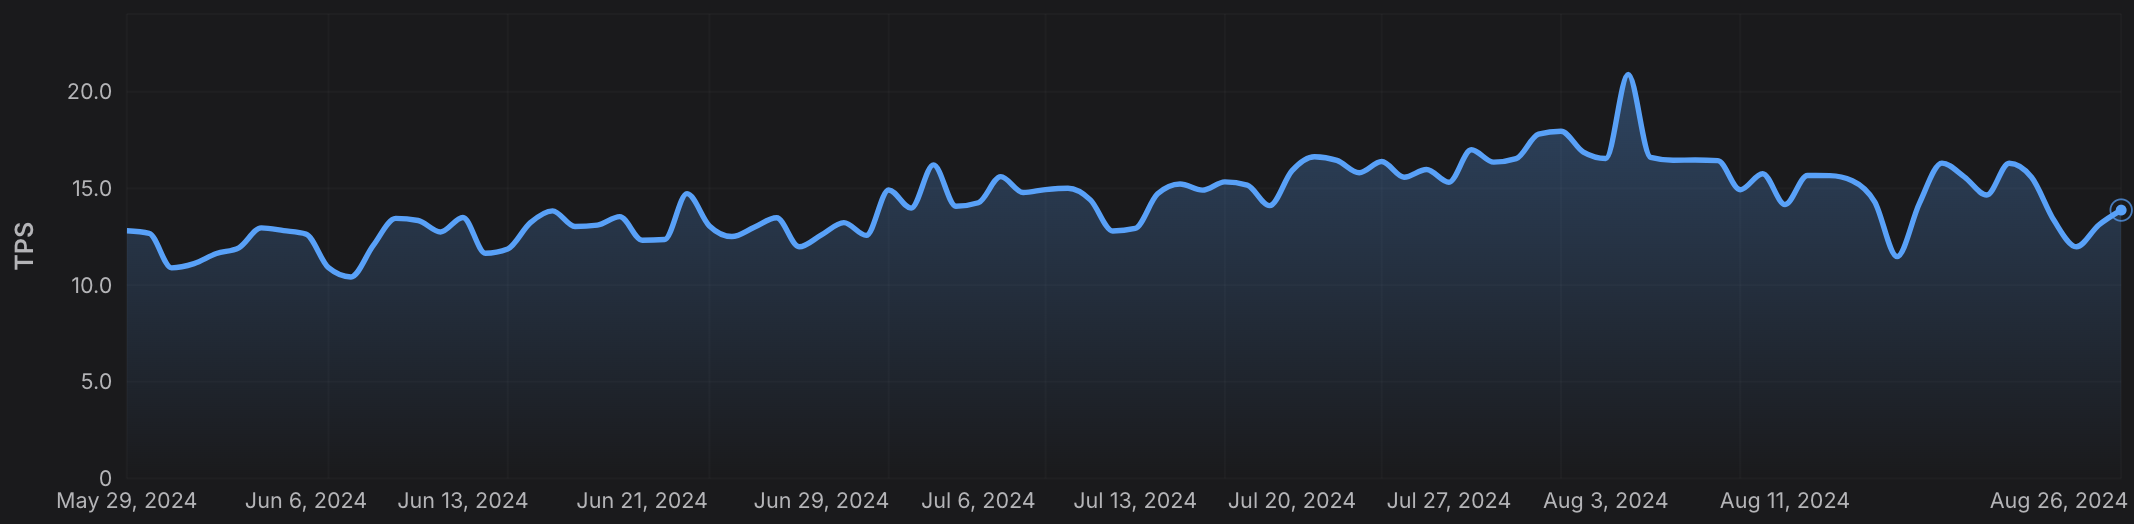 * **Gas Prices**
 Analyze average and maximum gas prices over time to optimize transaction costs and predict fee trends. Monitor the average and peak TPS to assess the network’s capacity and utilization.
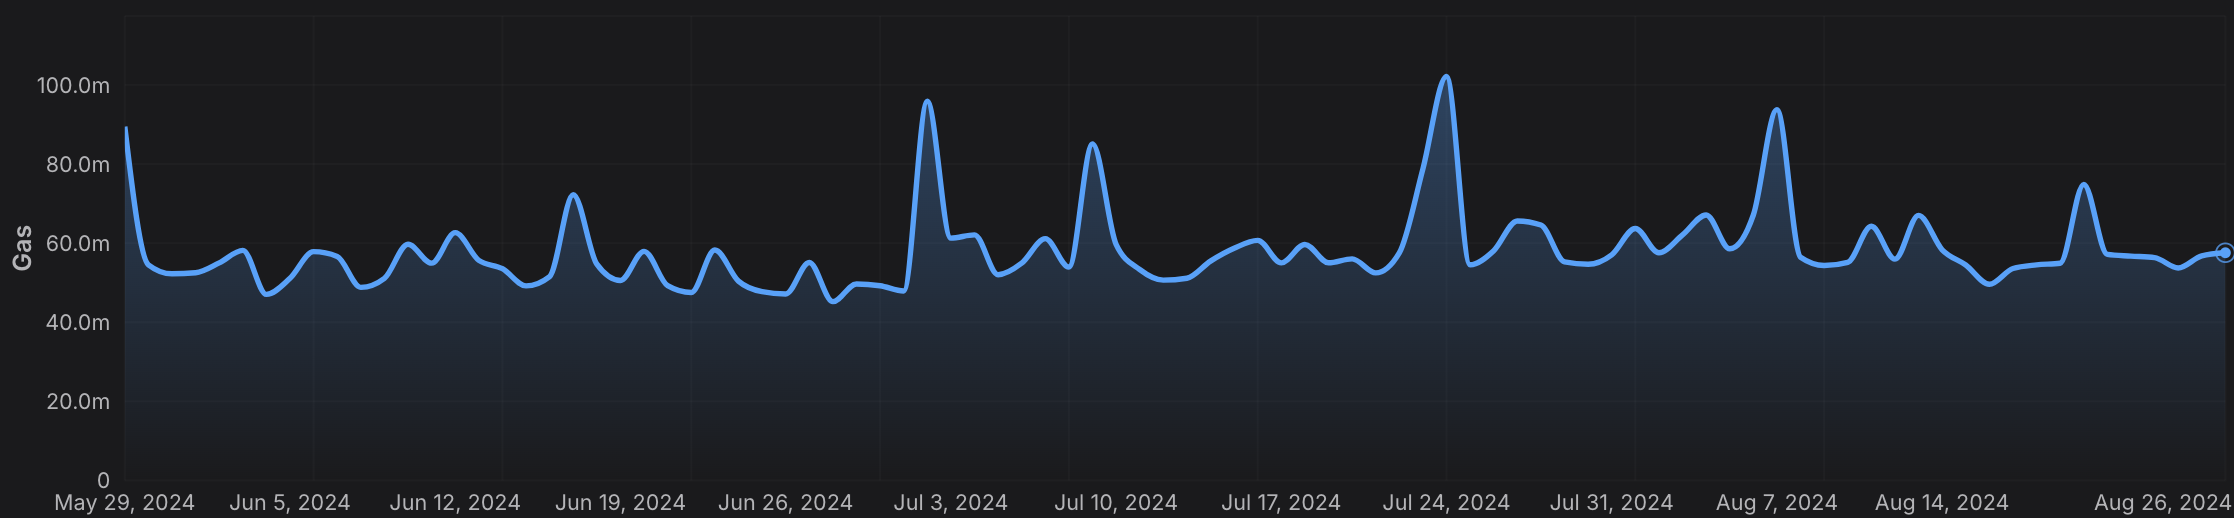 ### Cumulative Metrics
* **Address Growth**
### Cumulative Metrics
* **Address Growth** Access the cumulative number of active addresses on a chain, providing insights into network adoption and user activity.
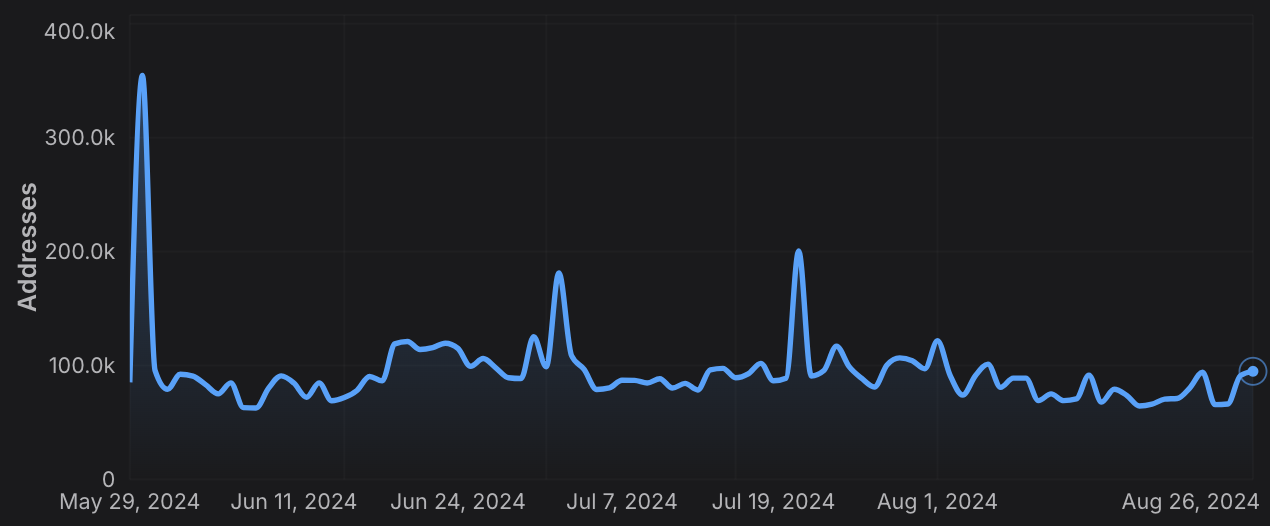 * **Contract Deployment**
 Monitor the cumulative number of smart contracts deployed, helping to gauge developer engagement and platform usage.
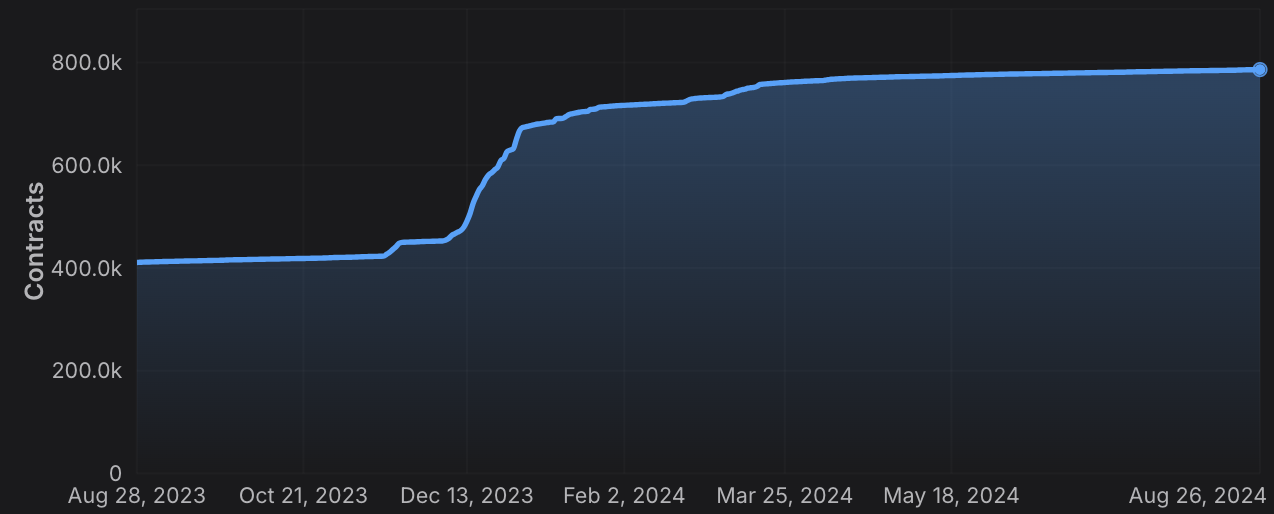 * **Transaction Count**
 Track the cumulative number of transactions, offering a clear view of network activity and transaction volume.
Retrieve the number of active validators and delegators for a given L1, crucial for understanding network security and decentralization.
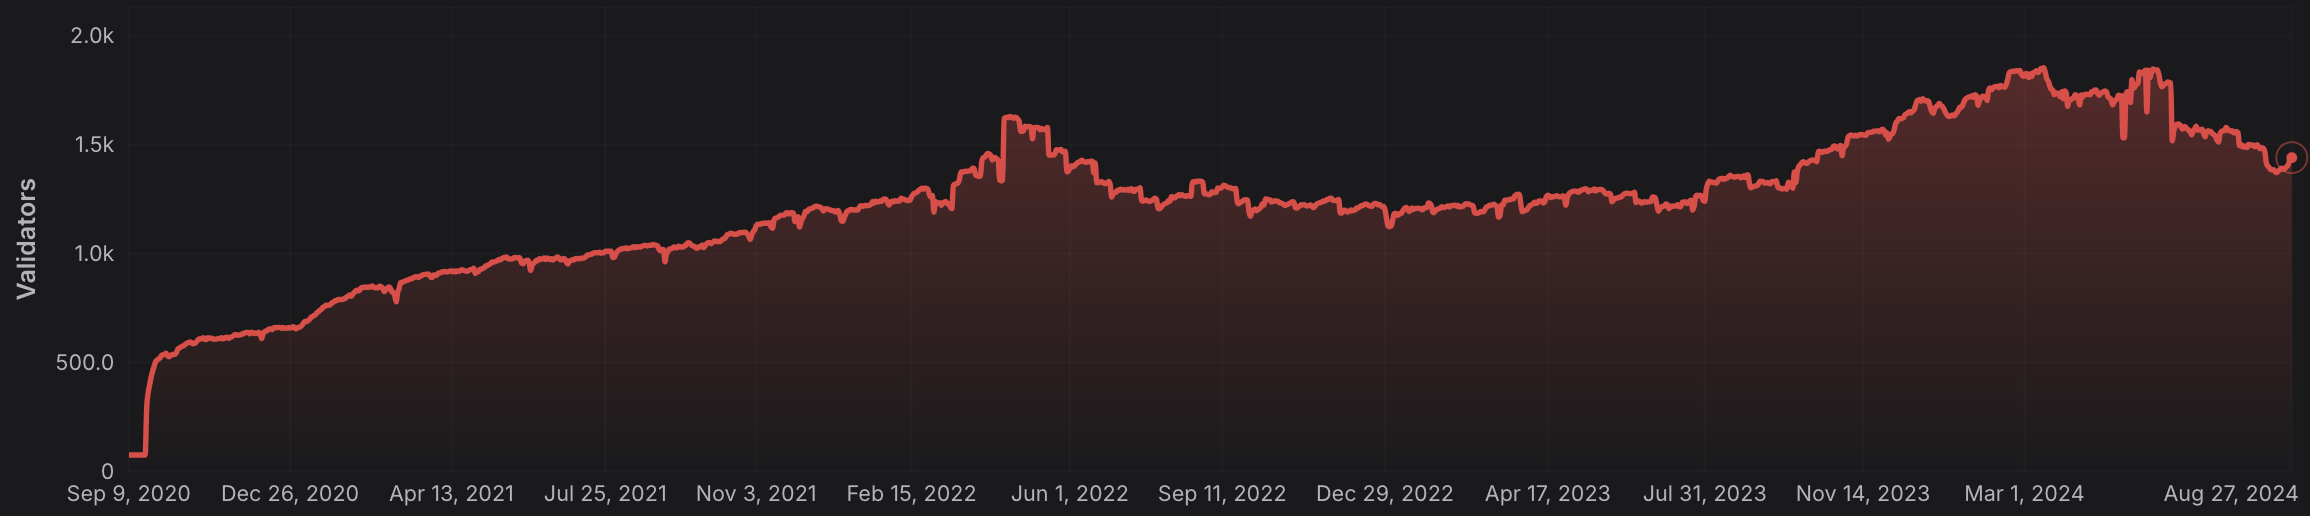 * **Staking Weights**
 Access the total stake weight of validators and delegators, helping to assess the distribution of staked assets across the network.
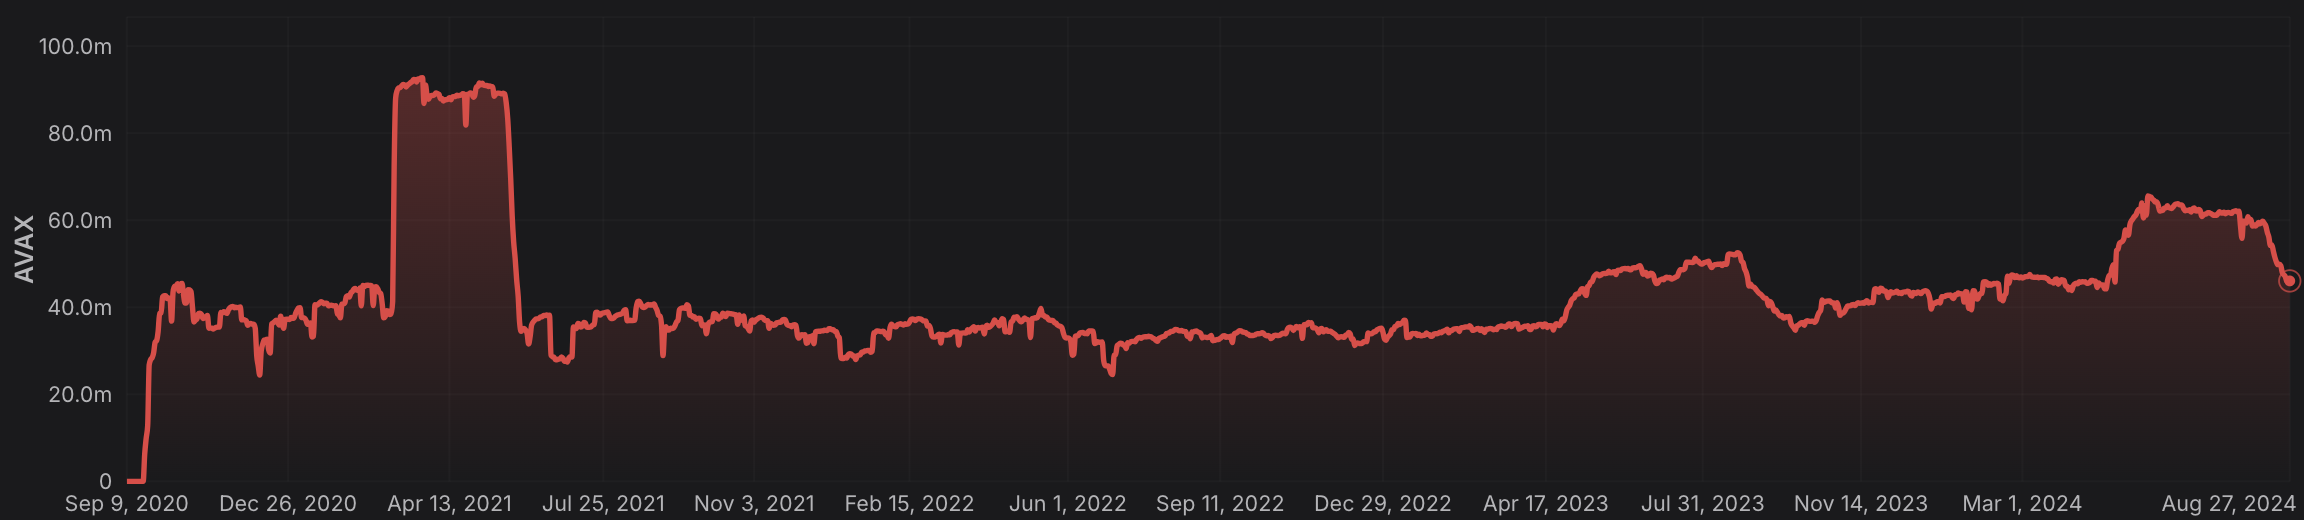 ### Rolling Window Analytics
* **Short-Term and Long-Term Metrics:** Perform rolling window analysis on various metrics like gas used, TPS, and gas prices, allowing for both short-term and long-term trend analysis.
* **Customizable Time Frames:** Choose from different time intervals (hourly, daily, monthly) to suit your specific analytical needs.
### Blockchain and L1 Information
* **Chain and L1 Mapping:** Get detailed information about EVM chains and their associated L1s, including chain IDs, blockchain IDs, and subnet IDs, facilitating cross-chain analytics.
### Advanced Composite Queries
* **Custom Metrics Combinations**: Combine multiple metrics and apply logical operators to perform sophisticated queries, enabling deep insights and tailored analytics.
* **Paginated Results:** Handle large datasets efficiently with paginated responses, ensuring seamless data retrieval in your applications.
The Metrics API equips developers with the tools needed to build robust analytics, monitoring, and reporting solutions, leveraging the full power of multi-chain data across the Avalanche ecosystem and beyond.
# Rate Limits (/docs/api-reference/metrics-api/rate-limits)
---
title: Rate Limits
description: Rate Limits for the Metrics API
icon: Clock
---
# Rate Limits
Rate limiting is managed through a weighted scoring system, known as Compute Units (CUs). Each API request consumes a specified number of CUs, determined by the complexity of the request. This system is designed to accommodate basic requests while efficiently handling more computationally intensive operations.
## Rate Limit Tiers
The maximum CUs (rate-limiting score) for a user depends on their subscription level and is delineated in the following table:
| Subscription Level | Per Minute Limit (CUs) | Per Day Limit (CUs) |
| :----------------- | :--------------------- | :------------------ |
| Free | 8,000 | 1,200,000 |
> We are working on new subscription tiers with higher rate limits to support even greater request volumes.
## Rate Limit Categories
The CUs for each category are defined in the following table:
| Weight | CU Value |
| :----- | :------- |
| Free | 1 |
| Small | 20 |
| Medium | 100 |
| Large | 500 |
| XL | 1000 |
| XXL | 3000 |
## Rate Limits for Metrics Endpoints
The CUs for each route are defined in the table below:
| Endpoint | Method | Weight | CU Value |
| :---------------------------------------------------------- | :----- | :----- | :------- |
| `/v2/health-check` | GET | Free | 1 |
| `/v2/chains` | GET | Free | 1 |
| `/v2/chains/{chainId}` | GET | Free | 1 |
| `/v2/chains/{chainId}/metrics/{metric}` | GET | Medium | 100 |
| `/v2/chains/{chainId}/teleporterMetrics/{metric}` | GET | Medium | 100 |
| `/v2/chains/{chainId}/rollingWindowMetrics/{metric}` | GET | Medium | 100 |
| `/v2/networks/{network}/metrics/{metric}` | GET | Medium | 100 |
| `/v2/chains/{chainId}/contracts/{address}/nfts:listHolders` | GET | Large | 500 |
| `/v2/chains/{chainId}/contracts/{address}/balances` | GET | XL | 1000 |
| `/v2/chains/43114/btcb/bridged:getAddresses` | GET | Large | 500 |
| `/v2/subnets/{subnetId}/validators:getAddresses` | GET | Large | 500 |
| `/v2/lookingGlass/compositeQuery` | POST | XXL | 3000 |
### Rolling Window Analytics
* **Short-Term and Long-Term Metrics:** Perform rolling window analysis on various metrics like gas used, TPS, and gas prices, allowing for both short-term and long-term trend analysis.
* **Customizable Time Frames:** Choose from different time intervals (hourly, daily, monthly) to suit your specific analytical needs.
### Blockchain and L1 Information
* **Chain and L1 Mapping:** Get detailed information about EVM chains and their associated L1s, including chain IDs, blockchain IDs, and subnet IDs, facilitating cross-chain analytics.
### Advanced Composite Queries
* **Custom Metrics Combinations**: Combine multiple metrics and apply logical operators to perform sophisticated queries, enabling deep insights and tailored analytics.
* **Paginated Results:** Handle large datasets efficiently with paginated responses, ensuring seamless data retrieval in your applications.
The Metrics API equips developers with the tools needed to build robust analytics, monitoring, and reporting solutions, leveraging the full power of multi-chain data across the Avalanche ecosystem and beyond.
# Rate Limits (/docs/api-reference/metrics-api/rate-limits)
---
title: Rate Limits
description: Rate Limits for the Metrics API
icon: Clock
---
# Rate Limits
Rate limiting is managed through a weighted scoring system, known as Compute Units (CUs). Each API request consumes a specified number of CUs, determined by the complexity of the request. This system is designed to accommodate basic requests while efficiently handling more computationally intensive operations.
## Rate Limit Tiers
The maximum CUs (rate-limiting score) for a user depends on their subscription level and is delineated in the following table:
| Subscription Level | Per Minute Limit (CUs) | Per Day Limit (CUs) |
| :----------------- | :--------------------- | :------------------ |
| Free | 8,000 | 1,200,000 |
> We are working on new subscription tiers with higher rate limits to support even greater request volumes.
## Rate Limit Categories
The CUs for each category are defined in the following table:
| Weight | CU Value |
| :----- | :------- |
| Free | 1 |
| Small | 20 |
| Medium | 100 |
| Large | 500 |
| XL | 1000 |
| XXL | 3000 |
## Rate Limits for Metrics Endpoints
The CUs for each route are defined in the table below:
| Endpoint | Method | Weight | CU Value |
| :---------------------------------------------------------- | :----- | :----- | :------- |
| `/v2/health-check` | GET | Free | 1 |
| `/v2/chains` | GET | Free | 1 |
| `/v2/chains/{chainId}` | GET | Free | 1 |
| `/v2/chains/{chainId}/metrics/{metric}` | GET | Medium | 100 |
| `/v2/chains/{chainId}/teleporterMetrics/{metric}` | GET | Medium | 100 |
| `/v2/chains/{chainId}/rollingWindowMetrics/{metric}` | GET | Medium | 100 |
| `/v2/networks/{network}/metrics/{metric}` | GET | Medium | 100 |
| `/v2/chains/{chainId}/contracts/{address}/nfts:listHolders` | GET | Large | 500 |
| `/v2/chains/{chainId}/contracts/{address}/balances` | GET | XL | 1000 |
| `/v2/chains/43114/btcb/bridged:getAddresses` | GET | Large | 500 |
| `/v2/subnets/{subnetId}/validators:getAddresses` | GET | Large | 500 |
| `/v2/lookingGlass/compositeQuery` | POST | XXL | 3000 |
- ],
"managerAddresses": [
- ],
"enabledAddresses": [
- ],
}
}
```
`AllowList` configuration affects only the related precompile. For instance, the admin address in `feeManagerConfig` does not affect admin addresses in other activated precompiles.
The `AllowList` solidity interface is defined as follows, and can be found in [IAllowList.sol](https://github.com/ava-labs/subnet-evm/blob/helloworld-official-tutorial-v2/contracts/contracts/interfaces/IAllowList.sol):
```solidity
//SPDX-License-Identifier: MIT
pragma solidity ^0.8.0;
interface IAllowList {
event RoleSet(
uint256 indexed role,
address indexed account,
address indexed sender,
uint256 oldRole
);
// Set [addr] to have the admin role over the precompile contract.
function setAdmin(address addr) external;
// Set [addr] to be enabled on the precompile contract.
function setEnabled(address addr) external;
// Set [addr] to have the manager role over the precompile contract.
function setManager(address addr) external;
// Set [addr] to have no role for the precompile contract.
function setNone(address addr) external;
// Read the status of [addr].
function readAllowList(address addr) external view returns (uint256 role);
}
```
`readAllowList(addr)` will return a uint256 with a value of 0, 1, or 2, corresponding to the roles `None`, `Enabled`, and `Admin` respectively.
`RoleSet` is an event that is emitted when a role is set for an address. It includes the role, the modified address, the sender as indexed parameters and the old role as non-indexed parameter. Events in precompiles are activated after Durango upgrade.
Note: `AllowList` is not an actual contract but just an interface. It's not callable by itself. This is used by other precompiles. Check other precompile sections to see how this works.
### Restricting Smart Contract Deployers[](#restricting-smart-contract-deployers "Direct link to heading")
If you'd like to restrict who has the ability to deploy contracts on your Avalanche L1, you can provide an `AllowList` configuration in your genesis or upgrade file:
```json
{
"contractDeployerAllowListConfig": {
"blockTimestamp": 0,
"adminAddresses": ["0x8db97C7cEcE249c2b98bDC0226Cc4C2A57BF52FC"]
}
}
```
In this example, `0x8db97C7cEcE249c2b98bDC0226Cc4C2A57BF52FC` is named as the `Admin` of the `ContractDeployerAllowList`. This enables it to add other `Admin` or to add `Enabled` addresses. Both `Admin` and `Enabled` can deploy contracts. To provide a great UX with factory contracts, the `tx.Origin` is checked for being a valid deployer instead of the caller of `CREATE`. This means that factory contracts will still be able to create new contracts as long as the sender of the original transaction is an allow listed deployer.
The `Stateful Precompile` contract powering the `ContractDeployerAllowList` adheres to the [AllowList Solidity interface](#allowlist-interface) at `0x0200000000000000000000000000000000000000` (you can load this interface and interact directly in Remix):
- If you attempt to add a `Enabled` and you are not an `Admin`, you will see something like: 
- If you attempt to deploy a contract but you are not an `Admin` not a `Enabled`, you will see something like: 
- If you call `readAllowList(addr)` then you can read the current role of `addr`, which will return a uint256 with a value of 0, 1, or 2, corresponding to the roles `None`, `Enabled`, and `Admin` respectively.
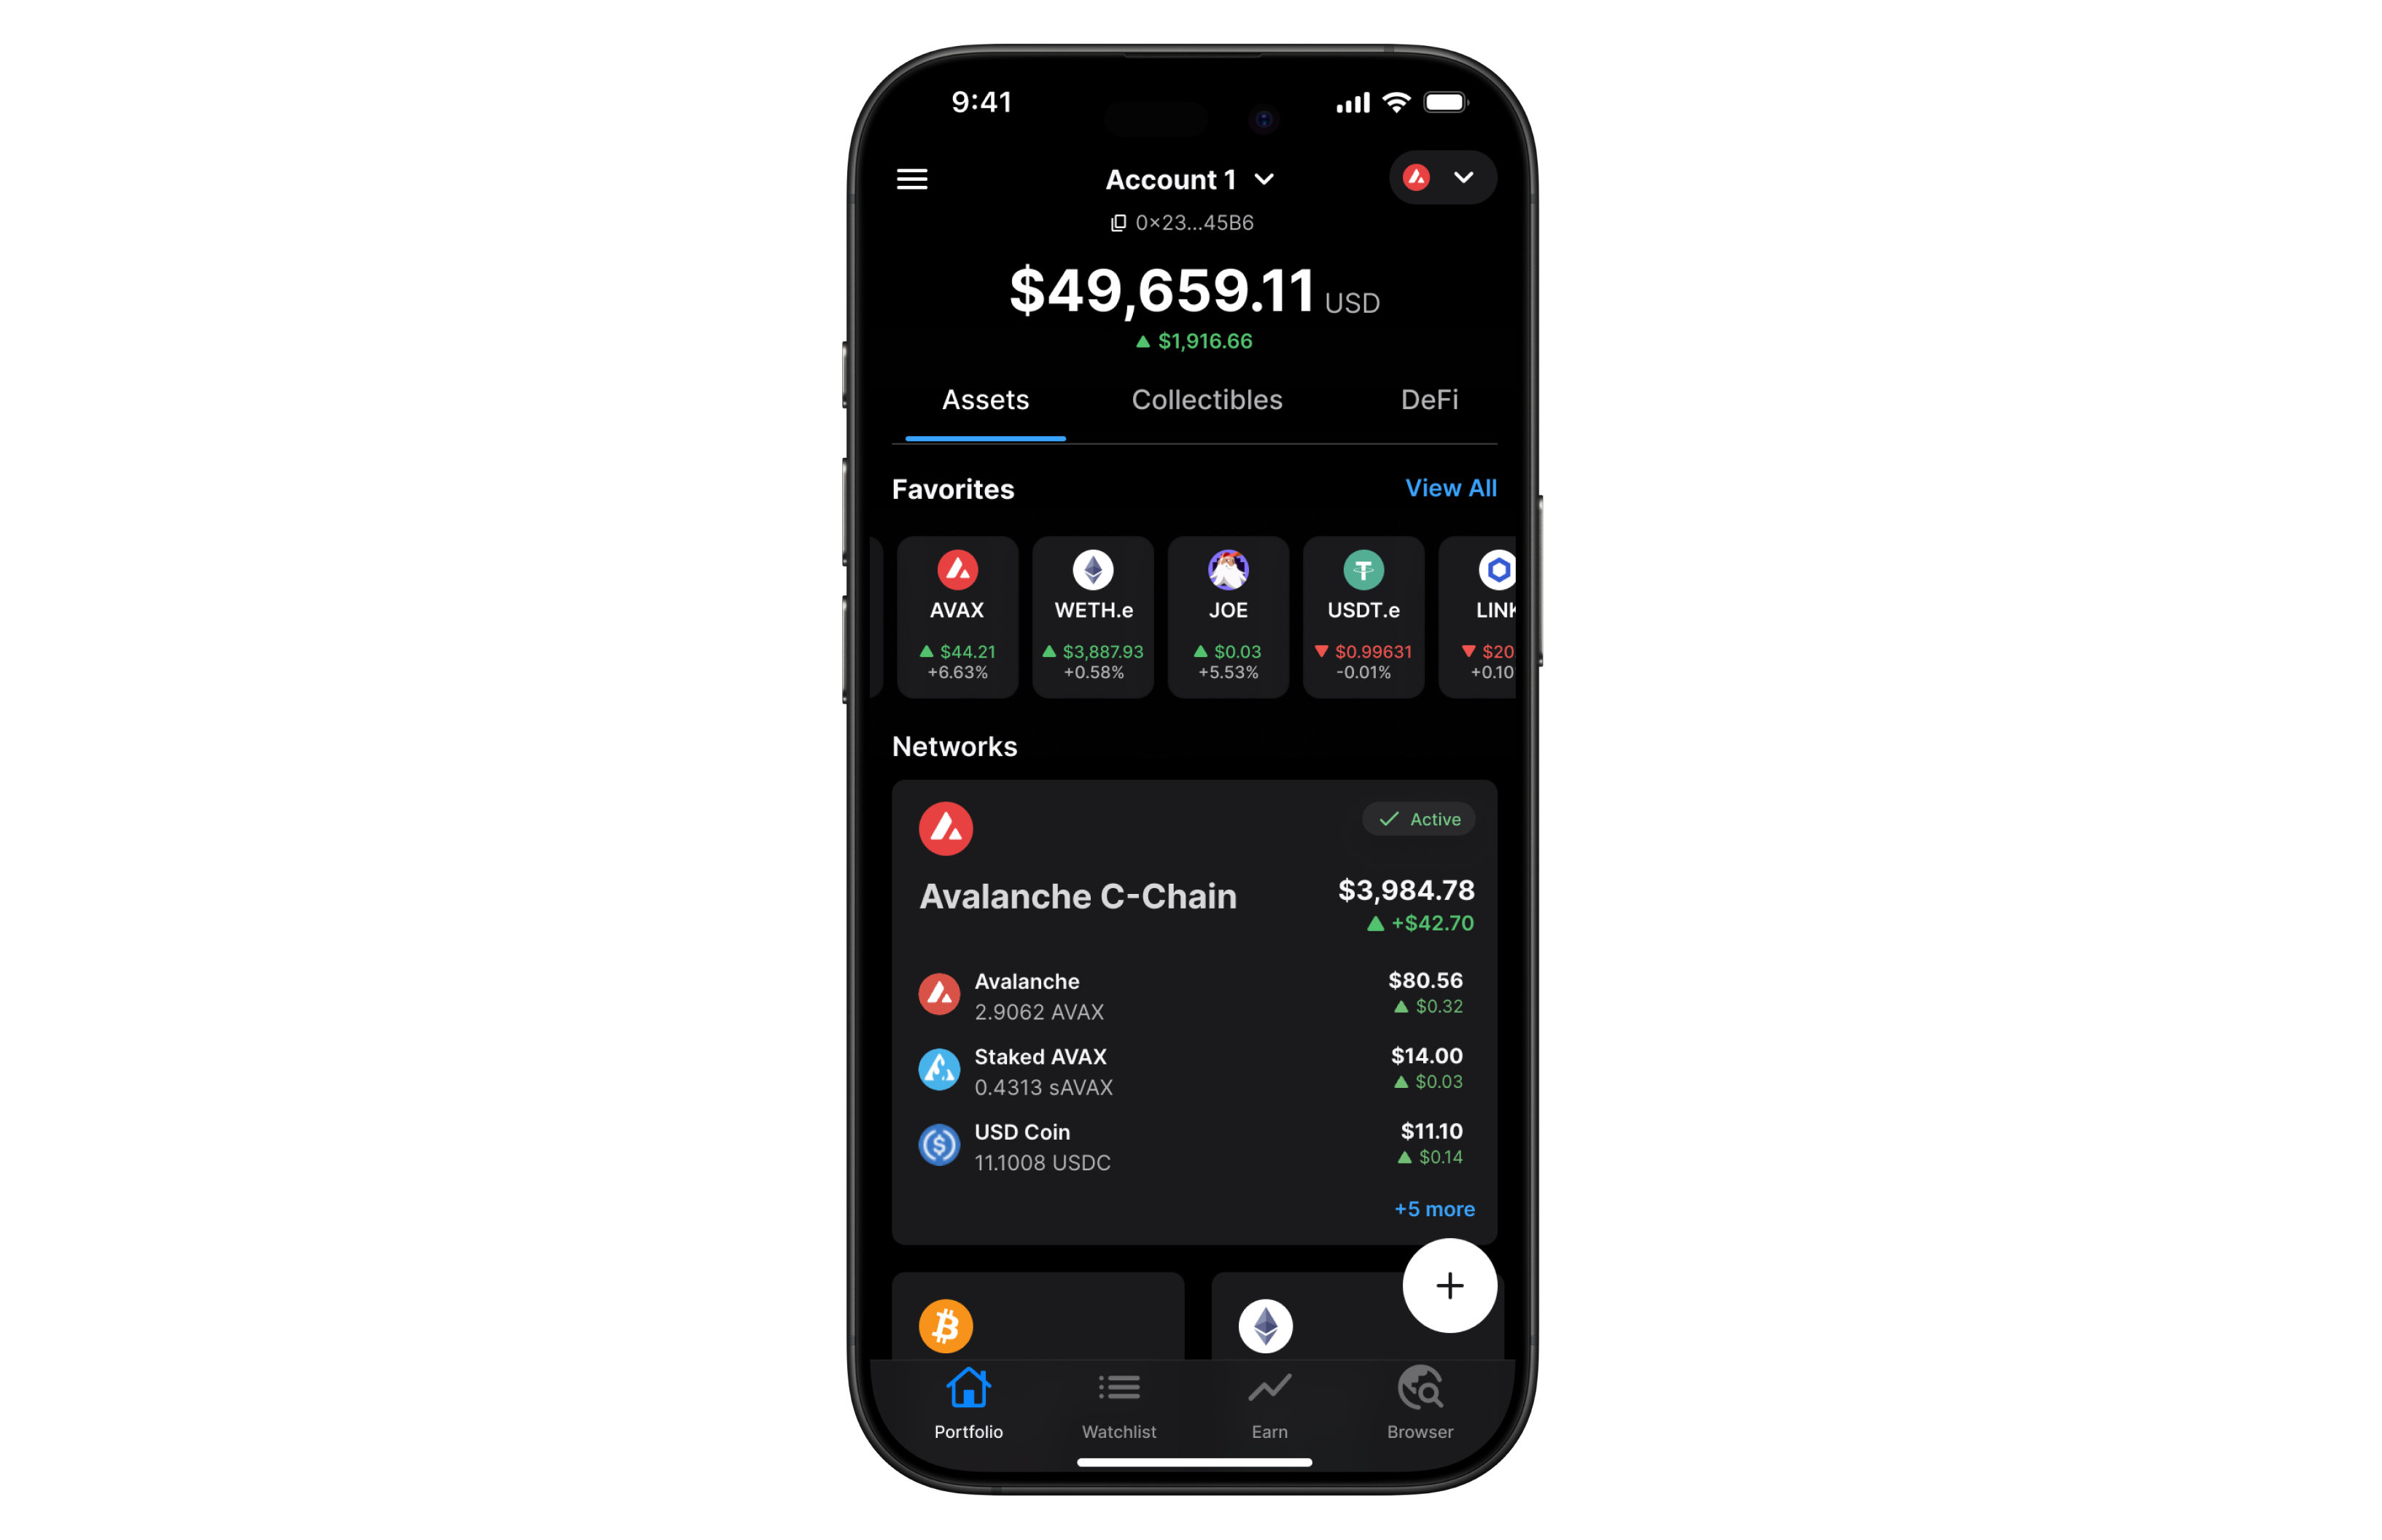 Developers generally have two options to fetch this data:
1. **Using RPC methods to index blockchain data on their own**
2. **Leveraging an indexer provider like the Data API**
While both methods aim to achieve the same goal, the Data API offers a more efficient, scalable, and developer-friendly solution. This article delves into why using the Data API is better than relying on traditional RPC (Remote Procedure Call) methods.
### What Are RPC methods and their challenges?
Remote Procedure Call (RPC) methods allow developers to interact directly with blockchain nodes. One of their key advantages is that they are standardized and universally understood by blockchain developers across different platforms. With RPC, you can perform tasks such as querying data, submitting transactions, and interacting with smart contracts. These methods are typically low-level and synchronous, meaning they require a deep understanding of the blockchain’s architecture and specific command structures.
You can refer to the [official documentation](https://ethereum.org/en/developers/docs/apis/json-rpc/) to gain a more comprehensive understanding of the JSON-RPC API.
Here’s an example using the `eth_getBalance` method to retrieve the native balance of a wallet:
```bash
curl --location 'https://api.avax.network/ext/bc/C/rpc' \
--header 'Content-Type: application/json' \
--data '{"method":"eth_getBalance","params":["0x8ae323046633A07FB162043f28Cea39FFc23B50A", "latest"],"id":1,"jsonrpc":"2.0"}'
```
This call returns the following response:
```json
{
"jsonrpc": "2.0",
"id": 1,
"result": "0x284476254bc5d594"
}
```
The balance in this wallet is 2.9016 AVAX. However, despite the wallet holding multiple tokens such as USDC, the `eth_getBalance` method only returns the AVAX amount and it does so in Wei and in hexadecimal format. This is not particularly human-readable, adding to the challenge for developers who need to manually convert the balance to a more understandable format.
#### No direct RPC methods to retrieve token balances
Despite their utility, RPC methods come with significant limitations when it comes to retrieving detailed token and transaction data. Currently, RPC methods do not provide direct solutions for the following:
* **Listing all tokens held by a wallet**: There is no RPC method that provides a complete list of ERC-20 tokens owned by a wallet.
* **Retrieving all transactions for a wallet**: : There is no direct method for fetching all transactions associated with a wallet.
* **Getting ERC-20/721/1155 token balances**: The `eth_getBalance` method only returns the balance of the wallet’s native token (such as AVAX on Avalanche) and cannot be used to retrieve ERC-20/721/1155 token balances.
To achieve these tasks using RPC methods alone, you would need to:
* **Query every block for transaction logs**: Scan the entire blockchain, which is resource-intensive and impractical.
* **Parse transaction logs**: Identify and extract ERC-20 token transfer events from each transaction.
* **Aggregate data**: Collect and process this data to compute balances and transaction histories.
#### Manual blockchain indexing is difficult and costly
Using RPC methods to fetch token balances involves an arduous process:
1. You must connect to a node and subscribe to new block events.
2. For each block, parse every transaction to identify ERC-20 token transfers involving the user's address.
3. Extract contract addresses and other relevant data from the parsed transactions.
4. Compute balances by processing transfer events.
5. Store the processed data in a database for quick retrieval and aggregation.
#### Why this is difficult:
* **Resource-Intensive**: Requires significant computational power and storage to process and store blockchain data.
* **Time-consuming**: Processing millions of blocks and transactions can take an enormous amount of time.
* **Complexity**: Handling edge cases like contract upgrades, proxy contracts, and non-standard implementations adds layers of complexity.
* **Maintenance**: Keeping the indexed data up-to-date necessitates continuous synchronization with new blocks being added to the blockchain.
* **High Costs**: Associated with servers, databases, and network bandwidth.
### The Data API Advantage
The Data API provides a streamlined, efficient, and scalable solution for fetching token balances. Here's why it's the best choice:
With a single API call, you can retrieve all ERC-20 token balances for a user's address:
```javascript
avalancheSDK.data.evm.balances.listErc20Balances({
address: "0xYourAddress",
});
```
Sample Response:
```json
{
"erc20TokenBalances": [
{
"ercType": "ERC-20",
"chainId": "43114",
"address": "0xB97EF9Ef8734C71904D8002F8b6Bc66Dd9c48a6E",
"name": "USD Coin",
"symbol": "USDC",
"decimals": 6,
"price": {
"value": 1.0,
"currencyCode": "usd"
},
"balance": "15000000",
"balanceValue": {
"currencyCode": "usd",
"value": 9.6
},
"logoUri": "https://images.ctfassets.net/gcj8jwzm6086/e50058c1-2296-4e7e-91ea-83eb03db95ee/8db2a492ce64564c96de87c05a3756fd/43114-0xB97EF9Ef8734C71904D8002F8b6Bc66Dd9c48a6E.png"
}
// Additional tokens...
]
}
```
As you can see with a single call the API returns an array of token balances for all the wallet tokens, including:
* **Token metadata**: Contract address, name, symbol, decimals.
* **Balance information**: Token balance in both hexadecimal and decimal formats, Also retrieves balances of native assets like ETH or AVAX.
* **Price data**: Current value in USD or other supported currencies, saving you the effort of integrating another API.
* **Visual assets**: Token logo URI for better user interface integration.
If you’re building a wallet, DeFi app, or any application that requires displaying balances, transaction history, or smart contract interactions, relying solely on RPC methods can be challenging. Just as there’s no direct RPC method to retrieve token balances, there’s also no simple way to fetch all transactions associated with a wallet, especially for ERC-20, ERC-721, or ERC-1155 token transfers.
However, by using the Data API, you can retrieve all token transfers for a given wallet **with a single API call**, making the process much more efficient. This approach simplifies tracking and displaying wallet activity without the need to manually scan the entire blockchain.
Below are two examples that demonstrate the power of the Data API: in the first, it returns all ERC transfers, including ERC-20, ERC-721, and ERC-1155 tokens, and in the second, it shows all internal transactions, such as when one contract interacts with another.
Developers generally have two options to fetch this data:
1. **Using RPC methods to index blockchain data on their own**
2. **Leveraging an indexer provider like the Data API**
While both methods aim to achieve the same goal, the Data API offers a more efficient, scalable, and developer-friendly solution. This article delves into why using the Data API is better than relying on traditional RPC (Remote Procedure Call) methods.
### What Are RPC methods and their challenges?
Remote Procedure Call (RPC) methods allow developers to interact directly with blockchain nodes. One of their key advantages is that they are standardized and universally understood by blockchain developers across different platforms. With RPC, you can perform tasks such as querying data, submitting transactions, and interacting with smart contracts. These methods are typically low-level and synchronous, meaning they require a deep understanding of the blockchain’s architecture and specific command structures.
You can refer to the [official documentation](https://ethereum.org/en/developers/docs/apis/json-rpc/) to gain a more comprehensive understanding of the JSON-RPC API.
Here’s an example using the `eth_getBalance` method to retrieve the native balance of a wallet:
```bash
curl --location 'https://api.avax.network/ext/bc/C/rpc' \
--header 'Content-Type: application/json' \
--data '{"method":"eth_getBalance","params":["0x8ae323046633A07FB162043f28Cea39FFc23B50A", "latest"],"id":1,"jsonrpc":"2.0"}'
```
This call returns the following response:
```json
{
"jsonrpc": "2.0",
"id": 1,
"result": "0x284476254bc5d594"
}
```
The balance in this wallet is 2.9016 AVAX. However, despite the wallet holding multiple tokens such as USDC, the `eth_getBalance` method only returns the AVAX amount and it does so in Wei and in hexadecimal format. This is not particularly human-readable, adding to the challenge for developers who need to manually convert the balance to a more understandable format.
#### No direct RPC methods to retrieve token balances
Despite their utility, RPC methods come with significant limitations when it comes to retrieving detailed token and transaction data. Currently, RPC methods do not provide direct solutions for the following:
* **Listing all tokens held by a wallet**: There is no RPC method that provides a complete list of ERC-20 tokens owned by a wallet.
* **Retrieving all transactions for a wallet**: : There is no direct method for fetching all transactions associated with a wallet.
* **Getting ERC-20/721/1155 token balances**: The `eth_getBalance` method only returns the balance of the wallet’s native token (such as AVAX on Avalanche) and cannot be used to retrieve ERC-20/721/1155 token balances.
To achieve these tasks using RPC methods alone, you would need to:
* **Query every block for transaction logs**: Scan the entire blockchain, which is resource-intensive and impractical.
* **Parse transaction logs**: Identify and extract ERC-20 token transfer events from each transaction.
* **Aggregate data**: Collect and process this data to compute balances and transaction histories.
#### Manual blockchain indexing is difficult and costly
Using RPC methods to fetch token balances involves an arduous process:
1. You must connect to a node and subscribe to new block events.
2. For each block, parse every transaction to identify ERC-20 token transfers involving the user's address.
3. Extract contract addresses and other relevant data from the parsed transactions.
4. Compute balances by processing transfer events.
5. Store the processed data in a database for quick retrieval and aggregation.
#### Why this is difficult:
* **Resource-Intensive**: Requires significant computational power and storage to process and store blockchain data.
* **Time-consuming**: Processing millions of blocks and transactions can take an enormous amount of time.
* **Complexity**: Handling edge cases like contract upgrades, proxy contracts, and non-standard implementations adds layers of complexity.
* **Maintenance**: Keeping the indexed data up-to-date necessitates continuous synchronization with new blocks being added to the blockchain.
* **High Costs**: Associated with servers, databases, and network bandwidth.
### The Data API Advantage
The Data API provides a streamlined, efficient, and scalable solution for fetching token balances. Here's why it's the best choice:
With a single API call, you can retrieve all ERC-20 token balances for a user's address:
```javascript
avalancheSDK.data.evm.balances.listErc20Balances({
address: "0xYourAddress",
});
```
Sample Response:
```json
{
"erc20TokenBalances": [
{
"ercType": "ERC-20",
"chainId": "43114",
"address": "0xB97EF9Ef8734C71904D8002F8b6Bc66Dd9c48a6E",
"name": "USD Coin",
"symbol": "USDC",
"decimals": 6,
"price": {
"value": 1.0,
"currencyCode": "usd"
},
"balance": "15000000",
"balanceValue": {
"currencyCode": "usd",
"value": 9.6
},
"logoUri": "https://images.ctfassets.net/gcj8jwzm6086/e50058c1-2296-4e7e-91ea-83eb03db95ee/8db2a492ce64564c96de87c05a3756fd/43114-0xB97EF9Ef8734C71904D8002F8b6Bc66Dd9c48a6E.png"
}
// Additional tokens...
]
}
```
As you can see with a single call the API returns an array of token balances for all the wallet tokens, including:
* **Token metadata**: Contract address, name, symbol, decimals.
* **Balance information**: Token balance in both hexadecimal and decimal formats, Also retrieves balances of native assets like ETH or AVAX.
* **Price data**: Current value in USD or other supported currencies, saving you the effort of integrating another API.
* **Visual assets**: Token logo URI for better user interface integration.
If you’re building a wallet, DeFi app, or any application that requires displaying balances, transaction history, or smart contract interactions, relying solely on RPC methods can be challenging. Just as there’s no direct RPC method to retrieve token balances, there’s also no simple way to fetch all transactions associated with a wallet, especially for ERC-20, ERC-721, or ERC-1155 token transfers.
However, by using the Data API, you can retrieve all token transfers for a given wallet **with a single API call**, making the process much more efficient. This approach simplifies tracking and displaying wallet activity without the need to manually scan the entire blockchain.
Below are two examples that demonstrate the power of the Data API: in the first, it returns all ERC transfers, including ERC-20, ERC-721, and ERC-1155 tokens, and in the second, it shows all internal transactions, such as when one contract interacts with another.
 The [Data API](/docs/api-reference/data-api), along with the [Metrics API](/docs/api-reference/metrics-api), are the engines behind the [Avalanche Explorer](https://subnets.avax.network/stats/) and the [Core wallet](https://core.app/en/). They are used to display transactions, logs, balances, NFTs, and more. The data and visualizations presented are all powered by these APIs, offering real-time and historical insights that are essential for building sophisticated, data-driven blockchain products.
### Features
* **Extensive L1 Support**: Gain access to data from over 100+ L1s across both mainnet and testnet. If an L1 is listed on the [Avalanche Explorer](https://subnets.avax.network/), you can query its data using the Data API.
* **Transactions and UTXOs**: easily retrieve details related to transactions, UTXOs, and token transfers from Avalanche EVMs, Ethereum, and Avalanche's Primary Network - the P-Chain, X-Chain and C-Chain.
* **Blocks**: retrieve latest blocks and block details
* **Balances**: fetch balances of native, ERC-20, ERC-721, and ERC-1155 tokens along with relevant metadata.
* **Tokens**: augment your user experience with asset details.
* **Staking**: get staking related data for active and historical validations.
### Supported Chains
Avalanche’s architecture supports a diverse ecosystem of interconnected L1 blockchains, each operating independently while retaining the ability to seamlessly communicate with other L1s within the network. Central to this architecture is the Primary Network—Avalanche’s foundational network layer, which all validators are required to validate prior to [ACP-77](/docs/acps/77-reinventing-subnets). The Primary Network runs three essential blockchains:
* The Contract Chain (C-Chain)
* The Platform Chain (P-Chain)
* The Exchange Chain (X-Chain)
However, with the implementation of [ACP-77](/docs/acps/77-reinventing-subnets), this requirement will change. Subnet Validators will be able to operate independently of the Primary Network, allowing for more flexible and affordable Subnet creation and management.
The **Data API** supports a wide range of L1 blockchains (**over 100**) across both **mainnet** and **testnet**, including popular ones like Beam, DFK, Lamina1, Dexalot, Shrapnel, and Pulsar. In fact, every L1 you see on the [Avalanche Explorer](https://explorer.avax.network/) can be queried through the Data API. This list is continually expanding as we keep adding more L1s. For a full list of supported chains, visit [List chains](/docs/api-reference/data-api/evm-chains/supportedChains).
#### The Contract Chain (C-Chain)
The C-Chain is an implementation of the Ethereum Virtual Machine (EVM). The primary network endpoints only provide information related to C-Chain atomic memory balances and import/export transactions. For additional data, please reference the [EVM APIs](/docs/rpcs/c-chain/rpc).
#### The Platform Chain (P-Chain)
The P-Chain is responsible for all validator and L1-level operations. The P-Chain supports the creation of new blockchains and L1s, the addition of validators to L1s, staking operations, and other platform-level operations.
#### The Exchange Chain (X-Chain)
The X-Chain is responsible for operations on digital smart assets known as Avalanche Native Tokens. A smart asset is a representation of a real-world resource (for example, equity, or a bond) with sets of rules that govern its behavior, like "can’t be traded until tomorrow." The X-Chain supports the creation and trade of Avalanche Native Tokens.
| Feature | Description |
| :--------------- | :--------------------------------------------------------------------------------------------------------------------------------------------------------------------------------------------------------------------------------------------------------------------------------------------------------------------------------------------------------------------------------------- |
| **Chains** | Utilize this endpoint to retrieve the Primary Network chains that an address has transaction history associated with. |
| **Blocks** | Blocks are the container for transactions executed on the Primary Network. Retrieve the latest blocks, a specific block by height or hash, or a list of blocks proposed by a specified NodeID on Primary Network chains. |
| **Vertices** | Prior to Avalanche Cortina (v1.10.0), the X-Chain functioned as a DAG with vertices rather than blocks. These endpoints allow developers to retrieve historical data related to that period of chain history. Retrieve the latest vertices, a specific vertex, or a list of vertices at a specific height from the X-Chain. |
| **Transactions** | Transactions are a user's primary form of interaction with a chain and provide details around their on-chain activity, including staking-related behavior. Retrieve a list of the latest transactions, a specific transaction, a list of active staking transactions for a specified address, or a list of transactions associated with a provided asset id from Primary Network chains. |
| **UTXOs** | UTXOs are fundamental elements that denote the funds a user has available. Get a list of UTXOs for provided addresses from the Primary Network chains. |
| **Balances** | User balances are an essential function of the blockchain. Retrieve balances related to the X and P-Chains, as well as atomic memory balances for the C-Chain. |
| **Rewards** | Staking is the process where users lock up their tokens to support a blockchain network and, in return, receive rewards. It is an essential part of proof-of-stake (PoS) consensus mechanisms used by many blockchain networks, including Avalanche. Using the Data API, you can easily access pending and historical rewards associated with a set of addresses. |
| **Assets** | Get asset details corresponding to the given asset id on the X-Chain. |
#### EVM
The C-Chain is an instance of the Coreth Virtual Machine, and many Avalanche L1s are instances of the *Subnet-EVM*, which is a Virtual Machine (VM) that defines the L1 Contract Chains. *Subnet-EVM* is a simplified version of *Coreth VM* (C-Chain).
| Feature | Description |
| :--------------- | :------------------------------------------------------------------------------------------------------------------------------------------------------------------------------------------------------------------------------------------------------------------------------------------------------------ |
| **Chains** | There are a number of chains supported by the Data API. These endpoints can be used to understand which chains are included/indexed as part of the API and retrieve information related to a specific chain. |
| **Blocks** | Blocks are the container for transactions executed within the EVM. Retrieve the latest blocks or a specific block by height or hash. |
| **Transactions** | Transactions are a user's primary form of interaction with a chain and provide details around their on-chain activity. These endpoints can be used to retrieve information related to specific transaction details, internal transactions, contract deployments, specific token standard transfers, and more! |
| **Balances** | User balances are an essential function of the blockchain. Easily retrieve native token, collectible, and fungible token balances related to an EVM chain with these endpoints. |
#### Operations
The Operations API allows users to easily access their on-chain history by creating transaction exports returned in a CSV format. This API supports EVMs as well as non-EVM Primary Network chains.
# Rate Limits (/docs/api-reference/data-api/rate-limits)
---
title: Rate Limits
description: Rate Limits for the Data API
icon: Clock
---
Rate limiting is managed through a weighted scoring system, known as Compute Units (CUs). Each API request consumes a specified number of CUs, determined by the complexity of the request. This system is designed to accommodate basic requests while efficiently handling more computationally intensive operations.
## Rate Limit Tiers
The maximum CUs (rate-limiting score) for a user depends on their subscription level and is delineated in the following table:
| Subscription Level | Per Minute Limit (CUs) | Per Day Limit (CUs) |
| :----------------- | :--------------------- | :------------------ |
| Unauthenticated | 6,000 | 1,200,000 |
| Free | 8,000 | 2,000,000 |
| Base | 10,000 | 3,750,000 |
| Growth | 14,000 | 11,200,000 |
| Pro | 20,000 | 25,000,000 |
To update your subscription level use the [AvaCloud Portal](https://app.avacloud.io/)
The [Data API](/docs/api-reference/data-api), along with the [Metrics API](/docs/api-reference/metrics-api), are the engines behind the [Avalanche Explorer](https://subnets.avax.network/stats/) and the [Core wallet](https://core.app/en/). They are used to display transactions, logs, balances, NFTs, and more. The data and visualizations presented are all powered by these APIs, offering real-time and historical insights that are essential for building sophisticated, data-driven blockchain products.
### Features
* **Extensive L1 Support**: Gain access to data from over 100+ L1s across both mainnet and testnet. If an L1 is listed on the [Avalanche Explorer](https://subnets.avax.network/), you can query its data using the Data API.
* **Transactions and UTXOs**: easily retrieve details related to transactions, UTXOs, and token transfers from Avalanche EVMs, Ethereum, and Avalanche's Primary Network - the P-Chain, X-Chain and C-Chain.
* **Blocks**: retrieve latest blocks and block details
* **Balances**: fetch balances of native, ERC-20, ERC-721, and ERC-1155 tokens along with relevant metadata.
* **Tokens**: augment your user experience with asset details.
* **Staking**: get staking related data for active and historical validations.
### Supported Chains
Avalanche’s architecture supports a diverse ecosystem of interconnected L1 blockchains, each operating independently while retaining the ability to seamlessly communicate with other L1s within the network. Central to this architecture is the Primary Network—Avalanche’s foundational network layer, which all validators are required to validate prior to [ACP-77](/docs/acps/77-reinventing-subnets). The Primary Network runs three essential blockchains:
* The Contract Chain (C-Chain)
* The Platform Chain (P-Chain)
* The Exchange Chain (X-Chain)
However, with the implementation of [ACP-77](/docs/acps/77-reinventing-subnets), this requirement will change. Subnet Validators will be able to operate independently of the Primary Network, allowing for more flexible and affordable Subnet creation and management.
The **Data API** supports a wide range of L1 blockchains (**over 100**) across both **mainnet** and **testnet**, including popular ones like Beam, DFK, Lamina1, Dexalot, Shrapnel, and Pulsar. In fact, every L1 you see on the [Avalanche Explorer](https://explorer.avax.network/) can be queried through the Data API. This list is continually expanding as we keep adding more L1s. For a full list of supported chains, visit [List chains](/docs/api-reference/data-api/evm-chains/supportedChains).
#### The Contract Chain (C-Chain)
The C-Chain is an implementation of the Ethereum Virtual Machine (EVM). The primary network endpoints only provide information related to C-Chain atomic memory balances and import/export transactions. For additional data, please reference the [EVM APIs](/docs/rpcs/c-chain/rpc).
#### The Platform Chain (P-Chain)
The P-Chain is responsible for all validator and L1-level operations. The P-Chain supports the creation of new blockchains and L1s, the addition of validators to L1s, staking operations, and other platform-level operations.
#### The Exchange Chain (X-Chain)
The X-Chain is responsible for operations on digital smart assets known as Avalanche Native Tokens. A smart asset is a representation of a real-world resource (for example, equity, or a bond) with sets of rules that govern its behavior, like "can’t be traded until tomorrow." The X-Chain supports the creation and trade of Avalanche Native Tokens.
| Feature | Description |
| :--------------- | :--------------------------------------------------------------------------------------------------------------------------------------------------------------------------------------------------------------------------------------------------------------------------------------------------------------------------------------------------------------------------------------- |
| **Chains** | Utilize this endpoint to retrieve the Primary Network chains that an address has transaction history associated with. |
| **Blocks** | Blocks are the container for transactions executed on the Primary Network. Retrieve the latest blocks, a specific block by height or hash, or a list of blocks proposed by a specified NodeID on Primary Network chains. |
| **Vertices** | Prior to Avalanche Cortina (v1.10.0), the X-Chain functioned as a DAG with vertices rather than blocks. These endpoints allow developers to retrieve historical data related to that period of chain history. Retrieve the latest vertices, a specific vertex, or a list of vertices at a specific height from the X-Chain. |
| **Transactions** | Transactions are a user's primary form of interaction with a chain and provide details around their on-chain activity, including staking-related behavior. Retrieve a list of the latest transactions, a specific transaction, a list of active staking transactions for a specified address, or a list of transactions associated with a provided asset id from Primary Network chains. |
| **UTXOs** | UTXOs are fundamental elements that denote the funds a user has available. Get a list of UTXOs for provided addresses from the Primary Network chains. |
| **Balances** | User balances are an essential function of the blockchain. Retrieve balances related to the X and P-Chains, as well as atomic memory balances for the C-Chain. |
| **Rewards** | Staking is the process where users lock up their tokens to support a blockchain network and, in return, receive rewards. It is an essential part of proof-of-stake (PoS) consensus mechanisms used by many blockchain networks, including Avalanche. Using the Data API, you can easily access pending and historical rewards associated with a set of addresses. |
| **Assets** | Get asset details corresponding to the given asset id on the X-Chain. |
#### EVM
The C-Chain is an instance of the Coreth Virtual Machine, and many Avalanche L1s are instances of the *Subnet-EVM*, which is a Virtual Machine (VM) that defines the L1 Contract Chains. *Subnet-EVM* is a simplified version of *Coreth VM* (C-Chain).
| Feature | Description |
| :--------------- | :------------------------------------------------------------------------------------------------------------------------------------------------------------------------------------------------------------------------------------------------------------------------------------------------------------ |
| **Chains** | There are a number of chains supported by the Data API. These endpoints can be used to understand which chains are included/indexed as part of the API and retrieve information related to a specific chain. |
| **Blocks** | Blocks are the container for transactions executed within the EVM. Retrieve the latest blocks or a specific block by height or hash. |
| **Transactions** | Transactions are a user's primary form of interaction with a chain and provide details around their on-chain activity. These endpoints can be used to retrieve information related to specific transaction details, internal transactions, contract deployments, specific token standard transfers, and more! |
| **Balances** | User balances are an essential function of the blockchain. Easily retrieve native token, collectible, and fungible token balances related to an EVM chain with these endpoints. |
#### Operations
The Operations API allows users to easily access their on-chain history by creating transaction exports returned in a CSV format. This API supports EVMs as well as non-EVM Primary Network chains.
# Rate Limits (/docs/api-reference/data-api/rate-limits)
---
title: Rate Limits
description: Rate Limits for the Data API
icon: Clock
---
Rate limiting is managed through a weighted scoring system, known as Compute Units (CUs). Each API request consumes a specified number of CUs, determined by the complexity of the request. This system is designed to accommodate basic requests while efficiently handling more computationally intensive operations.
## Rate Limit Tiers
The maximum CUs (rate-limiting score) for a user depends on their subscription level and is delineated in the following table:
| Subscription Level | Per Minute Limit (CUs) | Per Day Limit (CUs) |
| :----------------- | :--------------------- | :------------------ |
| Unauthenticated | 6,000 | 1,200,000 |
| Free | 8,000 | 2,000,000 |
| Base | 10,000 | 3,750,000 |
| Growth | 14,000 | 11,200,000 |
| Pro | 20,000 | 25,000,000 |
To update your subscription level use the [AvaCloud Portal](https://app.avacloud.io/)
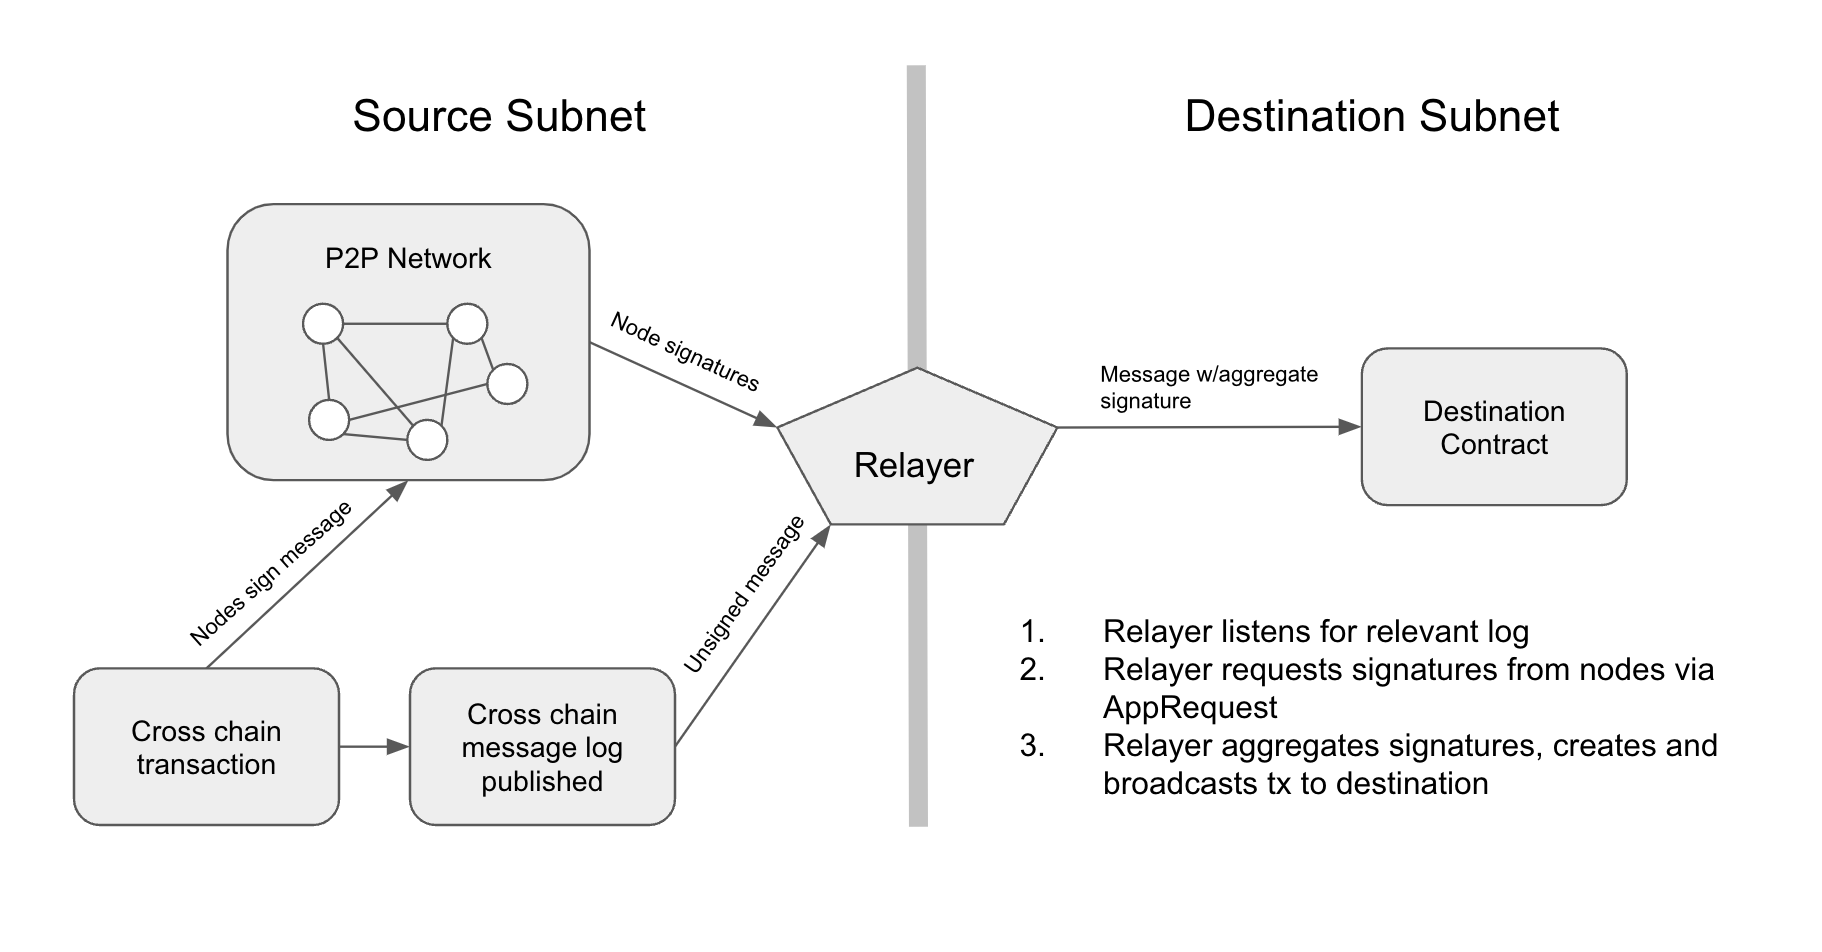 >
>
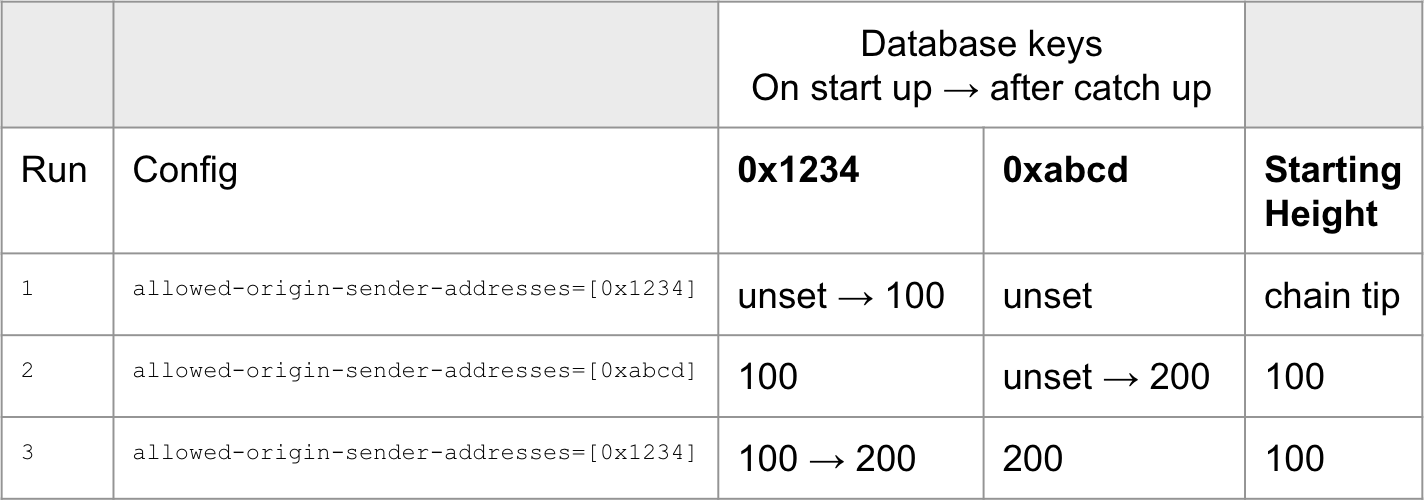 >
>
- "
}
}
}
```
## Testing
### Unit Tests
Unit tests can be ran locally by running the command in the root of the project:
```bash
./scripts/test.sh
```
If your temporary directory is not writable, the unit tests may fail with messages like `fork/exec /tmp/go-build2296620589/b247/config.test: permission denied`. To fix this, set the `TMPDIR` environment variable to something writable, for example `export TMPDIR=~/tmp`.
### E2E Tests
To run the E2E tests locally, you'll need to install Gingko following the instructions [here](https://onsi.github.io/ginkgo/#installing-ginkgo). Run the tests using the dedicated script:
```bash
./scripts/e2e_test.sh
```
To run a specific E2E test, specify the environment variable `GINKGO_FOCUS`, which will then look for [test descriptions](https://github.com/ava-labs/icm-services/blob/main/relayer/tests/e2e_test.go#L68) that match the provided input. For example, to run the `Basic Relay` test:
```bash
GINKGO_FOCUS="Basic" ./scripts/e2e_test.sh
```
The E2E tests use the `TeleporterMessenger` contract deployment transaction specified in the following files:
- `tests/utils/UniversalTeleporterDeployerAddress.txt`
- `tests/utils/UniversalTeleporterDeployerTransaction.txt`
- `tests/utils/UniversalTeleporterMessagerContractAddress.txt`
To update the version of Teleporter used by the E2E tests, update these values with the latest contract deployment information. For more information on how to deploy the Teleporter contract, see the [Teleporter documentation](https://github.com/ava-labs/icm-contracts/tree/main/utils/contract-deployment).
### Generate Mocks
[Gomock](https://pkg.go.dev/go.uber.org/mock/gomock) is used to generate mocks for testing. To generate mocks, run the following command at the root of the project:
```bash
go generate ./...
```
### Generate Protobuf Files
[buf](https://github.com/bufbuild/buf/) is used to generate protobuf definitions for communication with the [Decider service](https://github.com/ava-labs/icm-services/blob/main/proto/decider/decider.proto). If you change any of the protobuf definitions you will have to regenerate the `.go` files. To generate these files, run the following command at the root of the project:
```bash
./scripts/protobuf_codegen.sh
```
### Generate Abi Bindings
[subnet-evm](https://github.com/ava-labs/subnet-evm/tree/6e67777132dd7d0d556e1e34d68ad8e27b22ebef/cmd/abigen) is used to generate abi binding `.go` files for solidity contracts. If you change any of the smart contracts, you will have to update the abi bindings. To generate these files, run the following command at the root of the project:
```bash
./scripts/abi_bindings.sh
```
# Avalanche Interchain Token Transfer (ICTT) (/docs/cross-chain/interchain-token-transfer/overview)
---
title: "Avalanche Interchain Token Transfer (ICTT)"
description: "This page describes the Avalanche Interchain Token Transfer (ICTT)"
edit_url: https://github.com/ava-labs/icm-contracts/edit/main/contracts/ictt/README.md
---
# Avalanche Interchain Token Transfer (ICTT)
## Overview
Avalanche Interchain Token Transfer (ICTT) is an application that allows users to transfer tokens between L1s. The implementation is a set of smart contracts that are deployed across multiple L1s, and leverages [ICM](https://github.com/ava-labs/icm-contracts) for cross-chain communication.
Each token transferrer instance consists of one "home" contract and at least one but possibly many "remote" contracts. Each home contract instance manages one asset to be transferred out to `TokenRemote` instances. The home contract lives on the L1 where the asset to be transferred exists. A transfer consists of locking the asset as collateral on the home L1 and minting a representation of the asset on the remote L1. The remote contracts, each of which has a single specified home contract, live on other L1s that want to import the asset transferred by their specified home. The token transferrers are designed to be permissionless: anyone can register compatible `TokenRemote` instances to allow for transferring tokens from the `TokenHome` instance to that new `TokenRemote` instance. The home contract keeps track of token balances transferred to each `TokenRemote` instance, and handles returning the original tokens back to the user when assets are transferred back to the `TokenHome` instance. `TokenRemote` instances are registered with their home contract via an ICM message upon creation.
Home contract instances specify the asset to be transferred as either an ERC20 token or the native token, and they allow for transferring the token to any registered `TokenRemote` instances. The token representation on the remote chain can also either be an ERC20 or native token, allowing users to have any combination of ERC20 and native tokens between home and remote chains:
- `ERC20` -> `ERC20`
- `ERC20` -> `Native`
- `Native` -> `ERC20`
- `Native` -> `Native`
The remote tokens are designed to have compatibility with the token transferrer on the home chain by default, and they allow custom logic to be implemented in addition. For example, developers can inherit and extend the `ERC20TokenRemote` contract to add additional functionality, such as a custom minting, burning, or transfer logic.
The token transferrer also supports "multi-hop" transfers, where tokens can be transferred between remote chains. To illustrate, consider two remotes _Ra_ and _Rb_ that are both connected to the same home _H_. A multi-hop transfer from _Ra_ to _Rb_ first gets routed from _Ra_ to _H_, where remote balances are updated, and then _H_ automatically routes the transfer on to _Rb_.
In addition to supporting basic token transfers, the token transferrer contracts offer a `sendAndCall` interface for transferring tokens and using them in a smart contract interaction all within a single ICM message. If the call to the recipient smart contract fails, the transferred tokens are sent to a fallback recipient address on the destination chain of the transfer. The `sendAndCall` interface enables the direct use of transferred tokens in dApps on other chains, such as performing swaps, using the tokens to pay for fees when invoking services, etc.
## Upgradability
The token transferrer contracts implement both upgradeable and non-upgradeable versions. The non-upgradeable versions are extensions of their respective upgradeable token transferrer contract, and has a `constructor` that calls the `initialize` function of the upgradeable version. The upgradeable contracts are ERC7201 compliant, and use namespace storage to store the state of the contract.
## `ITokenTransferrer`
Interface that defines the events token transfer contract implementations must emit. Also defines the message types and formats of messages between all implementations.
## `IERC20TokenTransferrer` and `INativeTokenTransferrer`
Interfaces that define the external functions for interacting with token transfer contract implementations of each type. ERC20 and native token transferrer interfaces vary from each other in that the native token transferrer functions are `payable` and do not take an explicit amount parameter (it is implied by `msg.value`), while the ERC20 token transferrer functions are not `payable` and require the explicit amount parameter. Otherwise, they include the same functions.
## `TokenHome`
An abstract implementation of `ITokenTransferrer` for a token transfer contract on the "home" chain with the asset to be transferred. Each `TokenHome` instance supports transferring exactly one token type (ERC20 or native) on its chain to arbitrarily many "remote" instances on other chains. It handles locking tokens to be sent to `TokenRemote` instances, as well as receiving token transfer messages to either redeem tokens it holds as collateral (i.e. unlock), or route them to other `TokenRemote` instances (i.e. "multi-hop"). In the case of a multi-hop transfer, the `TokenHome` already has the collateral locked from when the tokens were originally transferred to the first `TokenRemote` instance, so it simply updates the accounting of the transferred balances to each respective `TokenRemote` instance. Remote contracts must first be registered with a `TokenHome` instance before the home contract will allow for sending tokens to them. This is to prevent tokens from being transferred to invalid remote addresses. Anyone is able to deploy and register remote contracts, which may have been modified from this repository. It is the responsibility of the users of the home contract to independently evaluate each remote for its security and correctness.
## `ERC20TokenHome`
A concrete implementation of `TokenHome` and `IERC20TokenTransferrer` that handles the locking and releasing of an ERC20 token.
## `NativeTokenHome`
A concrete implementation of `TokenHome` and `INativeTokenTransferrer` that handles the locking and release of the native EVM asset.
## `TokenRemote`
An abstract implementation of `ITokenTransferrer` for a token transfer contract on a "remote" chain that receives transferred assets from a specific `TokenHome` instance. Each `TokenRemote` instance has a single `TokenHome` instance that it receives token transfers from to mint tokens. It also handles sending messages (and correspondingly burning tokens) to route tokens back to other chains (either its `TokenHome`, or other `TokenRemote` instances). Once deployed, a `TokenRemote` instance must be registered with its specified `TokenHome` contract. This is done by calling `registerWithHome` on the remote contract, which will send an ICM message to the home contract with the information to register.
All messages sent by `TokenRemote` instances are sent to the specified `TokenHome` contract, whether they are to redeem the collateral from the `TokenHome` instance or route the tokens to another `TokenRemote` instance. Routing tokens from one `TokenRemote` instance to another is referred to as a "multi-hop", where the tokens are first sent back to their `TokenHome` contract to update its accounting, and then automatically routed on to their intended destination `TokenRemote` instance.
TokenRemote contracts allow for scaling token amounts, which should be used when the remote asset has a higher or lower denomination than the home asset, such as allowing for a ERC20 home asset with a denomination of 6 to be used as the native EVM asset on a remote chain (with a denomination of 18).
## `ERC20TokenRemote`
A concrete implementation of `TokenRemote`, `IERC20TokenTransferrer`, and `IERC20` that handles the minting and burning of an ERC20 asset. Note that the `ERC20TokenRemote` contract is an ERC20 implementation itself, which is why it takes the `tokenName`, `tokenSymbol`, and `tokenDecimals` in its constructor. All of the ERC20 interface implementations are inherited from the standard OpenZeppelin ERC20 implementation, and can be overriden in other implementations if desired.
## `NativeTokenRemote`
A concrete implementation of `TokenRemote`, `INativeTokenTransferrer`, and `IWrappedNativeToken` that handles the minting and burning of the native EVM asset on its chain using the native minter precompile. Deployments of this contract must be given the permission to mint native coins in the chain's configuration. Note that the `NativeTokenRemote` is also an implementation of `IWrappedNativeToken` itself, which is why the `nativeAssetSymbol` must be provided in its constructor. `NativeTokenRemote` instances always have a denomination of 18, which is the denomination of the native asset of EVM chains.
The [native minter precompile](https://build.avax.network/docs/virtual-machines/custom-precompiles#minting-native-coins) must be configured to allow the contract address of the `NativeTokenRemote` instance to call `mintNativeCoin`. The correctness of a native token transferrer implemented using `NativeTokenRemote` relies on no other accounts being allowed to call `mintNativeCoin`, which could result in the token transferrer becoming undercollateralized. Example initialization steps for a `NativeTokenRemote` instance are shown below.
Since the native minter precompile does not provide an interface for burning the native EVM asset, the "burn" functionality is implemented by transferring the native coins to an unowned address. The contract also provides a `reportBurnedTxFees` interface in order to burn the collateral in the `TokenHome` instance that should be made unredeemable to account for native tokens burnt on the chain with the `NativeTokenRemote` instance to pay for transaction fees.
To account for the need to bootstrap the chain using a transferred asset as its native token, the `NativeTokenRemote` takes the `initialReserveImbalance` in its constructor. Once registered with its `TokenHome`, the `TokenHome` will require the `initialReserveImbalance` to be accounted for before sending token amounts to be minted on the given remote chain. The following example demonstrates the intended initialization flow:
1. Create a new blockchain with 100 native tokens allocated in its genesis block, and set the pre-derived `NativeTokenRemote` contract address (based on the deployer nonce) to have the permission to mint native tokens using the native minter precompile. Note that the deployer account will need to be funded in order to deploy the `NativeTokenRemote` contract, and an account used to relay messages into this chain must also be funded to relay the first messages.
2. Deploy the `NativeTokenRemote` contract to the pre-derived address set in the blockchain configuration of step 1. The `initialReserveImbalance` should be 100, matching the number of tokens allocated in the genesis block that were not initially backed by collateral in the `TokenHome` instance.
3. Call the `registerWithHome` function on the `NativeTokenRemote` instance to send an ICM message registering this remote with its `TokenHome`. This message should be relayed and delivered to the `TokenHome` instance.
4. Once registered on the `TokenHome` contract, add 100 tokens as collateral for the new `NativeTokenRemote` instance by calling the `addCollateral` function on the `TokenHome` contract. A `CollateralAdded` event will be emitted by the `TokenHome` contract with a `remaining` amount of 0 once the `NativeTokenRemote` is fully collateralized.
5. Now that the `NativeTokenRemote` contract is fully collateralized, tokens can be moved normally in both directions across the token transfer contracts by calling their `send` functions.
The `totalNativeAssetSupply` implementation of `NativeTokenRemote` takes into account:
- the initial reserve imbalance
- the number of native tokens that it has minted
- the number of native tokens that have been burned to pay for transaction fees
- the number of native tokens "burned" to be transferred to other chains, which are sent to a pre-defined `BURNED_FOR_TRANSFER_ADDRESS`.
Note that the value returned by `totalNativeAssetSupply` is an upper bound on the circulating supply of the native asset on the chain using the `NativeTokenRemote` instance since tokens could be burned in other ways that it does not account for.
## ICM Message Fees
Fees can be optionally added to ICM messages in order to incentivize relayers to deliver them, as documented [here](https://github.com/ava-labs/icm-contracts/tree/main/contracts/teleporter#fees). The token transfer contracts in this repository allow for specifying any ERC20 token and amount to be used as the ICM message fee for single-hop transfers in either direction between `TokenHome` and `TokenRemote` instances. Fee amounts must be pre-approved to be spent by the token transfer contract before initiating a transfer.
Multi-hop transfers between two `TokenRemote` instances involve two ICM messages: the first from the initiating `TokenRemote` instance to its home, and the second from its home to the destination `TokenRemote` instance. In the multi-hop case, the first message fee can be paid in any ERC20 token and amount (similar to the single-hop case), but the second message fee must be paid in-kind of the asset being transferred and is deducted from the amount being transferred. This restriction on the secondary message fee is necessary because the transaction on the intermediate chain routing the funds to the destination `TokenRemote` instance is not sent by the wallet performing the transfer. Because of this, it can not directly spend an arbitrary ERC20 token from that wallet. Using the asset being transferred for the optional secondary fee allows users to perform an incentivized multi-hop transfer without needing to make any interaction with the home themselves. If there is a need for the second message from the home to the destination `TokenRemote` instance to pay a fee in another asset, it is recommended to perform two single-hop transfers, which allows for specifying an arbitrary ERC20 token to be used for the fee of each.
# Avalanche L1 Configs (/docs/nodes/configure/avalanche-l1-configs)
---
title: "Avalanche L1 Configs"
description: "This page describes the configuration options available for Avalanche L1s."
edit_url: https://github.com/ava-labs/avalanchego/edit/master/subnets/config.md
---
# Subnet Configs
It is possible to provide parameters for a Subnet. Parameters here apply to all
chains in the specified Subnet.
AvalancheGo looks for files specified with `{subnetID}.json` under
`--subnet-config-dir` as documented
[here](https://build.avax.network/docs/nodes/configure/configs-flags#subnet-configs).
Here is an example of Subnet config file:
```json
{
"validatorOnly": false,
"consensusParameters": {
"k": 25,
"alpha": 18
}
}
```
## Parameters
### Private Subnet
#### `validatorOnly` (bool)
If `true` this node does not expose Subnet blockchain contents to non-validators
via P2P messages. Defaults to `false`.
Avalanche Subnets are public by default. It means that every node can sync and
listen ongoing transactions/blocks in Subnets, even they're not validating the
listened Subnet.
Subnet validators can choose not to publish contents of blockchains via this
configuration. If a node sets `validatorOnly` to true, the node exchanges
messages only with this Subnet's validators. Other peers will not be able to
learn contents of this Subnet from this node.
:::tip
This is a node-specific configuration. Every validator of this Subnet has to use
this configuration in order to create a full private Subnet.
:::
#### `allowedNodes` (string list)
If `validatorOnly=true` this allows explicitly specified NodeIDs to be allowed
to sync the Subnet regardless of validator status. Defaults to be empty.
:::tip
This is a node-specific configuration. Every validator of this Subnet has to use
this configuration in order to properly allow a node in the private Subnet.
:::
### Consensus Parameters
Subnet configs supports loading new consensus parameters. JSON keys are
different from their matching `CLI` keys. These parameters must be grouped under
`consensusParameters` key. The consensus parameters of a Subnet default to the
same values used for the Primary Network, which are given [CLI Snow Parameters](https://build.avax.network/docs/nodes/configure/configs-flags#snow-parameters).
| CLI Key | JSON Key |
| :------------------------------- | :-------------------- |
| --snow-sample-size | k |
| --snow-quorum-size | alpha |
| --snow-commit-threshold | `beta` |
| --snow-concurrent-repolls | concurrentRepolls |
| --snow-optimal-processing | `optimalProcessing` |
| --snow-max-processing | maxOutstandingItems |
| --snow-max-time-processing | maxItemProcessingTime |
| --snow-avalanche-batch-size | `batchSize` |
| --snow-avalanche-num-parents | `parentSize` |
#### `proposerMinBlockDelay` (duration)
The minimum delay performed when building snowman++ blocks. Default is set to 1 second.
As one of the ways to control network congestion, Snowman++ will only build a
block `proposerMinBlockDelay` after the parent block's timestamp. Some
high-performance custom VMs may find this too strict. This flag allows tuning the
frequency at which blocks are built.
### Gossip Configs
It's possible to define different Gossip configurations for each Subnet without
changing values for Primary Network. JSON keys of these
parameters are different from their matching `CLI` keys. These parameters
default to the same values used for the Primary Network. For more information
see [CLI Gossip Configs](https://build.avax.network/docs/nodes/configure/configs-flags#gossiping).
| CLI Key | JSON Key |
| :------------------------------------------------------ | :------------------------------------- |
| --consensus-accepted-frontier-gossip-validator-size | gossipAcceptedFrontierValidatorSize |
| --consensus-accepted-frontier-gossip-non-validator-size | gossipAcceptedFrontierNonValidatorSize |
| --consensus-accepted-frontier-gossip-peer-size | gossipAcceptedFrontierPeerSize |
| --consensus-on-accept-gossip-validator-size | gossipOnAcceptValidatorSize |
| --consensus-on-accept-gossip-non-validator-size | gossipOnAcceptNonValidatorSize |
| --consensus-on-accept-gossip-peer-size | gossipOnAcceptPeerSize |
# AvalancheGo Config Flags (/docs/nodes/configure/configs-flags)
---
title: "AvalancheGo Config Flags"
description: "This page lists all available configuration options for AvalancheGo nodes."
edit_url: https://github.com/ava-labs/avalanchego/edit/master/config/config.md
---
# AvalancheGo Configs and Flags
This document lists all available configuration options for AvalancheGo nodes. You can configure your node using either command-line flags or environment variables.
> **Note:** For comparison with the previous documentation format (using individual flag headings), see the [archived version](https://gist.github.com/navillanueva/cdb9c49c411bd89a9480f05a7afbab37).
## Environment Variable Naming Convention
All environment variables follow the pattern: `AVAGO_` + flag name where the flag name is converted to uppercase with hyphens replaced by underscores.
For example:
- Flag: `--api-admin-enabled`
- Environment Variable: `AVAGO_API_ADMIN_ENABLED`
## Example Usage
### Using Command-Line Flags
```bash
avalanchego --network-id=fuji --http-host=0.0.0.0 --log-level=debug
```
### Using Environment Variables
```bash
export AVAGO_NETWORK_ID=fuji
export AVAGO_HTTP_HOST=0.0.0.0
export AVAGO_LOG_LEVEL=debug
avalanchego
```
### Using Config File
Create a JSON config file:
```json
{
"network-id": "fuji",
"http-host": "0.0.0.0",
"log-level": "debug"
}
```
Run with:
```bash
avalanchego --config-file=/path/to/config.json
```
## Configuration Precedence
Configuration sources are applied in the following order (highest to lowest precedence):
1. Command-line flags
2. Environment variables
3. Config file
4. Default values
# Configuration Options
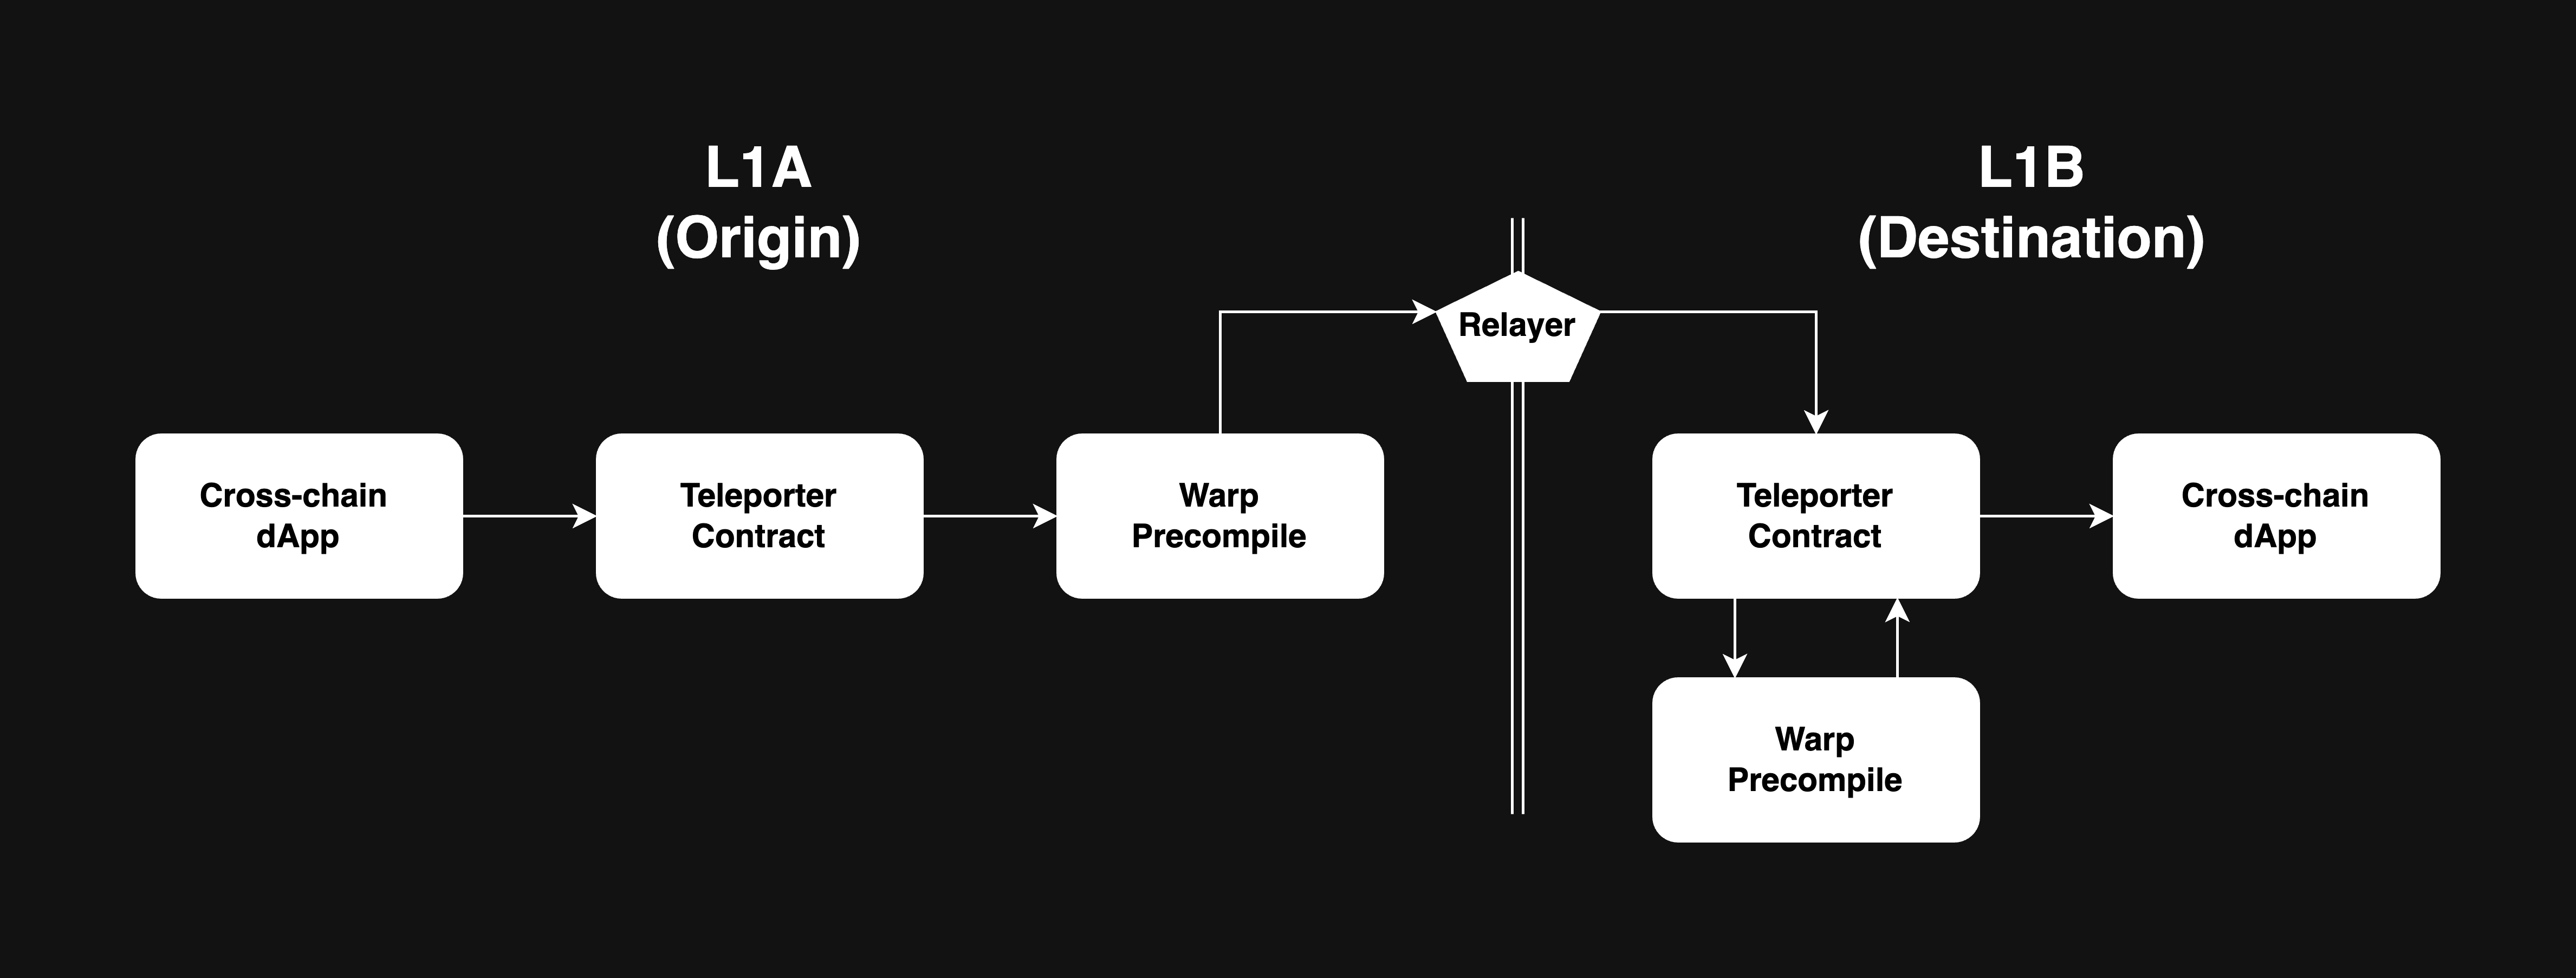 />
/>
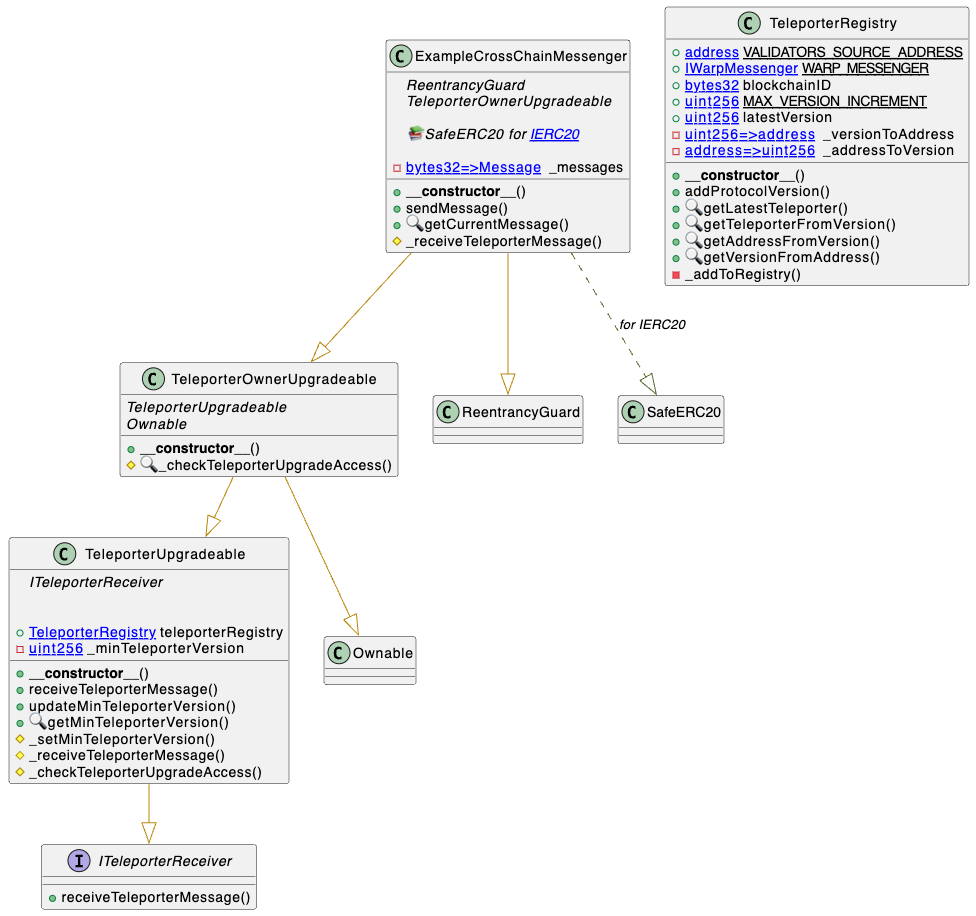 alt="Upgrade UML diagram"/>
• NodeID already in use
• Old instance still running
• Firewall blocking outbound connections | • Check internet connection
• Ensure only one node instance is running
• Verify firewall allows outbound connections
• Confirm staking port (9651) is configured | | `subnets not bootstrapped` | • Node still syncing with network
• Health checks called too early
• Network connectivity issues | • Wait for bootstrap to complete (can take hours)
• Monitor `/api/health` endpoint
• Ensure stable network connection
• Check logs for progress | | `db contains invalid genesis hash` | • Database from different network
• Database corruption
• Incompatible database | • Delete database and resync from scratch
• Verify correct network connection
• Check `--network-id` flag matches database | ## Network and Connectivity Errors | Error | Cause | Solution | |-------|-------|----------| | `cannot query unfinalized data` | • Not connected to other validators
• Wrong public IP configured
• Port 9651 closed/blocked
• Insufficient validator connections | • Configure public IP with `--public-ip`
• Open port 9651 to internet
• Allow inbound connections in firewall
• Set up port forwarding if behind NAT
• Verify peers: `curl -X POST --data '{"jsonrpc":"2.0","id":1,"method":"info.peers"}' -H 'content-type:application/json;' http://127.0.0.1:9650/ext/info` | | `primary network validator has no inbound connections` | • Firewall blocking inbound traffic
• NAT/router not configured
• Wrong public IP advertised
• ISP blocking connections | • Configure port forwarding for 9651
• Verify firewall allows inbound
• Check public IP: `curl ifconfig.me`
• Test port with online checkers
• Use VPS if ISP blocks ports | | `not connected to enough stake` | • Insufficient validator connections
• Network partitioning
• Node isolated from network
• Bootstrap incomplete | • Check network connectivity
• Verify firewall rules
• Wait for more connections
• Synchronize system time (NTP) | | `throttled` (Code: -4) | • Too many connection attempts
• Rate limiting by peers
• Network congestion | • Wait before retrying
• Check for connection loops
• Reduce connection rate | ## Database and Storage Errors | Error | Cause | Solution | |-------|-------|----------| | `closed` | • Database accessed after shutdown
• Ungraceful termination
• Connection lost | • Restart the node
• Check for disk errors or full disk
• Verify database files not corrupted | | `blockdb: unrecoverable corruption detected` | • Ungraceful shutdown (power loss, kill -9)
• Disk errors during writes
• Hardware failure | • Delete database and resync
• Run SMART diagnostics on disk
• Ensure 10+ GiB free space
• Use UPS for power protection
• Maintain regular backups | | Disk space warnings | • Usage exceeds threshold
• Database growth without cleanup
• Log accumulation | • Keep at least 10 GiB free (20+ GiB recommended)
• Monitor disk usage regularly
• Clean up old logs
• Set up low-space alerts | | `blockdb: invalid block height` | • Database corruption
• Querying non-existent block
• Index corruption | • Verify block height is valid
• Resync if corrupted
• Check database integrity | ## Configuration Errors | Error | Cause | Solution | |-------|-------|----------| | `invalid TLS key` | • TLS key without certificate
• Certificate without key
• Invalid key format
• Corrupted certificate files | • Provide both key and certificate together
• Regenerate credentials if corrupted
• Verify file permissions
• Check certificate format | | `minimum validator stake can't be greater than maximum` | • Invalid stake configuration
• Conflicting parameters
• Configuration typos | • Review configuration file
• Ensure min < max stake
• Check for typos | | `uptime requirement must be in the range [0, 1]` | • Out-of-range uptime value | • Set uptime requirement between 0 and 1 | | `delegation fee must be in the range [0, 1,000,000]` | • Invalid delegation fee | • Set fee between 0 and 1,000,000 | | `min stake duration must be > 0` | • Invalid stake duration
• Min > max duration | • Set min duration > 0 and < max | | `sybil protection disabled on public network` | • Disabling protection on mainnet/testnet
• Security misconfiguration | • Only disable on private networks
• Verify network configuration
• Remove override for public networks | | `plugin dir is not a directory` | • Path points to file not directory
• Directory doesn't exist
• Permission issues | • Create plugin directory
• Verify path points to directory
• Check read/execute permissions | ## Resource and Capacity Errors | Error | Cause | Solution | |-------|-------|----------| | `insufficient funds` | • Insufficient balance for fees
• Transaction exceeds balance
• Gas estimation too low | • Ensure sufficient balance
• Account for transaction fees
• Verify balance before submitting | | `insufficient gas capacity to build block` | • Mempool exceeds block gas limit
• Complex transactions
• Network congestion | • Wait for congestion to clear
• Break into smaller transactions
• Increase gas limits if possible | | `insufficient history to generate proof` | • Partial sync mode
• Pruned historical data
• Incomplete state sync | • Use full sync for complete history
• Wait for state sync to finish
• Use archival node for historical data | ## Validator and Consensus Errors | Error | Cause | Solution | |-------|-------|----------| | `not a validator` (Code: -3) | • Validator-only operation on non-validator
• Stake expired or not active
• Not registered as validator | • Verify registration status
• Check stake is active
• Wait for validation period
• Use correct API for node type | | `unknown validator` | • Not in current validator set
• NodeID mismatch
• Validator expired/removed | • Verify validator is active
• Check end time hasn't passed
• Confirm correct NodeID
• Query validator set | ## Version and Upgrade Errors | Error | Cause | Solution | |-------|-------|----------| | `unknown network upgrade detected` | • Outdated node version
• Network upgrade scheduled/active
• Incompatible protocol | • **Update immediately** to latest version
• Monitor upgrade announcements
• Enable automatic updates
• Check version: `avalanchego --version` | | `unknown network upgrade - update as soon as possible` | • Network upgrade approaching
• Node version outdated | • Update within the day
• Check GitHub releases
• Plan for maintenance window | | `imminent network upgrade - update immediately` | • Network upgrade imminent (within hour) | • **Critical: Update immediately**
• Risk of network disconnection | | `invalid upgrade configuration` | • Upgrade times not chronological
• Conflicting schedules
• Invalid precompile config | • Review upgrade config files
• Ensure sequential timing
• Validate precompile settings
• Consult upgrade documentation | ## API and RPC Errors | Error | Cause | Solution | |-------|-------|----------| | Health check: `not yet run` | • Node still initializing
• Bootstrap incomplete
• Subnet sync in progress
• Network issues | • Wait for initialization
• Monitor `/api/health` for updates
• Check individual health checks
• Ensure subnets are synced | | `timed out` (Code: -1) | • Request exceeded timeout
• Node overloaded
• Network latency | • Increase timeout settings
• Check resource usage (CPU/memory/disk)
• Reduce request complexity
• Use retry with exponential backoff | | Invalid content-type | • Wrong Content-Type header
• Missing header | • Add `Content-Type: application/json`
• Verify API client config
• Example: `curl -H 'content-type:application/json;' ...` | ## State Sync Errors | Error | Cause | Solution | |-------|-------|----------| | `proof obtained an invalid root ID` | • State changed during sync
• Corrupted merkle proof
• Network issues | • Restart state sync
• Ensure stable connection
• Wait for state to stabilize | | `vm does not implement StateSyncableVM interface` | • Unsupported VM
• Outdated VM version | • Update VM to support state sync
• Use full bootstrap instead
• Check VM compatibility docs | --- ## Monitoring and Prevention ### Key Metrics to Monitor | Metric | Threshold | How to Check | |--------|-----------|--------------| | **Disk Space** | Keep 10+ GiB free (20+ GiB recommended) | `df -h` | | **Network Connectivity** | Inbound/outbound connections active | Check firewall, use port scanners | | **Bootstrap Status** | Should be `bootstrapped` | `/api/health` | | **Validator Connections** | Connected to sufficient stake | `/ext/info` API, check peer count | | **Database Health** | No corruption warnings in logs | Monitor `~/.avalanchego/logs/` | | **Node Version** | Current with latest release | `avalanchego --version` | ### Best Practices | Practice | Benefit | |----------|---------| | Use UPS (uninterruptible power supply) | Prevents database corruption from power loss | | Enable automatic updates | Stay current with security patches | | Monitor logs regularly | Early detection of issues | | Keep adequate disk space | Prevent database write failures | | Configure port forwarding properly | Ensure validator connectivity | | Synchronize system time with NTP | Prevent consensus issues | | Backup critical files | Quick recovery from failures | | Test changes on testnet first | Avoid production issues | ### Health Check Endpoints | Endpoint | Purpose | What It Checks | |----------|---------|----------------| | `/ext/health/liveness` | Basic process health | Is the node process running? | | `/ext/health/readiness` | Ready to serve traffic | Is bootstrapping complete? | | `/ext/health` | Comprehensive status | All health checks and details | ### Getting Help If you encounter errors not listed here: 1. **Check Logs**: Review `~/.avalanchego/logs/` for detailed error messages 2. **Search Forum**: [Avalanche Forum](https://forum.avax.network/) 3. **Join Discord**: [Avalanche Discord](https://chat.avax.network/) 4. **GitHub Issues**: [Review existing issues](https://github.com/ava-labs/avalanchego/issues) 5. **Provide Context**: Include specific error messages, logs, and configuration when asking for help ### Quick Diagnostic Commands ```bash # Check node version avalanchego --version # Check disk space df -h # Check if port 9651 is open nc -zv
snowman/transitive.go:392 consensus starting {"lastAcceptedBlock": "2ofmPJuWZbdroCPEMv6aHGvZ45oa8SBp2reEm9gNxvFjnfSGFP"}
[09-09|17:01:51.628] INFO snowman/transitive.go:392 consensus starting {"lastAcceptedBlock": "2ofmPJuWZbdroCPEMv6aHGvZ45oa8SBp2reEm9gNxvFjnfSGFP"}
[09-09|17:01:51.628] INFO 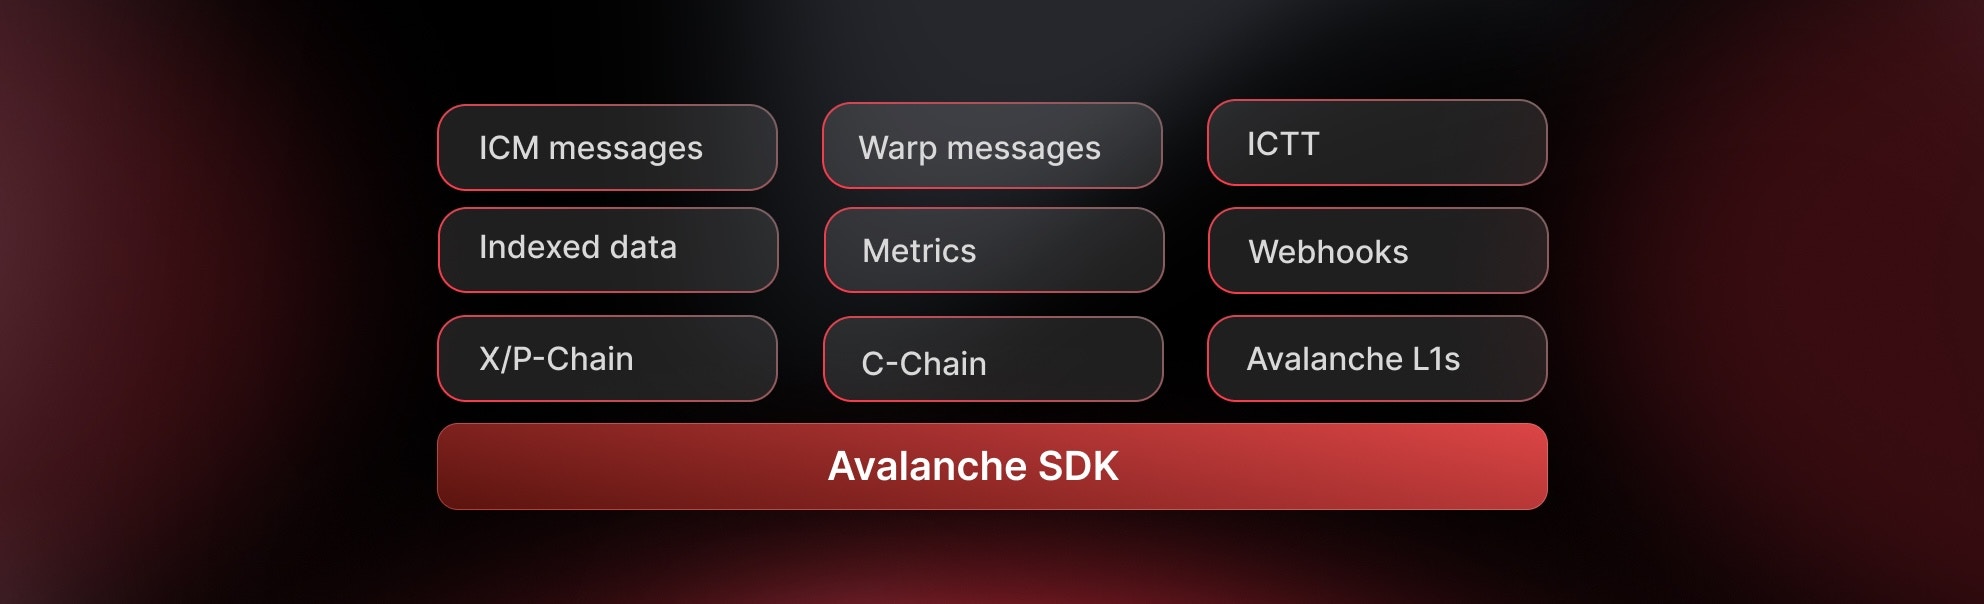 ### Core Capabilities
* **Direct Chain Access** - RPC calls, wallet integration, and transaction management.
* **Indexed Data & Metrics** - Access Glacier Data API & Metrics API with type safety.
* **Interchain Messaging** - Build cross-L1 applications with ICM/Teleporter.
### Core Capabilities
* **Direct Chain Access** - RPC calls, wallet integration, and transaction management.
* **Indexed Data & Metrics** - Access Glacier Data API & Metrics API with type safety.
* **Interchain Messaging** - Build cross-L1 applications with ICM/Teleporter.